My oldest graduated from Kindergarten this week and I couldn’t pass up the chance to bake some cupcakes for the celebration party. In the process I learned that you can make and ice about 60 mini cupcakes from a standard boxed cake mix and tub of frosting. These bathing beauties were vanilla cupcakes with cream cheese frosting, dipped in light and dark brown (sand) sugar. Topped with a strip of fruit roll-up for the towel and a gummy bear. Garnished with a paper parasol these were a hit with the kiddies.
Ingredients
Boxed cake mix
eggs
oil
Tub of frosting
gummy bears
light/dark brown sugar
fruit roll ups
paper umbrella
Instructions
Bake the cupcakes as per the box instructions
Ice once cooled
Roll iced cupcakes in the sugar
Cut the fruit roll up into towel sized pieces (I did 1″ pieces for mini cupcakes)
put a dab of icing on the top of the cupcake to attach the towel (fruit roll up)
Put a dab of icing in the middle of the towel and attach the gummy bear
What do brain tumours and photography have in common? Probably not much. But having been recently diagnosed with a brain tumour has prompted me to yet again have family photos taken. When I told my husband that I wanted to have photos taken his response was “really AGAIN”. It has only been a year since the last batch and I understand his point but I played the brain tumour card anyway. You never know what the future may bring, so while I can get some family shots taken I went for it. Scroll to the bottom to see the lovely pictures that Nicola at Lily and Lane took for us.
We don’t have a lot of family pictures of all of us, there are a pile of the kids, and lots of my husband with the kids. I am almost always behind the camera so just in case something goes wrong and Timmy the tumour wins (which is highly unlikely in my opinion) my family will have some new shiny pictures of me. Until that dark day (holy morbid) inevitably happens sometime in my late 90’s I plan on enjoying the photos. Which means that they need to make their way out of the computer.
Step 1 is getting the photos, Step 2 is getting them out of the computer and into some form that you can enjoy. Hint, hint nudge nudge. I stumbled across this fantastic INEXPENSIVE, EASY, AND QUICK way to display photos. In the image above there is a mix of pictures taken by three different photographers (myself included). In the top row the 3rd and 6th images from the left, and first and fifth images in the bottom row I mounted on wood artist panels. It’s really rare that I come across any DIY project that is all three, so I am pretty excited to share this one with you. This project cost $2.00 for the wood artist board at the dollar store, $3.00 for the 8×10 print, $1.00 craft paint to paint the edges from the dollar store. I already had a jar of modge podge and a paint brush, but neither of those items will break the bank.
What you need:
8×10 photo
modge podge
Canvas or wood artist board
A paint brush/foam brush
craft paint to paint the edges
Exacto knife
Instructions:
Step 1 – paint the edges of the canvas or wood board and wait for it to dry. Have a glass of wine while you wait.
Step 2 – Apply a second coat of paint if needed and wait for it to dry
Step 3 – Apply a coat of modge podge to the canvas/board and lineup the photo making sure to remove any air bubbles, wait for it to stick
Step 4 – Trim around the edges of the canvas/board
Step 5 – Apply a coat of modge podge as evenly as possible over the entire photo to seal it. A foam brush is better than a bristle brush.
One of the moms in my son’s class had the brilliant idea of hosting a party for 40 kids graduating from Kindergarten. It was an opportunity for all of the families to meet and a chance for all of the kids to get together on the weekend outside of the school environment. There were a group of moms that got together to plan the event. We rented a “block party” trailer from the city which included chairs, tents, tables and games. With 40 kindergarten children plus their parents, and siblings we ended up with just over 100 people in attendance. With a group that large we opted to book a local park with a playground. We ordered party platters of fruit, veggies, cheese and meat to compliment the chips, popsicles and cupcakes. There was also two surprise guests from the movie Frozen who made a special appearance.
The weather was fantastic. The turnout was amazing. And my kids were exhausted and that is the sign of a good party. I volunteered to bake the cupcakes, all 100 of them. It was a bit of an undertaking but it was a challenge that I eagerly accepted. If you happen to be planning a graduation party these cupcakes were a hit.
Ingredients:
boxed cake mix
eggs
vegetable oil
canned frosting
fruit rollups
mini peanut butter cups
chocolate covered cookies
m&m’s
Instructions:
1. Bakes the cupcakes as per the box instructions and let cool
2. Place chocolate covered cookies upside down on a tray (so that you can put them in the freezer)
3. Put a dab of frosting in the middle of each one
4. Place the small end of the mini peanut butter cup in the frosting/cookie
5. Place the try in the freezer to set for 15-20 minutes
6. Cut the fruit rollup into 1/4″ x 1 1/2″-2″ strips
7. Remove from freezer once stuck together and flip all of the cookies over so that they are standing on the peanut butter cup
8. Put a dab of frosting in the middle of each cookie to adhere the tassel and M&M
9. Place the fruit rollup “tassel” and them the M&M in the frosting and place the tray back into the freezer to set
10. Ice the cupcakes
11. Place the graduation cap (mortarboards) in the center of the cupcakes
12. Refrigerate or freeze (because we were having an outdoor party I froze the cupcakes so that the chocolate hats would melt slower. We had them out for an hour and only had a couple break before eaten)
Whenever I get out crafting supplies one of my kids asks what I am making. When I told my oldest that I was making crowns to give as birthday presents for a couple of upcoming parties, he requested one. I had a crown pattern drawn with stars on it and when I showed him he requested more points and to change the stars to diamonds. So this project was designed by my oldest and sewn by me. He is my biggest critic, greatest source of inspiration and the king of the castle. At least one of the kings of the castle, my youngest is challenging him at every step. No one around here wants to be the dirty rascal.
My youngest is yelling to the neighbourhood “I’m the king of the castle you are the dirty rascal”. He is also sporting his superhero cape and his love shirt.
If you are interested in making a crown here is a pattern. If you are interested in buying one here is a link to my Etsy store.
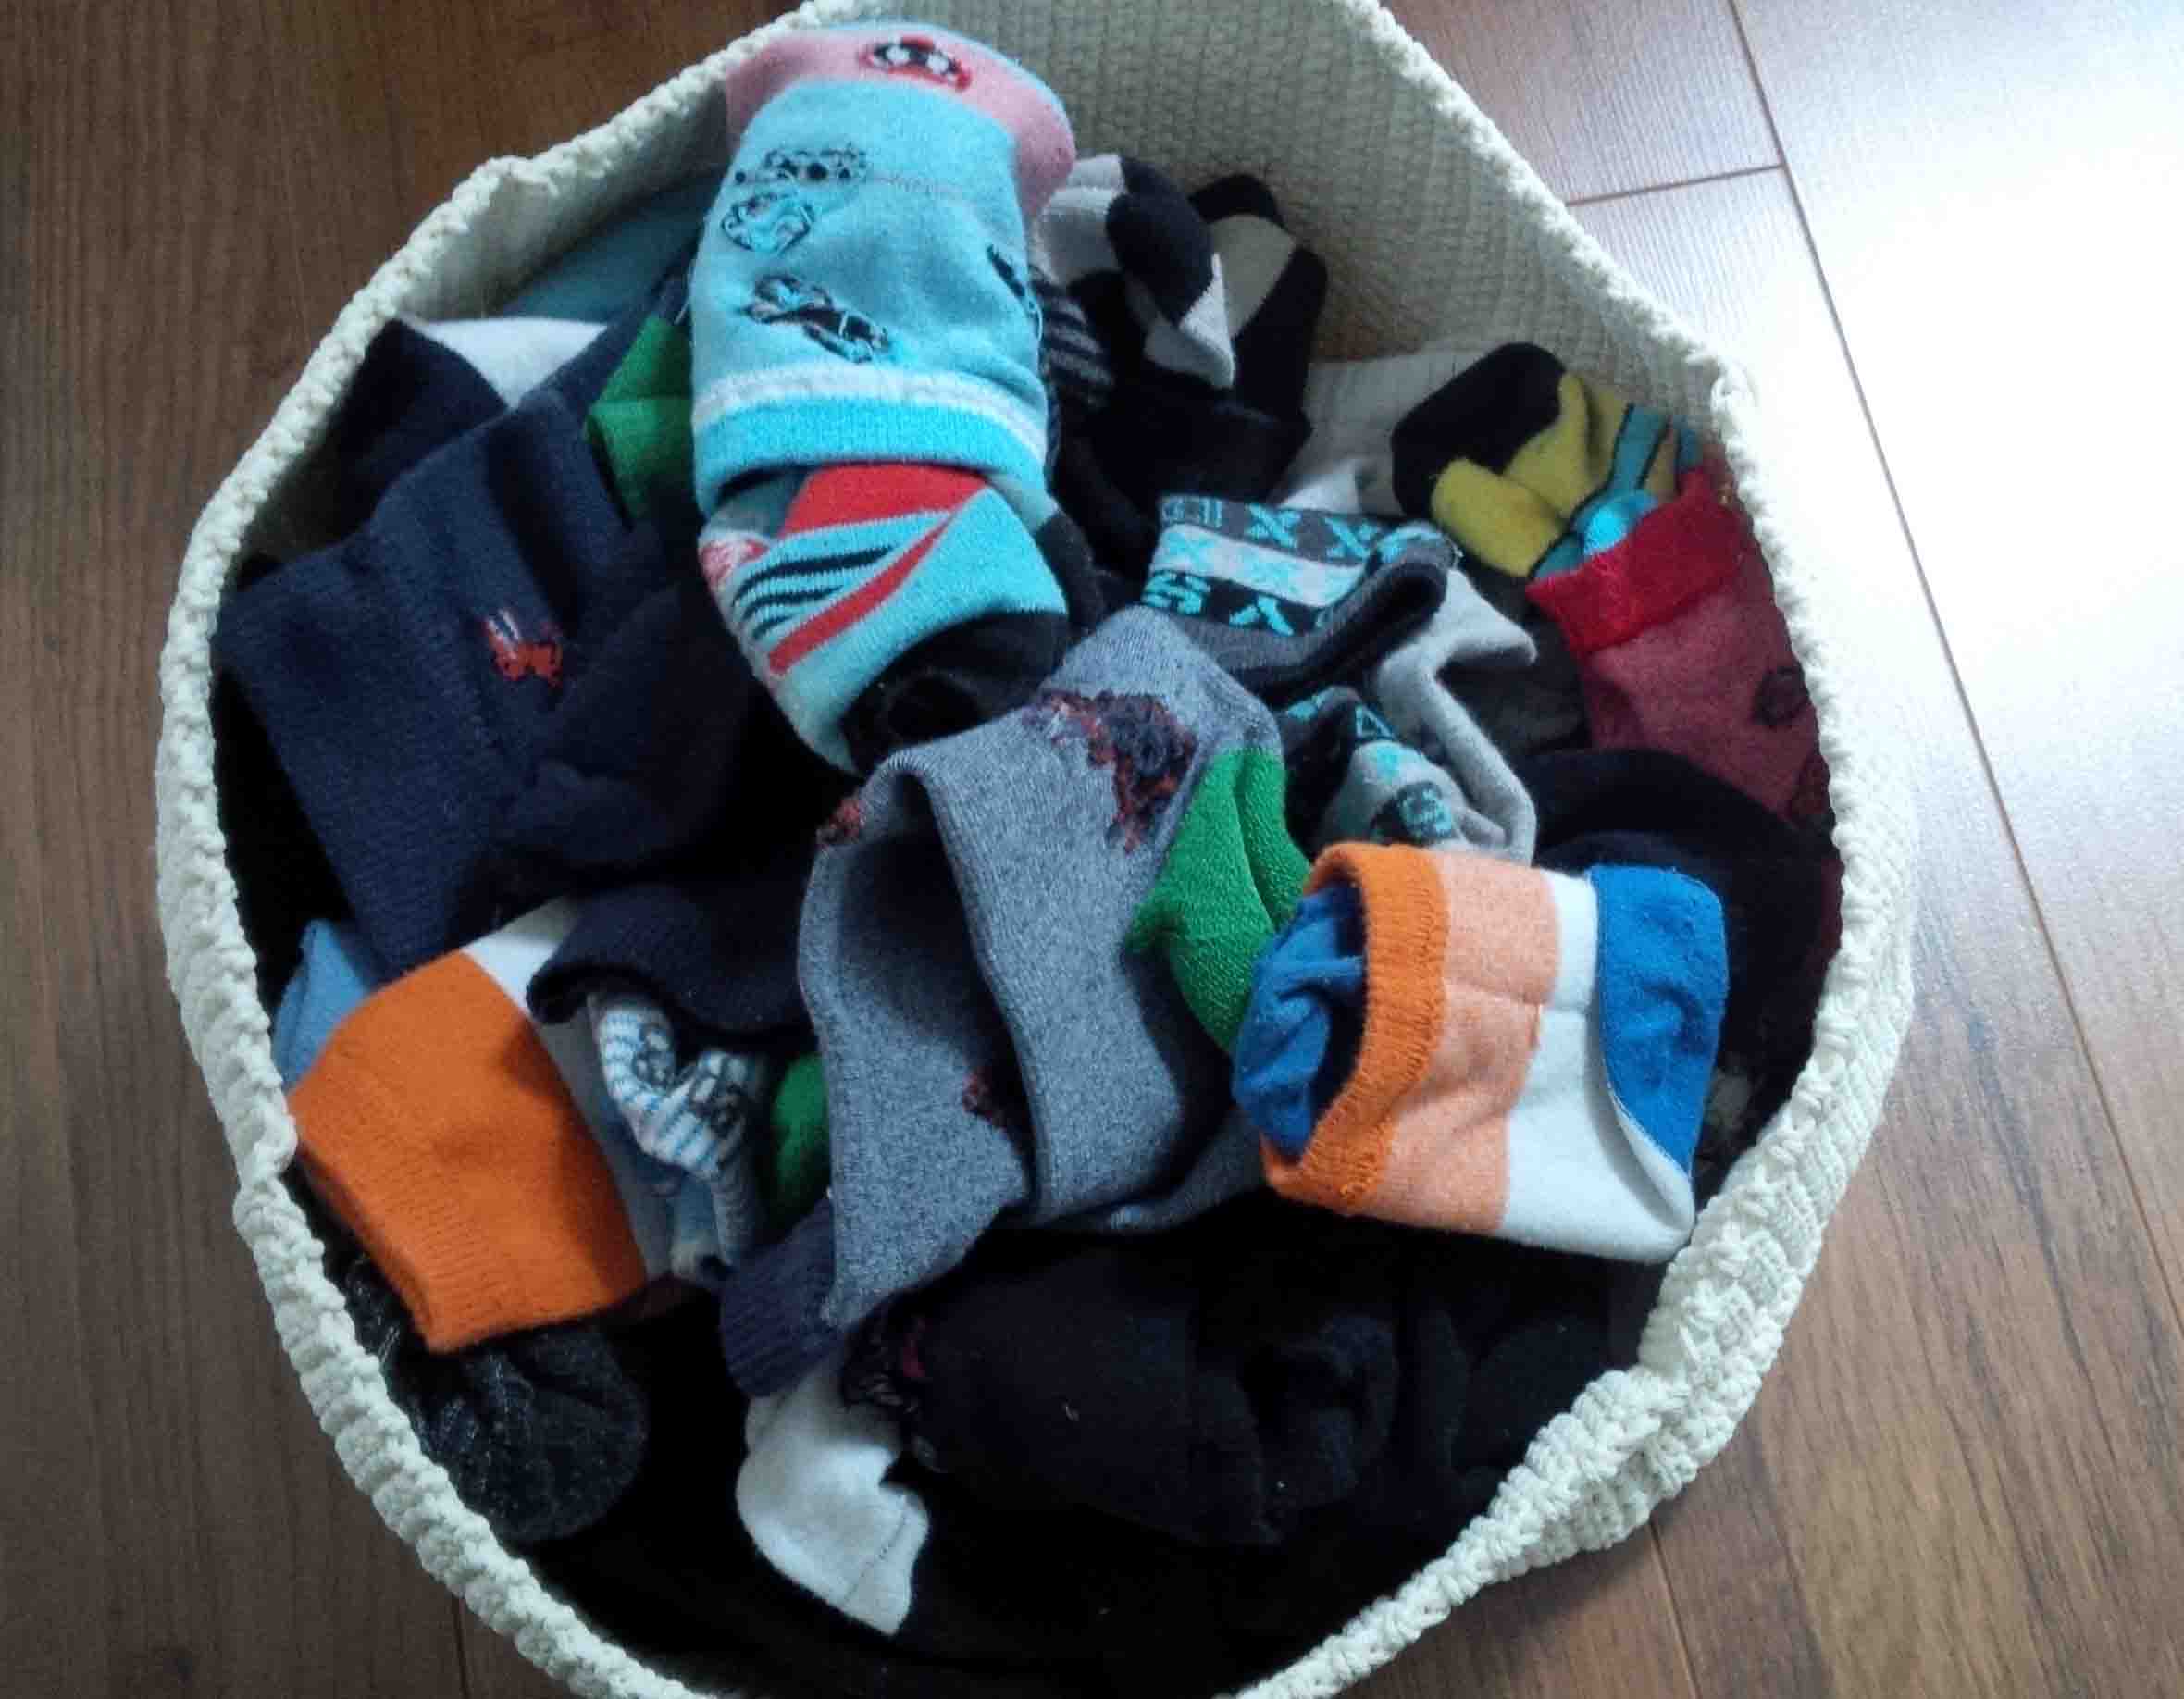
There are two people in my house that love to wear socks, and there are two of us that don’t. My husband and oldest son are the sock wearers. They seem to go through socks so quickly. I am not a fan of socks, and only put them on with sneakers, or in the winter. The rest of time I am barefoot, as is my youngest. I rarely wear out a pair of socks, usually the elastic goes before I wear holes in them. This is not the case for our resident sock wearers, they are constantly wearing through socks. I have been saving them because it seems such a waste to throw them out.
I am also an avid recycler. Pants, shirts, doors, milk jugs, new socks and now even the holey old socks in our house gotten a new lease on life. Meet our newest house guest, “Sunday” the sock snake. He is constructed of mainly of my husband, and eldest son’s holey socks. He is named Sunday because one of the pairs of socks said Sunday on the bottom, so I though that it was fitting. He is also the only snake that I know that has a mustache, or many mustaches.
If you are interested in giving your old socks a new lease on life, check out this tutorial from Grosgrain. I made a couple of alterations to the tutorial with the main one being using quilting batting instead of stuffing. I learned when making sock monkeys that it’s really hard to get the socks stuffed with out having big lumps, so for the snake I used batting. Here are some pictures of my battle with the batting. It was a full body workout to get Sunday stuffed. Now I will need to make a second one because I still have a pile of holey socks.
How are you? This little question has turned into more of a greeting than an actual question. When you answer it do you tell the truth? Or do you say fine, thanks. How are you?
I feel like I am lying if you ask how I am and I say fine, because in no way am I fine. So I have started saying I am great except for the brain tumor. I have gotten some interesting reactions to say the least. I do however have great hope that I will one day be able to say fine again and really mean it.
I have been telling people that I have a brain tumor, some out of necessity, some because I want to, and others because I don’t want to pretend that everything is OK. I have been openly sharing my story. It’s hard because it’s emotionally exhausting but it’s worth it. I don’t even know how many people have told me of friends, relatives, or acquaintances who have survived a brain tumor. I have lost count. Your stories inspire me and fill me with hope, thank you, thank you, thank you.
Tomorrow we will be walking in the Brain Tumour Spring Sprint. I have raised money and participated in many walks for all kinds of causes but never one that affected me personally. I wanted to thank everyone for your donations, it’s humbling to know that I have so many people’s support. I have raised just over $1,000.00. Yahoo. If you would like to donate to this cause very close to my heart (brain) please do. Here is the link. http://www.springsprint.ca/site/TR/SpringSprint/General?px=1028237&pg=personal&fr_id=1217#.VWEjiU_BwXA
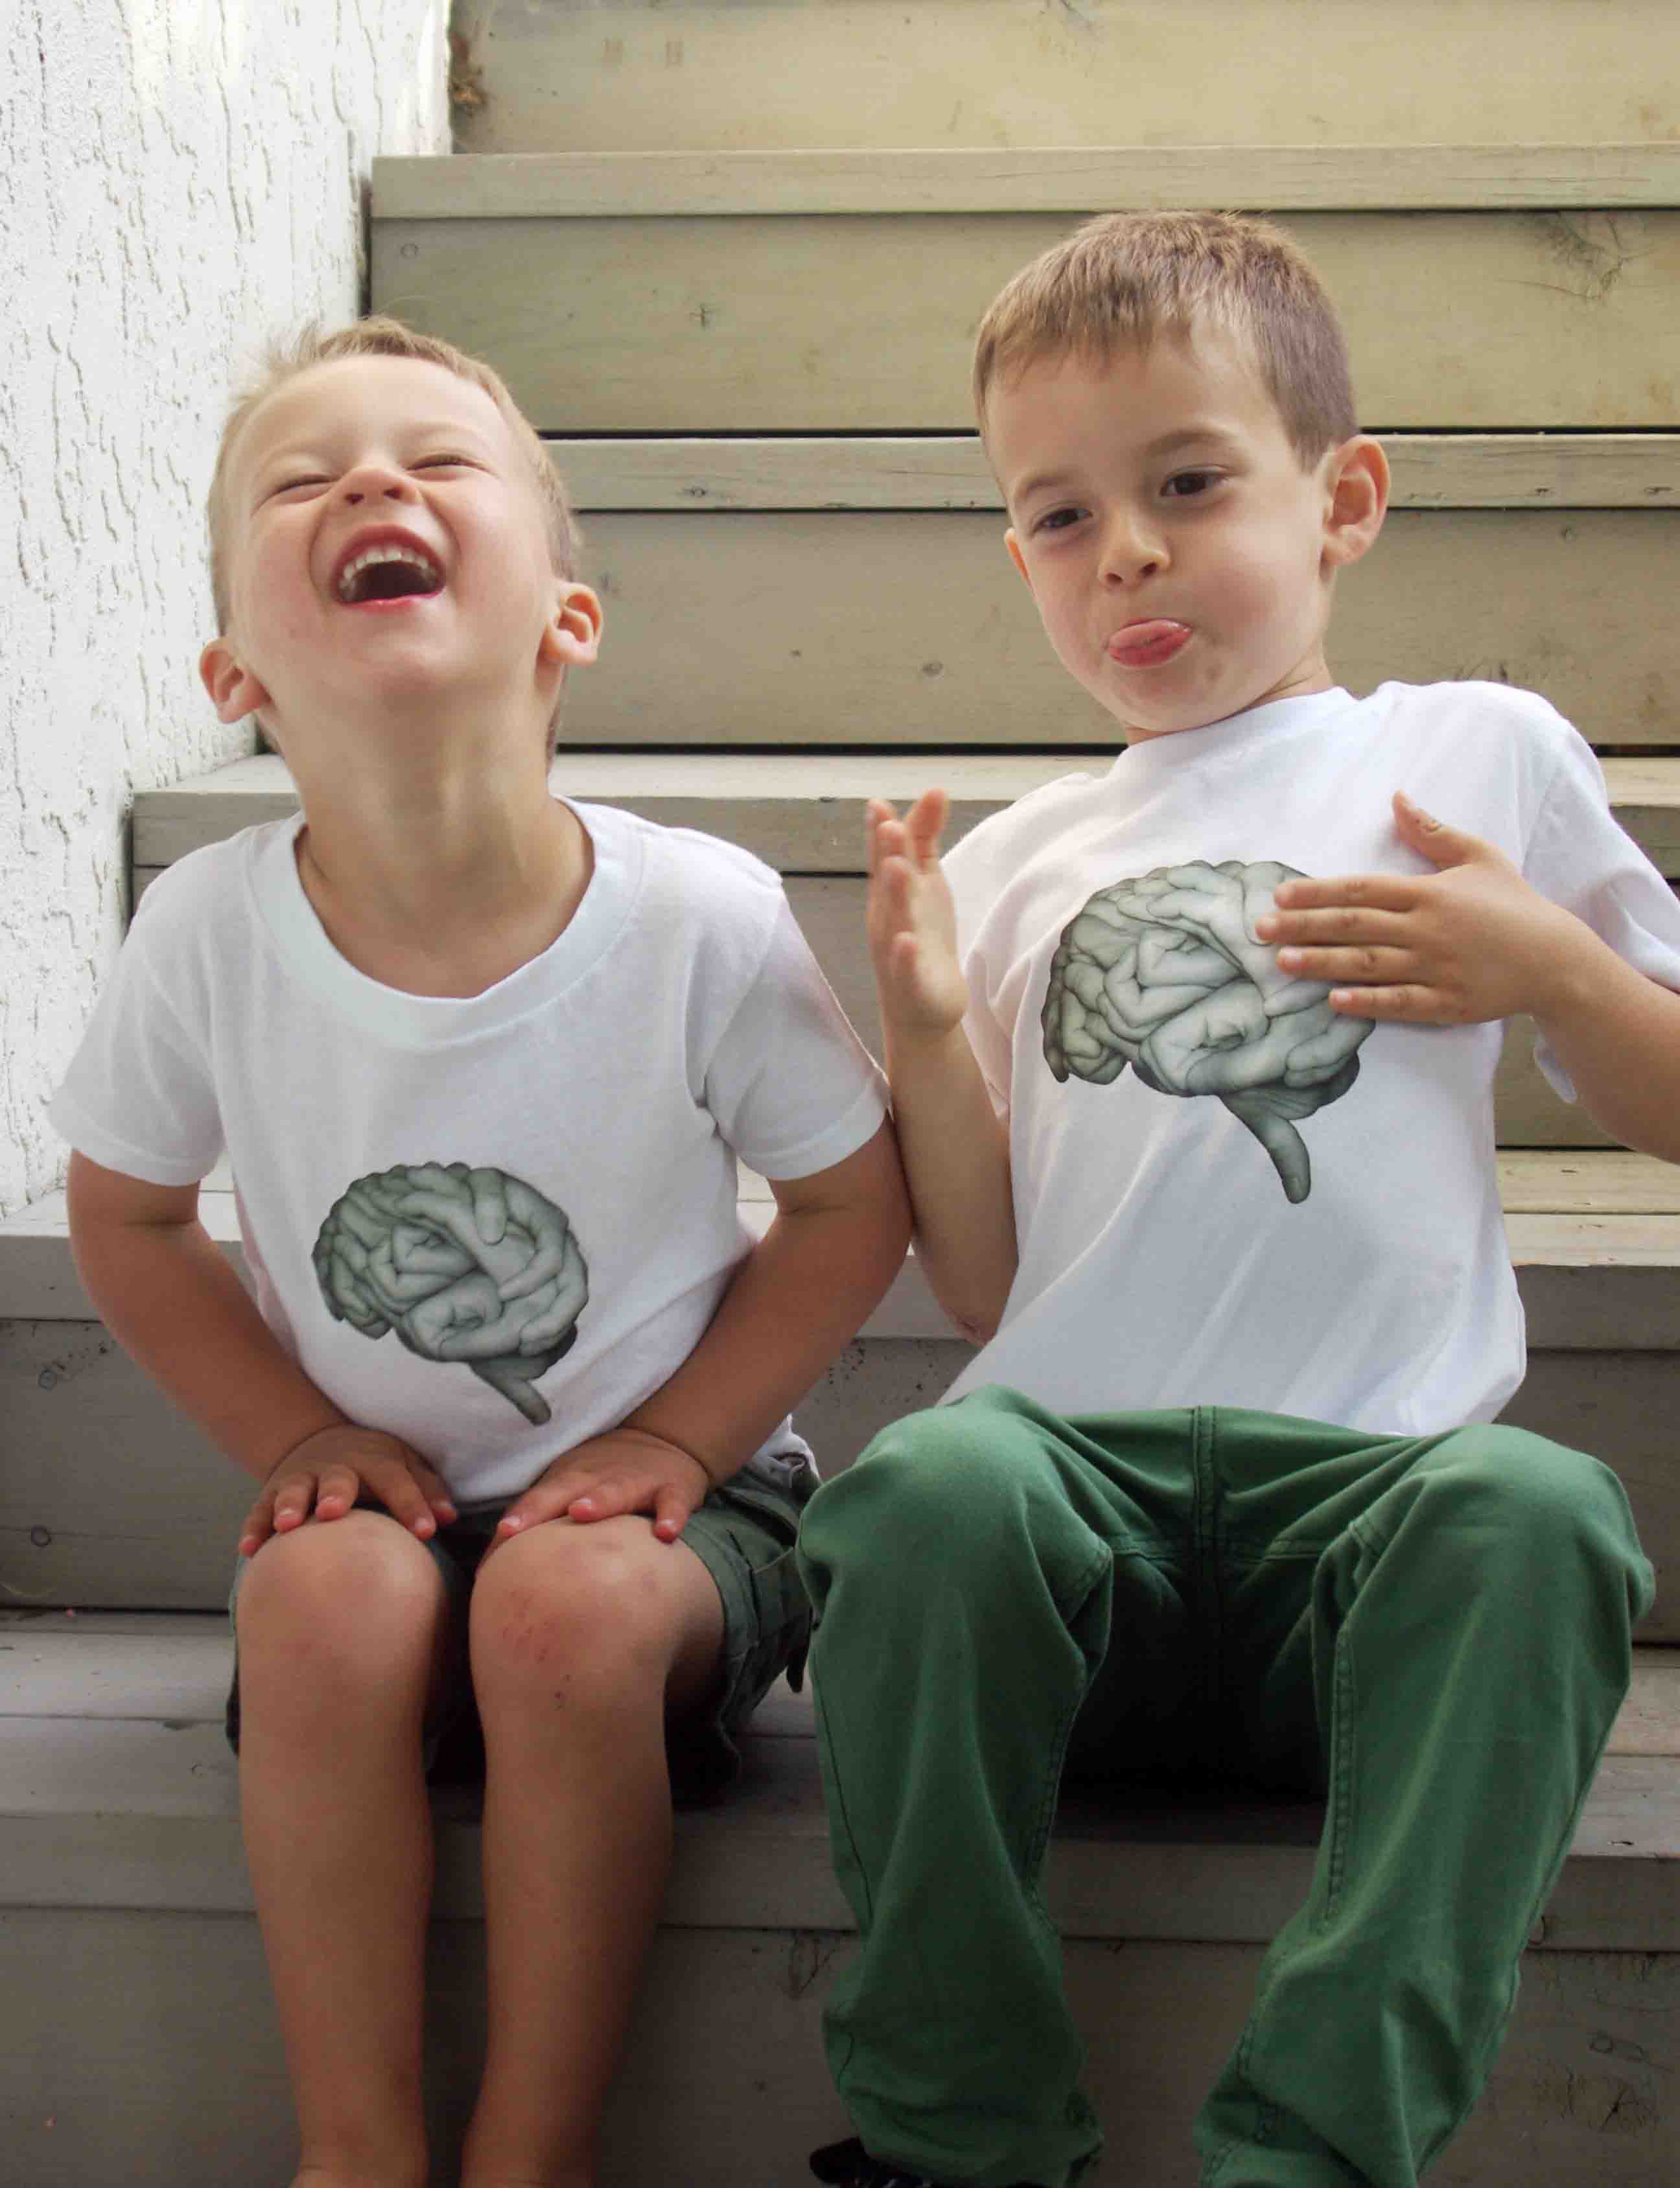
I decided to turn the image of a brain formed by hands into a shirt because I thought that it would make a perfect shirt for the kids for the walk. Every occasion around our house get some sort of t-shirt, this is no exception. I anticipate that they will be covered in food and or dirt and I may need to make another set before the walk tomorrow.
I am an amateur photographer so I am always behind the camera which means that there are only a few photos of me and the kids. Each year around Mother’s Day we have a family picture taken by a photographer so I actually make it into the photos. Yesterday we went to the beach for the annual picture, and each year it gets a little easier. The kids will look at the photographer at least occasionally, and sometimes even at the same time.
I graduated from a college photography program before digital photography became accessible to the masses. There are those that would say that digital photography has taken away from the art of photography, and I would tend to agree. But I would also say that it has afforded those of us that are inclined to take photos a million more chances to snap a good shot. I remember taking both slide and film photos and praying that there would be at least one good shot in the bunch (to hand in for an assignment) and waiting days for film/slides to be developed, only to have to repeat the shots. Granted a lot was learned though carefully setting up shots, but I can’t even image how many rolls of film it would take to get a shot with multiple children looking in the same direction with their eyes open. I am hoping that Nicola (our photographer) was able to get a couple of good shots of our crew. Here are a couple of quick shots I took while the kids were playing at the beach.
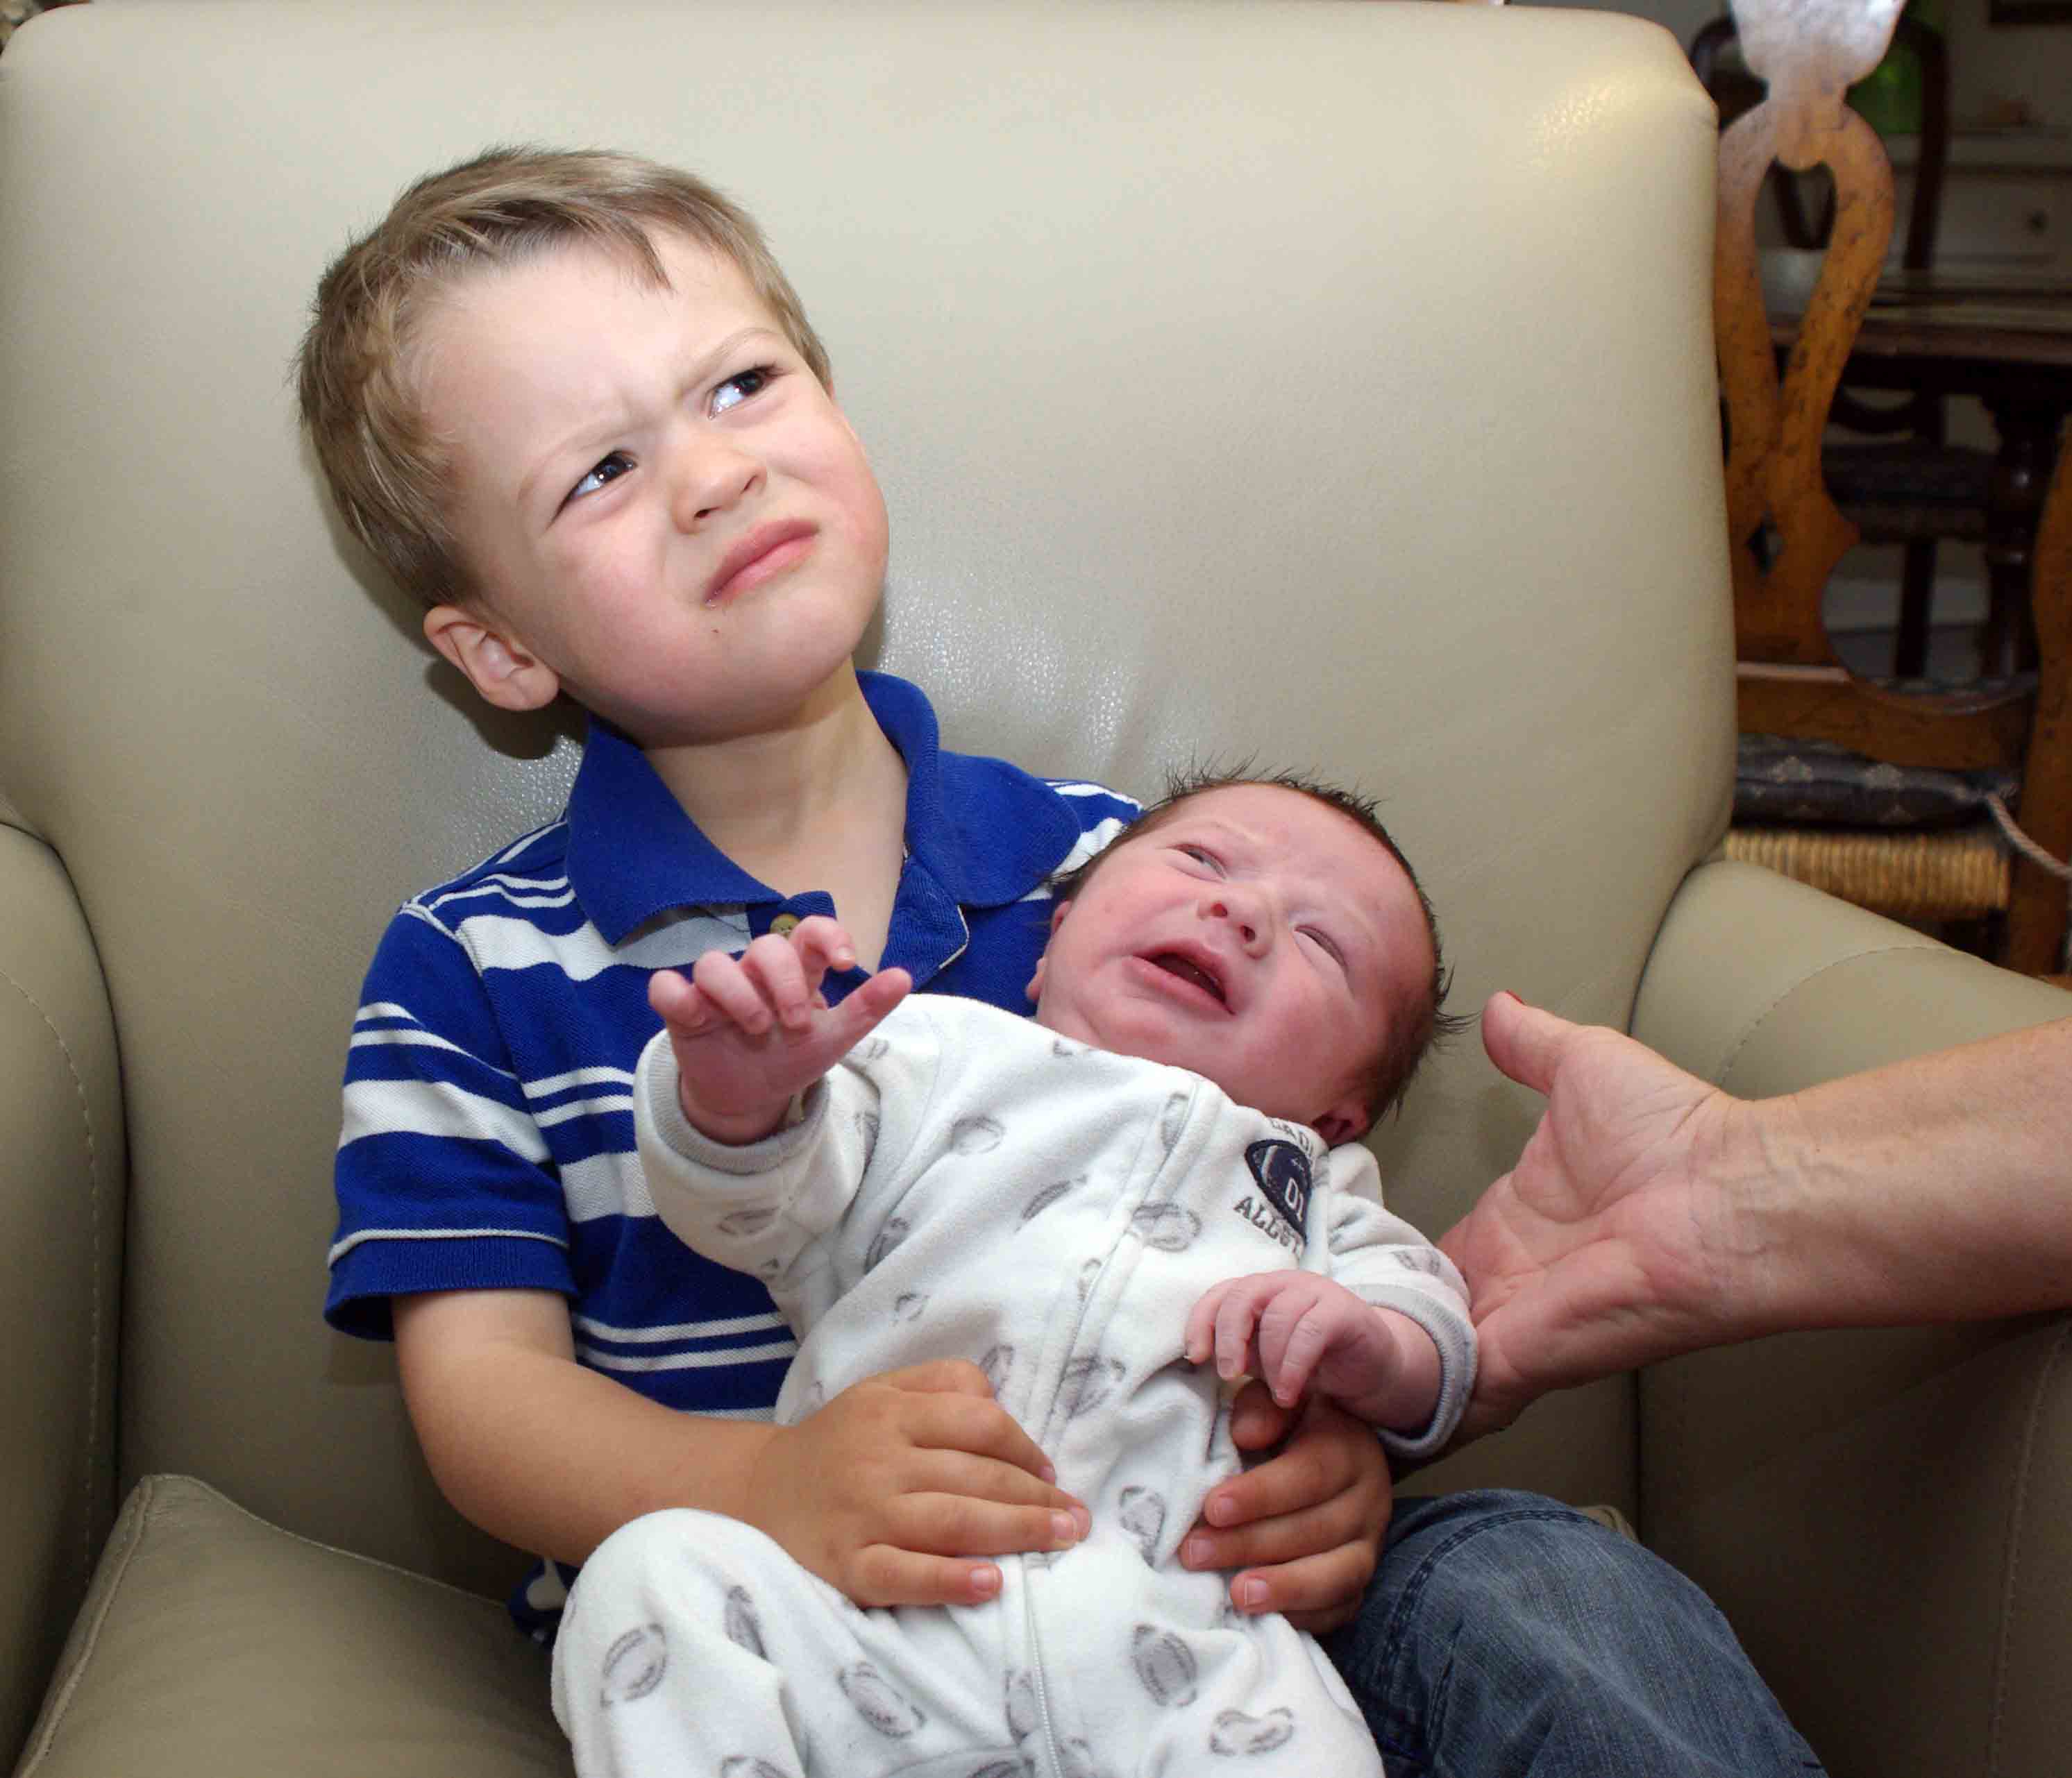
Logan our 2.5 year old has a habit of saying smile (instead of smiling) when someone points a camera at him. His older brother is trying to teach him how to smile in this photo. I took these when we were in Welland last month. Logan is clenching a gummy worm in his hand because when all else fails opt for candy, it’s sure to get a smile.
I needed to throw this one in there because I am keeping it real. Logan was yelling “get this thing off of me”, poor Bennett. Definitely no smiles in this photo.
About three weeks ago my sister, brother-in-law and niece welcomed little Bennett into the family. In honour of the event and my sister’s love of cupcakes I made a little welcome cupcake dessert to celebrate his arrival. His room is decorated in a nautical theme so I ran with that for the cupcakes as well. Welcome to the family little guy.
When life gives you lemons you can make lemonade but you better hope that life is also giving you a pound of sugar.
Other options to try if life has given you lemons
When life gives you lemons, squeeze them in people’s eyes. (that just seems wrong)
When life gives you lemons grab tequila and salt (unless you have a brain tumor and alcohol can increase your risk of seizures, not my best option right now)
When life gives you lemons stick them in your bra and work it (I love this one, but I could hide a few lemons in my bra and you wouldn’t even know they were there. ;))
and my ultimate favourite…..When life gives you lemons, you paint that shit GOLD!
Damn skippy I will. When life gives you lemons (or a brain tumor as luck would have it), you paint that shit gold. This saying has become my new motto. It has also inspired the painting below. I haven’t painted since I was a student at the Ontario College of Art and Design in the mid 90’s (OMG I sound so old). So don’t be too judgy. I did however signup for a painting/drawing class in Italy 8 years ago and not once did I paint. I ended up giving away all of my art supplies to make room in my suitcase for shoes and purses. While my classmates were painting I took thousands of photos. Some were of lemons. I used one of the photos taken on that trip as the basis of this painting.
I am going to proudly hang these lemons in my house because once I survive this brain tumor I am not going to forget the big basket of lemons that I was given. I realize that these aren’t exactly gold but I believe that the saying is more about making the best of a bad situation. Everyone has their lemons, I am going to paint mine gold.
Forgive me mother nature for I have been embellishing your creations. Sasha is studying his letters, and learning to spell so I made these alphabet rocks to help him on his journey. Using acrylic craft paint, I painted a letter and some dots (just for fun) on each rock, and when they were dry I sprayed them with a gloss paint so the rocks will stand up to touching and outdoor life. To complement the rocks I spray painted the top surface of a IKEA coffee table with chalkboard paint. The idea is to use the rocks and the table together to copy the letters and spell out words. I will post some more info about the chalkboard table in the future. But for now keep rocking out.
 My oldest graduated from Kindergarten this week and I couldn’t pass up the chance to bake some cupcakes for the celebration party. In the process I learned that you can make and ice about 60 mini cupcakes from a standard boxed cake mix and tub of frosting. These bathing beauties were vanilla cupcakes with cream cheese frosting, dipped in light and dark brown (sand) sugar. Topped with a strip of fruit roll-up for the towel and a gummy bear. Garnished with a paper parasol these were a hit with the kiddies.
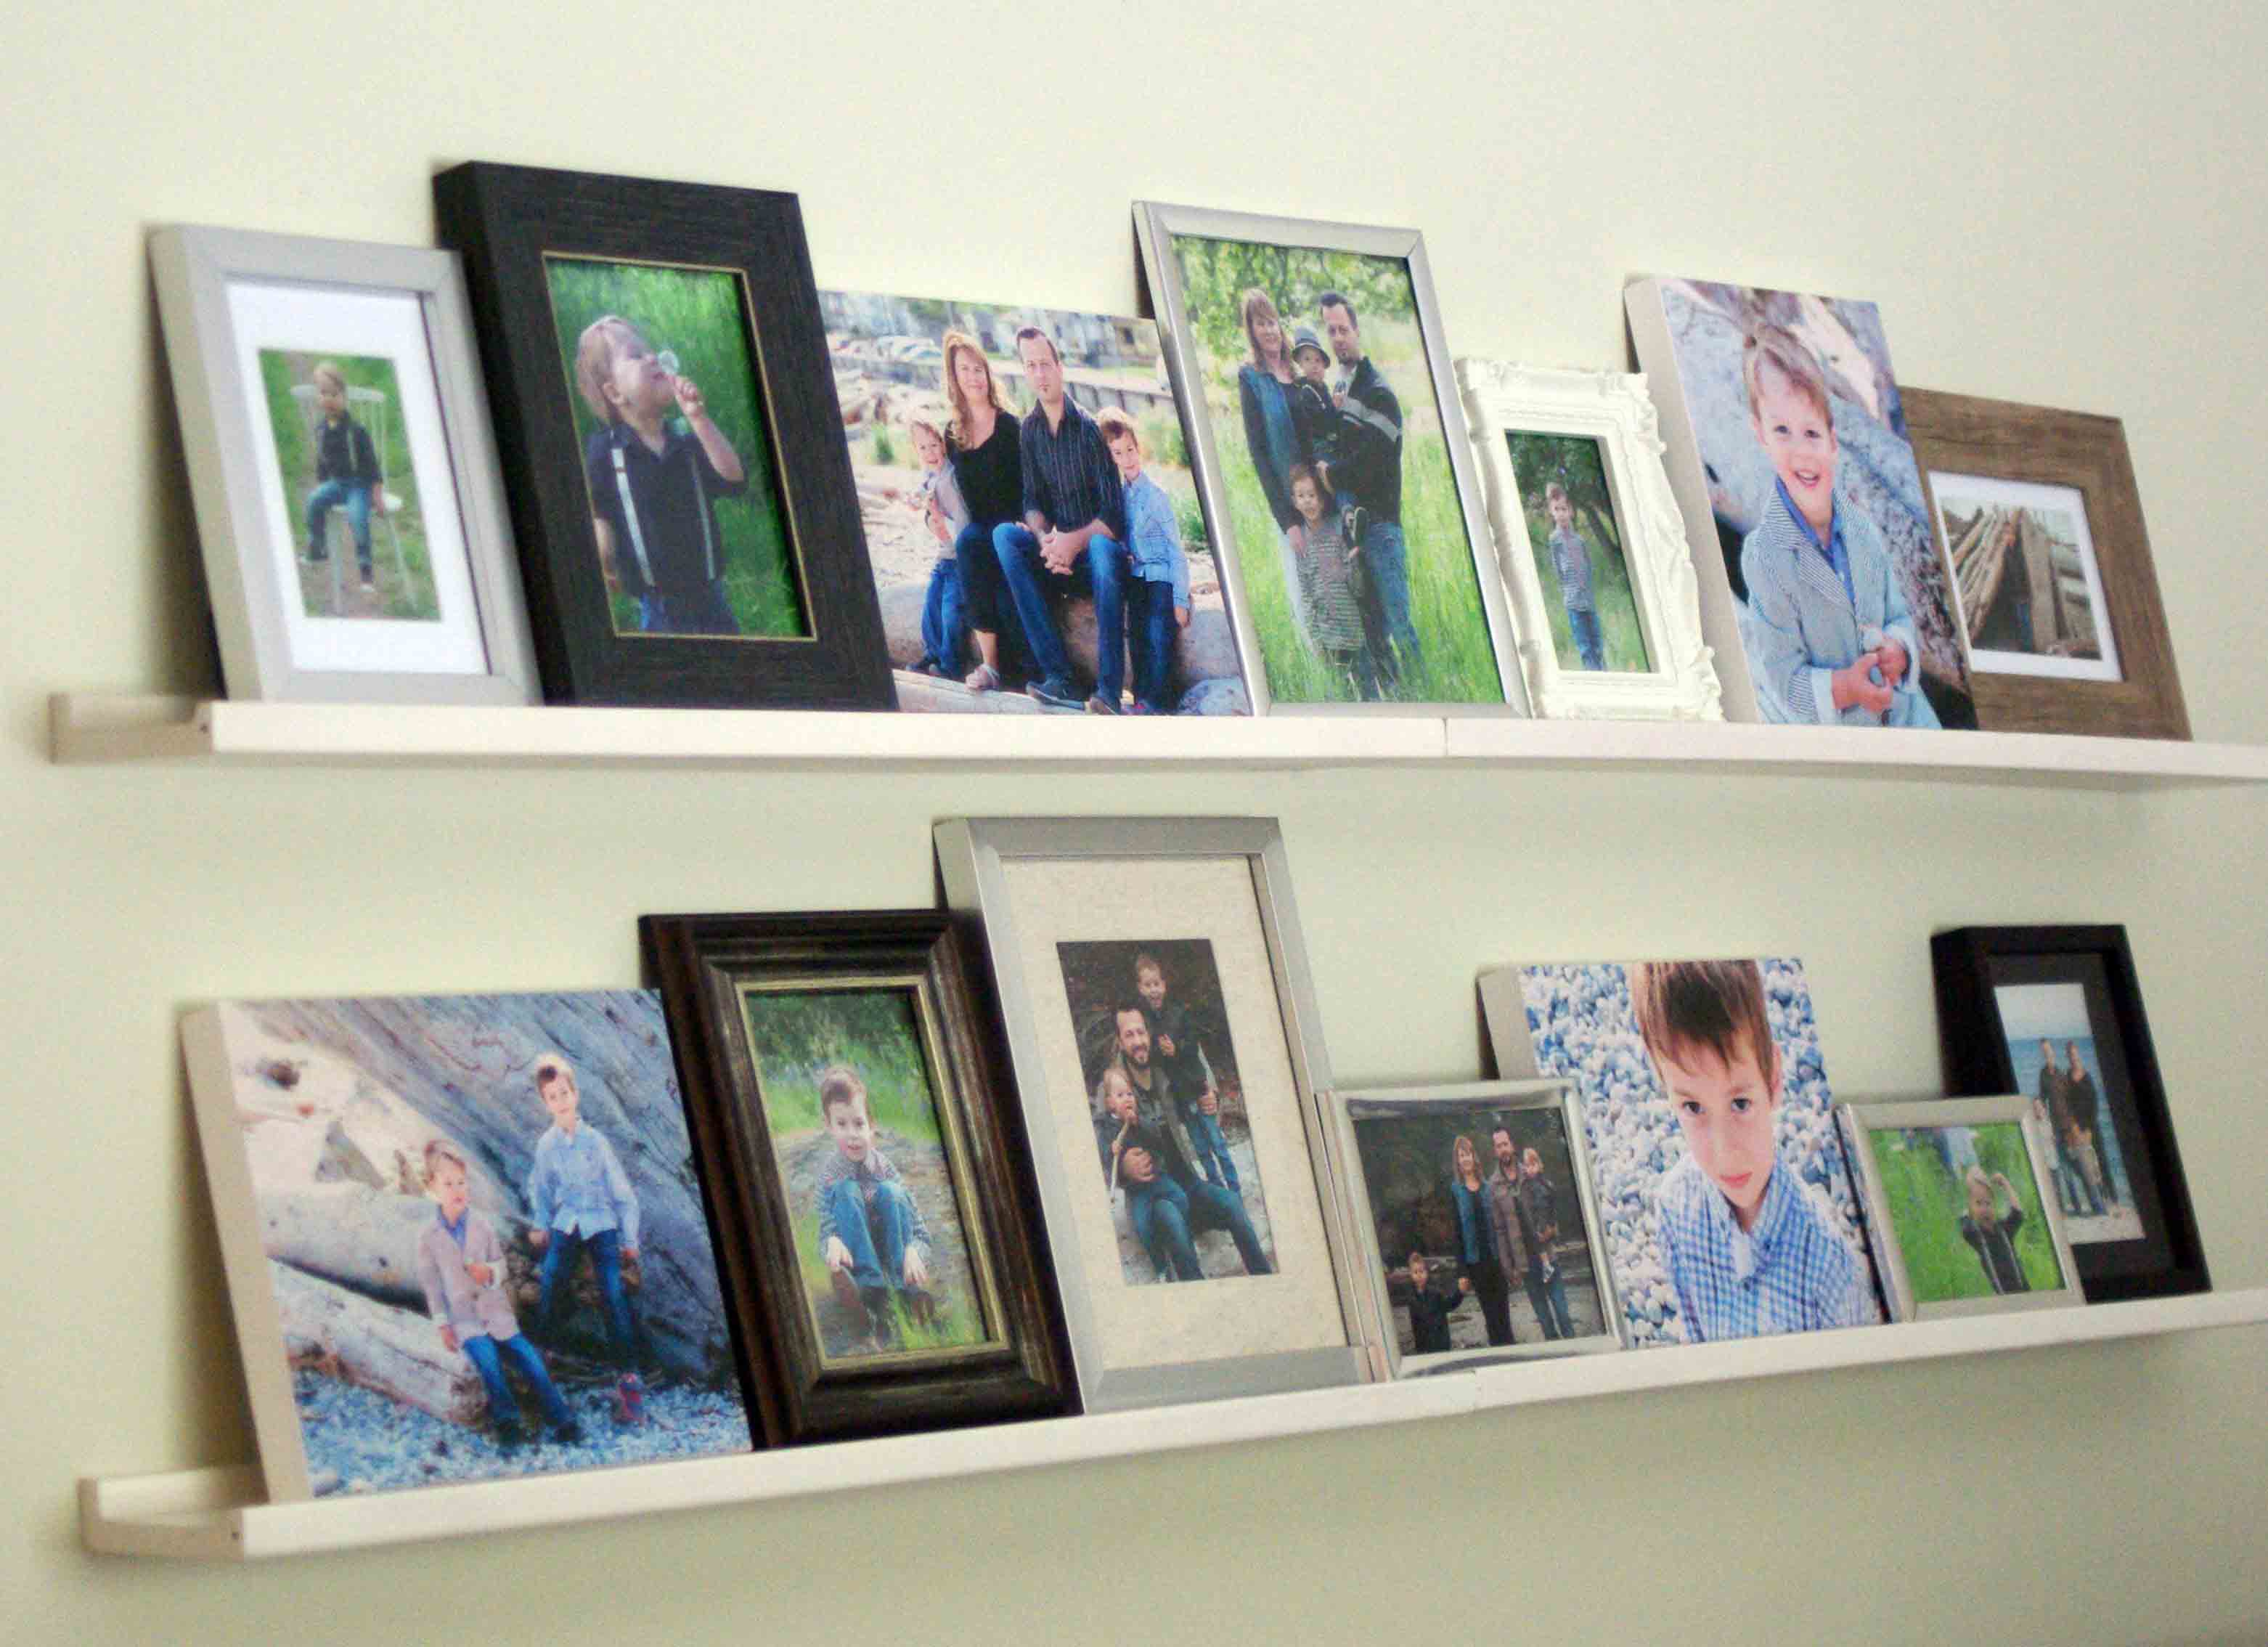


")
")
")
")
")
")
")
")
")
")
")

 d cake mix