On the second day of Christmas my true love made for me two types of reindeer treats, and a veggie tree.

On the second day of Christmas my true love made for me two types of reindeer treats, and a veggie tree.
 There is a chill in the air and all of the trees have lost their leaves. Fall is here. My youngest has begun to point out nests in the naked trees. He tells me that the birds are snuggled in their nests making candies. If only that was true. He has been making nests around the house and snuggling in with his stuffies. I am taking my cues from him these days and fluffing up my own nest.
I spend too much time browsing on Pinterest! I saw a picture of chunky knit blanket that I had to make. The problem was that I couldn’t find knitting needles long and thick enough. I wanted to make a king size chunky knit blanket and I wasn’t about to start knitting with 3′ long needles. Although come to think of it I probably could have tried knitting with the kids light sabers!
 I wasn’t going to let something as trivial as not having the right size needles stop me, so I made a pair. Using a pair of purchased 50mm short knitting needles (pictured) I cut them down drilled holes in the ends, tapered the cut ends, inserted and glued a rope, taped the rope to the needles and voila circular needles long enough to knit a king size blanket.
This was the biggest knit project that I have ever attempted. I learned a few things in the process. First off this project worked my arm muscles! I was sore after knitting because the blanket and yarn are so heavy. It was next to impossible to knit sitting in a chair because the blanket was so big it would spill over onto the floor and then it was really hard to get the tension right. Sitting in bed was the perfect place to work on this blanket so that the weight could be spread out over an even surface. It is only a little luxurious to knit and be warm and cozy under your project at the same time.


Pattern to follow
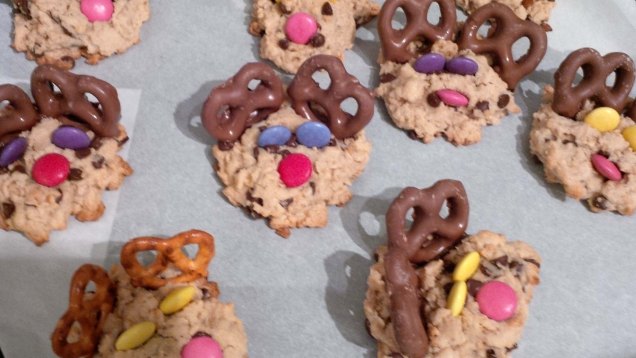
Halloween is one of my favourite days of the year. With little ones it’s easy to get caught up in all of the excitement. Here are a couple of projects that we made for the holiday.
Mummy Cupcakes
We went to a Halloween party and brought these mummy cupcakes as dessert. They are chocolate cupcakes with white icing, and red M&M’s for eyes.


Pumpkin Rice Crispies
These treats went to one of my boys classes for a Halloween party. I found the instructions here. I took some liberties with the recipe and added pretzels for stems and green frosting leaves.

Halloween Wreath
I copied my own idea from last years Christmas wreath and made a similar wreath for Halloween with orange and black washi tape.

As a pretty passionate maker you might think that I would be making the kids halloween costumes but I don’t. The reason why is that it’s just too expensive. I do however make my own costume every year. This year I was little red riding hood. I didn’t make it into any of the photos this year 😦


I haven’t posted any craft related projects in a very long time but I am always working on something. Here are a couple of pictures for my most current project. I am knitting a chunky king size blanket. It’s the perfect season to make blankets. This one is almost done, I just need to knit enough to cover up my toes. When I am finished the pattern and finished pictures will be posted!


At the end of August my youngest turned three just a couple of weeks after I had surgery. We still managed to celebrate multiple times. When my parents were here we had a little family celebration complete with store-bought cupcakes. On his actual birthday we had a store-bought cake. There isn’t anything wrong with buying cakes from the store but I use every occasion as a reason to bake.


The baker in me was having a really hard time but I was not in any state to be baking. I was still recovering from brain surgery. But that didn’t go on forever and when I was feeling better we threw a birthday party/Timmy the tumour eviction party. We asked friends for donations to the Brain Tumour Foundation instead of birthday gifts. That might seem mean but we have so many toys he really doesn’t need anything else. Can you find him in toy mountain?


The theme for the party was robots because now that I have a titanium plate in my head I am part robot. But really it’s what my little boy asked for. In keeping with the theme we made a robot pinata. Unfortunately when I took the robot outside for a photo-shoot one of my assistants closed the front door which locked behind us. Even more unfortunate I had to call my husband at work 45 minutes away to come and let us in the house. It was just before lunch and the kiddies were hungry thankfully my husband rescued us before we needed to smash the robot for lunch.
By the time the party happened I was four weeks post surgery and I figured that I was fine to start baking. Which I would have been if I chose to make a less detailed cake. After completing the robot cake I needed a nap.


The birthday boy said that it was the best day of his life and of course that makes all of the effort worthwhile.


I have been writing about some heavy topics lately and I thought that I would lighten it up a bit with felt dryer balls. I have been using a bounce dryer bar but they have become difficult to find, and after checking a number of stores I gave up and made some dryer balls. I was a little skeptical that they would work but after a couple of weeks of using them I am converted. When I made the switch from dryer sheets to the dryer bar I no longer needed to remember to put in a dryer sheet with every load, nor did I need to fish out a dryer sheet at the end of the load. There are a few added benefits of felt dryer balls the first being that there is no garbage and the second is that there isn’t any chemicals. They are also so easy to make, I made these three one night while I was watching TV.
Instructions


Step 1 – using 100% wool wrap into a ball (mine are about the size of an orange). I used yarn for the entire ball but you could also use an old wool sweater.

Step 2 – once the balls are wrapped put them into an old nylon/pantyhose and knot after every ball as pictured. Wash in the washing machine in the hottest water possible. They can be washed with a load of laundry or alone. I sent mine through two loads. After they are felted cut them out of the nylons and dry them in the dryer.

These are the finished dryer balls. I leave them in the dryer most of the time occasionally the kids steal them and play which is something that they couldn’t do with dryer sheets. I am going to experiment with adding oils into the balls to make the laundry smell nice.
For our Canada day celebrations I made beaver cupcakes for the little cannucks, or at least that is what they are supposed to look like. For some reason when I made them they did actually resemble the animal, now looking at the pictures I wonder how much wine I consumed while baking. Either way the kiddies ate them up.


If you want to take a run at them this is what I did, perhaps you can improve on it.
 I haven’t posted anything in a little while because I have been on a baking frenzy and I am supposed to be studying for exams. I write the first exam of three on Wednesday of next week. I just can’t let a holiday pass by without some sort of festive treat. We had a party on Canada Day to celebrate the birthday of our fantastic country and I made a cake, no real surprise there. I also made some festive cupcakes for the kiddies, I will reveal those tomorrow. We had a great time and the kids had a blast with water guns, and water balloons. Here is little L sporting his new Canada Day shirt for the occasion.
Historically I have made a sheet cake frosted with white icing, and decorated with strawberries in the shape of a Canadian flag. I thought that I would mix things up a bit this year. I have wanted to try making a cake with more than 2 layers. So I made a red, white, red layered cake to resemble the colours and pattern of the Canadian flag. It was more like pink than red but after a few drinks who could tell the difference. I did my best free hand maple leaf on the top. My free hand technique could use some work, but the taste is the same regardless of drawing ability.


I can’t believe the school year is over, maybe it’s because we got a late start due to a strike, or maybe it’s because this was my oldest’s first year of school. Either way it’s over and summer is officially here. Along with the graduation cupcakes, and the vacationing bear cupcakes I also made some teacher’s gifts. Last year I made watermelon tea towels with some lovely ladies, but this year it was a last minute race to get the presents done on time.
The cost of this gift is in no way related to the thanks I have for S’s amazing teachers this year. I am hoping that the thought and effort outweighs the $1.25 that I spent. Honestly if I didn’t tell you that I spent $1.25 you would never know. Being that I have a overflowing closet of crafting supplies I didn’t need to buy paint, but even if I had needed to the total cost of this project would still be less than $5.00. If you happen to have a pile of kids, celery, and a dollar store near by this might be right up your alley.
Supplies
Instructions
1. wash and iron the scarves
2. Lay the scarf out on a flat surface, and place paper towels under it so that you don’t ruin the table or get the scarf stuck to it
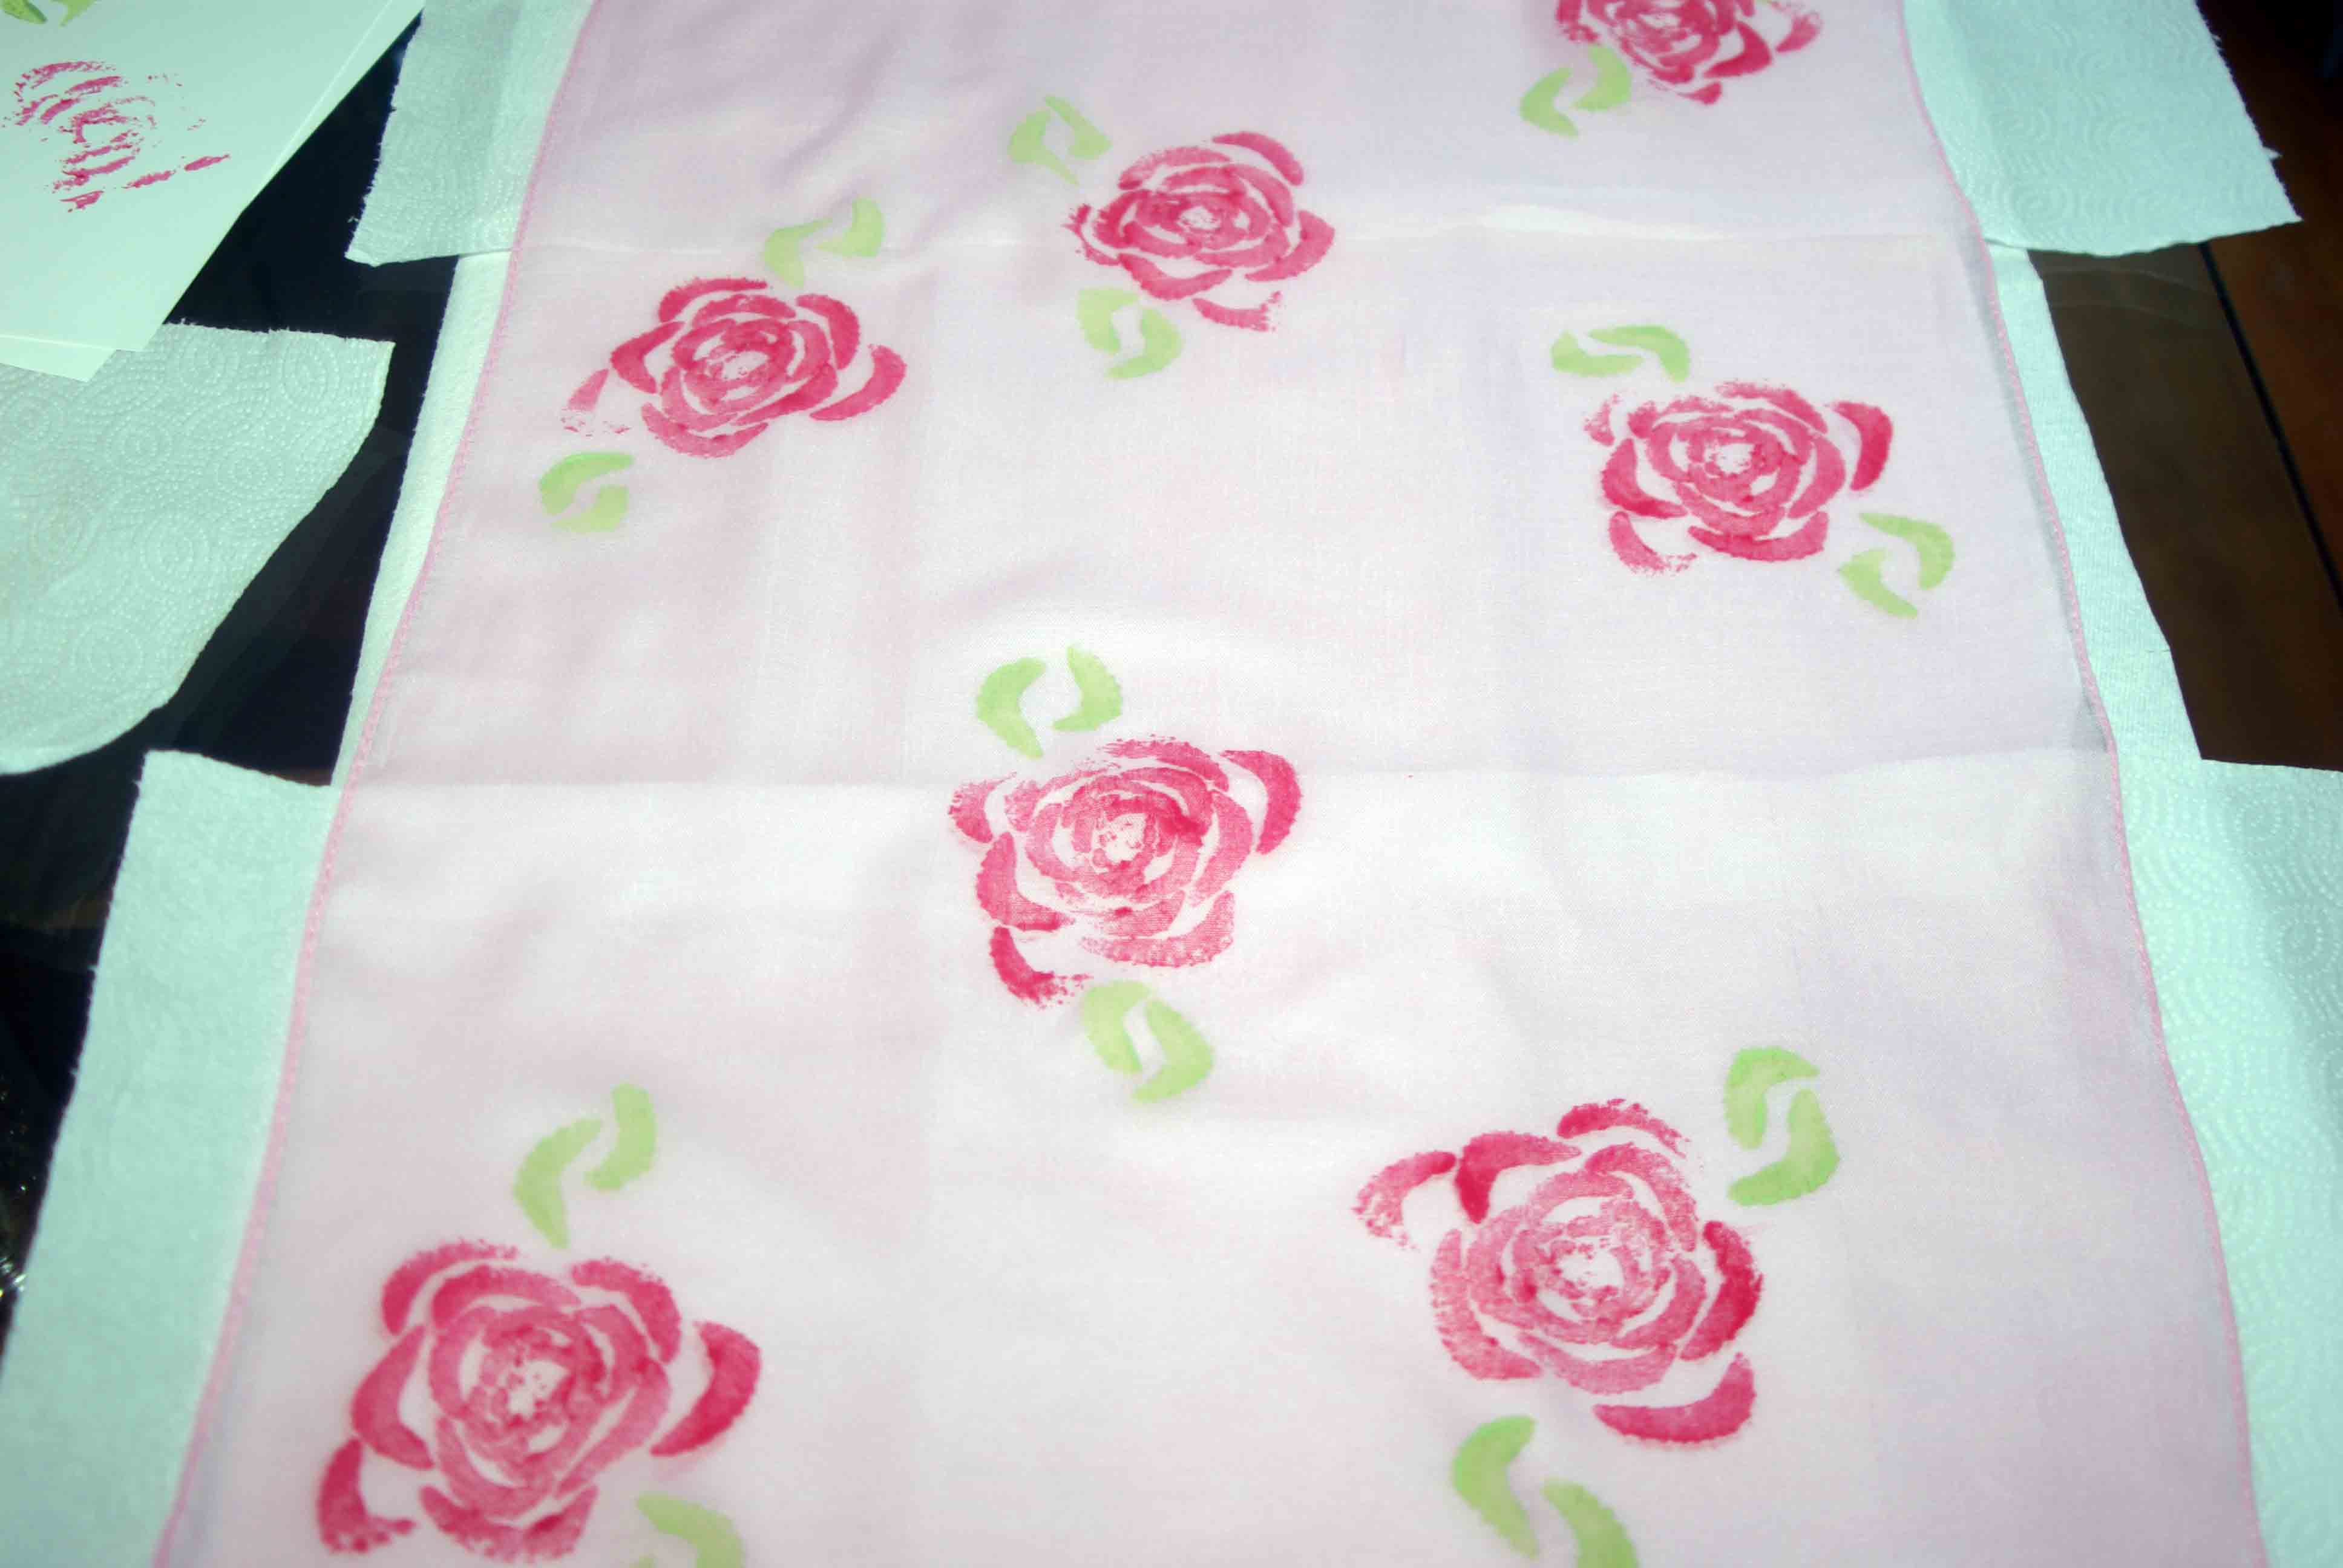
3. Chop the end off of a bunch of celery, and cut one stalk in half for the leaves
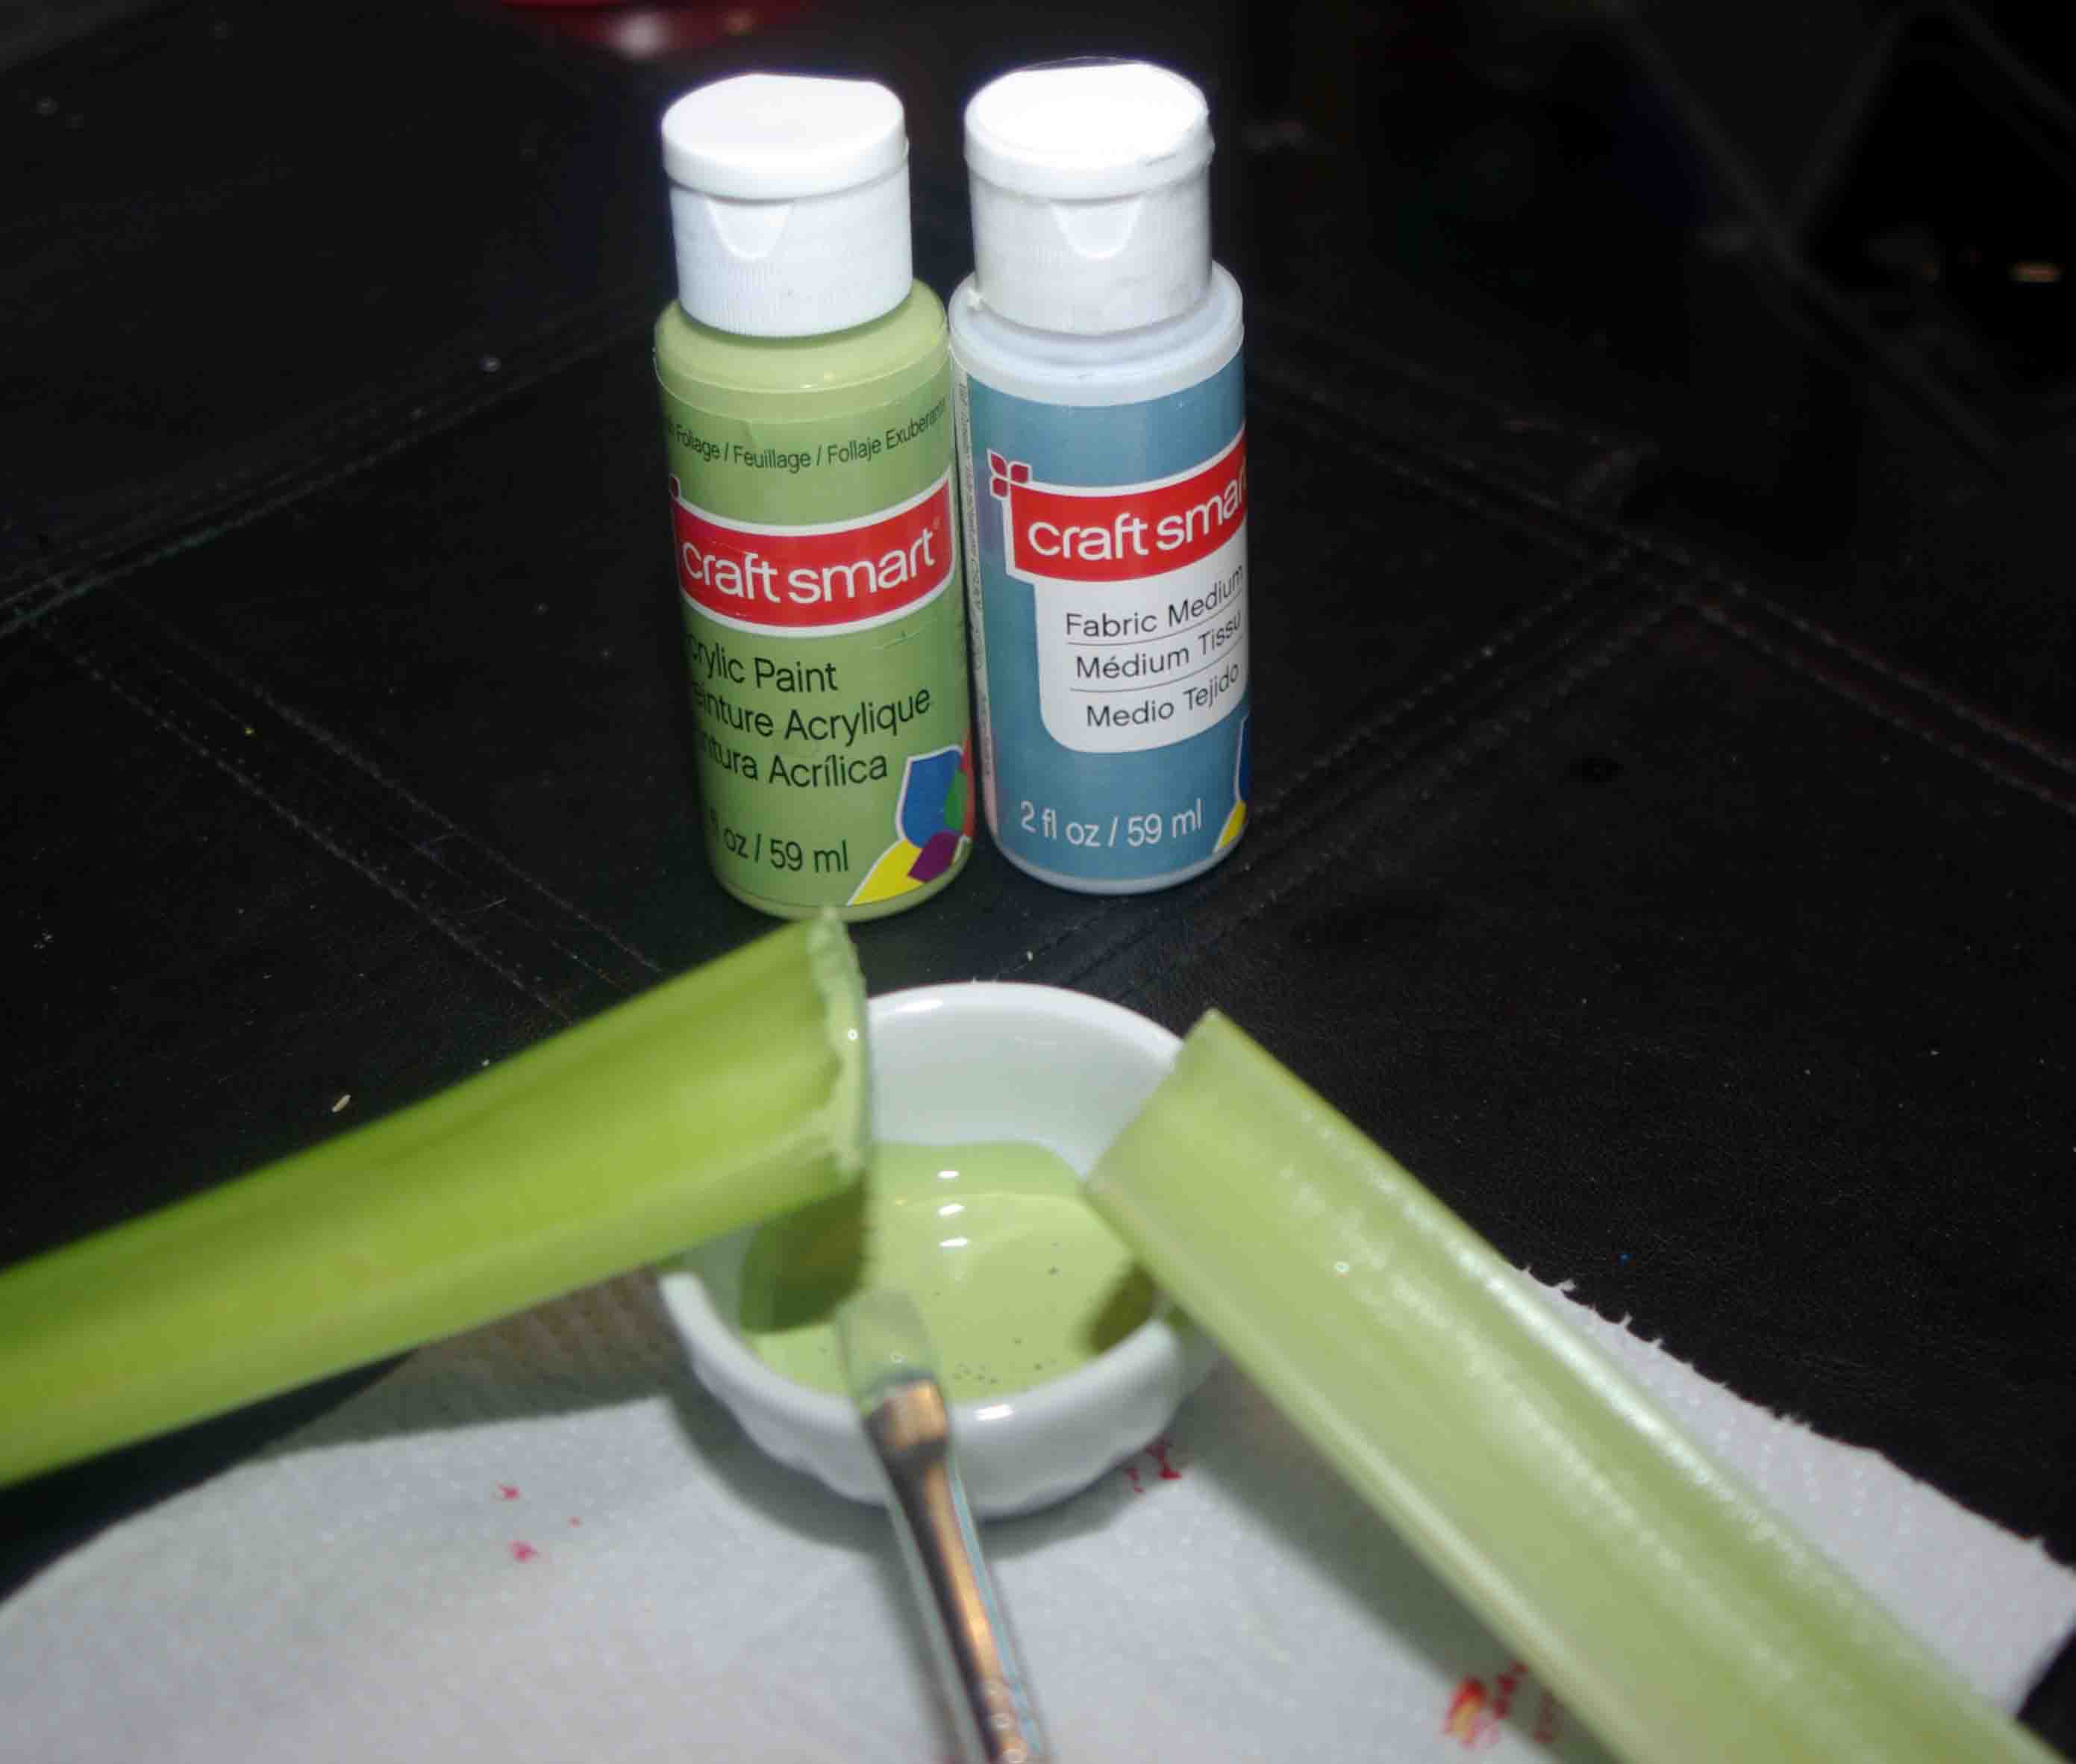
4. Mix the paint and textile medium as per the bottle instructions
5. Paint the end of the celery bunch and stamp it onto the scarf

6. Repeat step 5 until you have a desired pattern
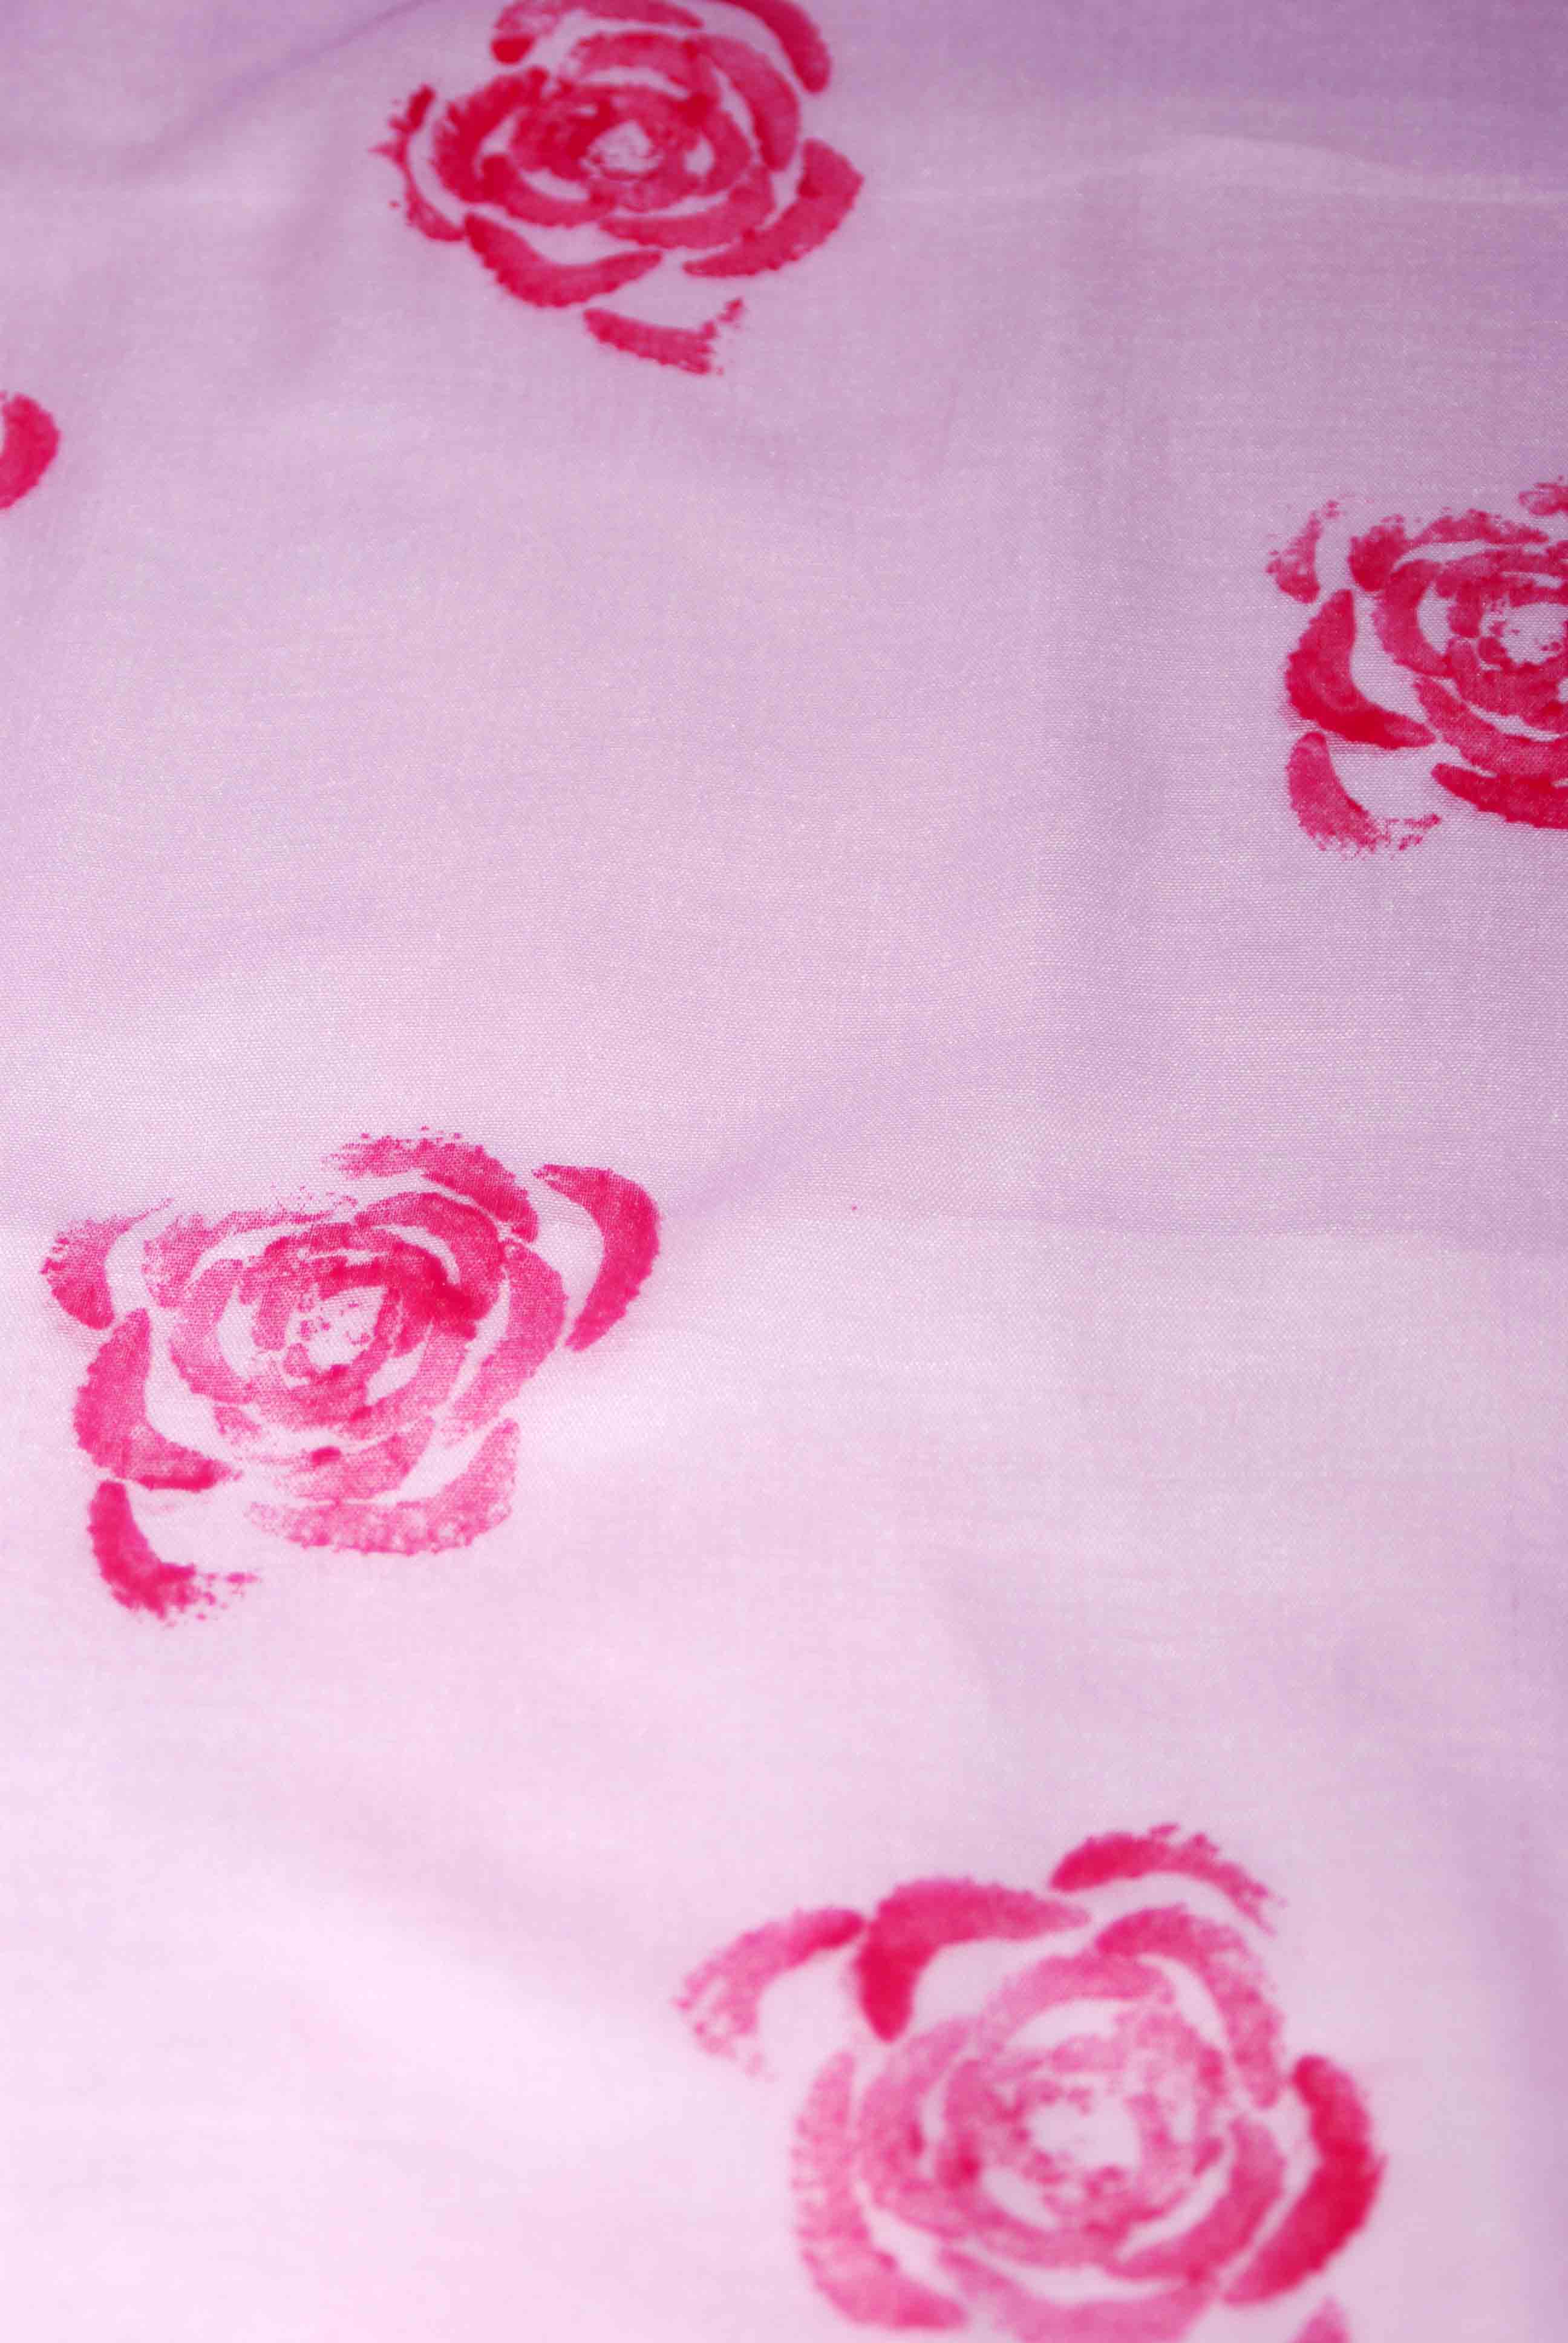
7. Paint the end of the celery stalks to make the green leaves, and stamp onto the scarf
8. Repeat step 7 until all of the roses have leaves

10. Once the scarf it dry iron it to set the colours
Being that the project cost me so little I made one for me too. I don’t usually take selfies, so I could use a little practice. But you can see how the scarf looks when finished, and I really don’t think you could guess that it cost me $1.25 to make.

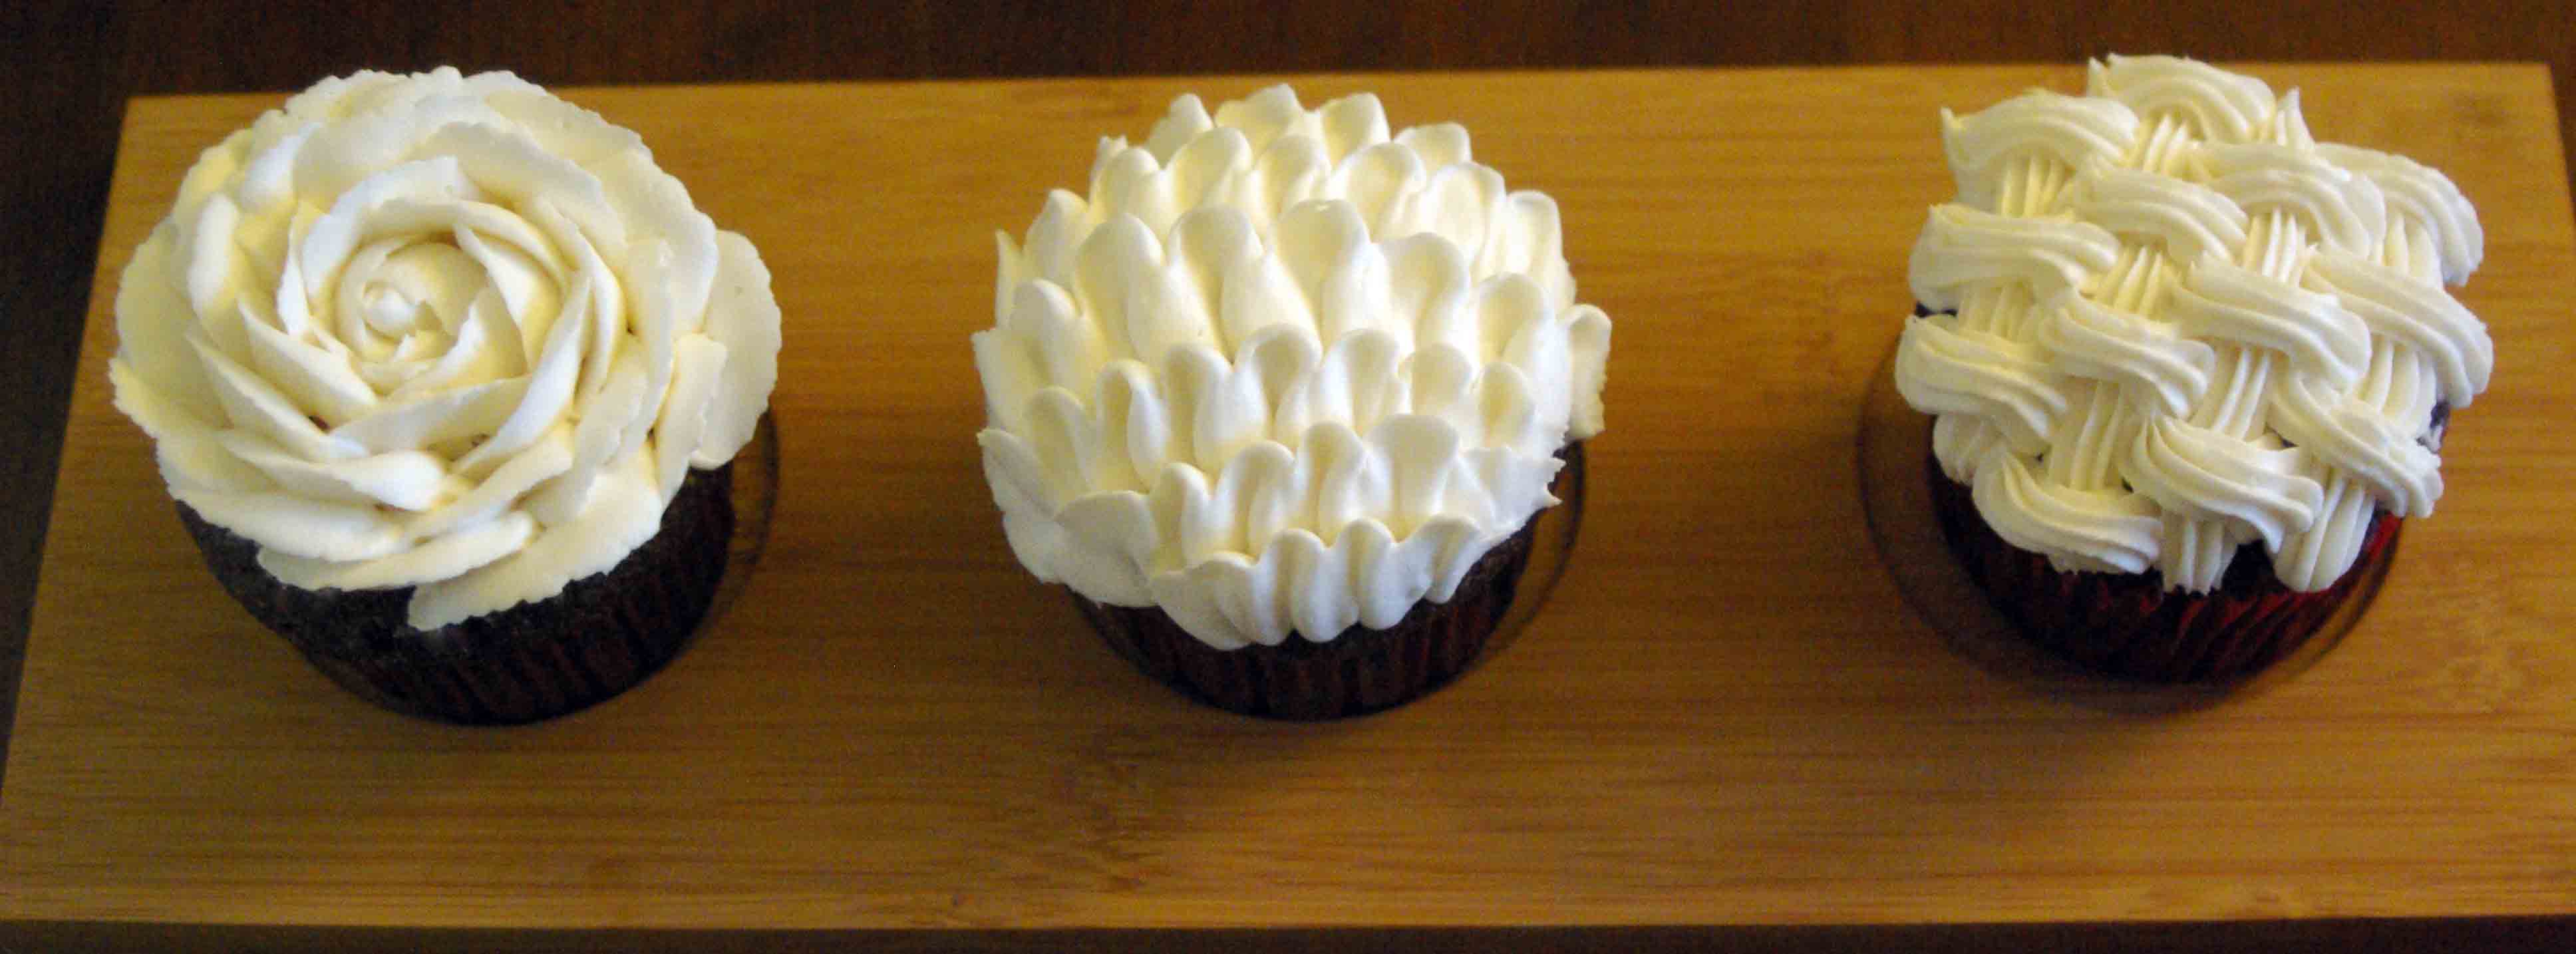
I have a problem. Even though I am working towards a masters in business I still feel the need to learn more, and make more. I have exams that I should be studying for but I just can’t help myself. I enrolled in a cake decorating class. I feel the need to constantly be learning something new. Just over a year ago I took up crochet, the year before that I learned to knit, now I am into cake decorating. Learning a new skill, craft or hobby for me is relaxing. I love making something out of nothing.
The problem really is that with each new hobby I add to my roster, I don’t give up the old ones. I am a hobby horder. With the hobby’s comes the supplies, and I have my fair share of crafting supplies. So much so that I can usually make things without going to the store. When I registered for the cake decorating class (2 hours before it started) the woman on the phone told me that I needed to bring 6 cupcakes. You might find this hard to believe but I already had 6 cupcakes in the fridge, I had to scrape the icing off but other than that I was ready to go. Here are some of my practice cupcakes all decked out with the fancy icing techniques I learned.