With every new year comes resolutions and I seem to make at least one similar resolution every year. Last year I resolved to listen to more music, and be more active. These resolutions went well together, and I did become more active while listening to music. This year I resolved to become a better listener, and to continue to be more active.
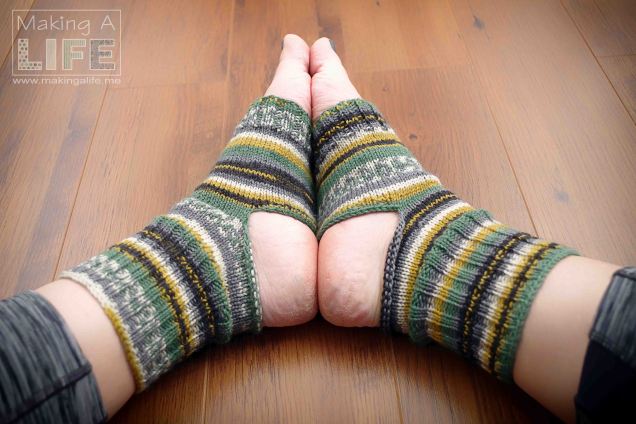
My resolution to be more active required the making of Yoga socks. I have been doing yoga in my living room but I end up with little people crawling under my downward dog. They also like to participate with me (really really close) by holding hands or sitting on me. My workout space is in my garage and it’s chilly, so I am thinking that if I wear socks maybe it won’t be so bad, and I won’t get interrupted by my little people. If you happen to have the same issues here is a pattern for yoga socks.
I was asked “what are yoga socks and why would I want them” by a follower the other day. In case you don’t know what, they are, they are socks designed to do yoga in. They come in a variety of forms but the main objective is allowing your toes to separate, and prevent you from slipping. You might want some if you are doing yoga in a cold space, or you really like to wear socks. I have a little issue in that my toes are attached, and the toe version of yoga socks will not work for me, so this is my solution.
Materials:
- Fingerling weight #1 yarn – 3 stitches per inch
- set of 4 double points and or 22″ circular needles – US 3/3.25 mm
- large needle
Pattern:
- ROW 1: CO64
- ROW 2: Join and K2 P2* repeat to end of row
- ROW 3-15: Repeat ROW 2
- ROW 16-38: Knit desired length depending on the size of your feet (24 rows for my size 10 feet)
- ROW 39: K2 P2* repeat for 32 stitches, K32
- ROW 40-45: repeat row 39 5 times
- ROW 46: K32, Cast off 32 (heel opening)
- ROW 47: K32, Cast on 32
- ROW 48: K64
- ROW 49-63 : K64 – 15 times
- ROW 64 : K2 P2* repeat to end of row
- ROW 65-103: repeat row 64 38 times or desired length
- ROW 104 – Cast off
- Cut yarn leaving a long enough tail to weave in ends with a needle
This pattern is intended for personal use only. I offer this pattern for free but I request that you do not sell it or any product made from it.


 There is a chill in the air and all of the trees have lost their leaves. Fall is here. My youngest has begun to point out nests in the naked trees. He tells me that the birds are snuggled in their nests making candies. If only that was true. He has been making nests around the house and snuggling in with his stuffies. I am taking my cues from him these days and fluffing up my own nest.
 I wasn’t going to let something as trivial as not having the right size needles stop me, so I made a pair. Using a pair of purchased 50mm short knitting needles (pictured) I cut them down drilled holes in the ends, tapered the cut ends, inserted and glued a rope, taped the rope to the needles and voila circular needles long enough to knit a king size blanket.


