Date Night Apple Pie

ready for bakingAre you looking for something to do on date night?  Have you baked a pie together?  We are always looking for things to do together at home after the kids go to bed, it seems that we get stuck doing the same things every week.  But this week was a little different, this week we baked an apple pie.  When I was out pedaling the excess plums around our neighbourhood, one neighbour insisted that we take apples in exchange for the plums.  So with a basket of local apples we set to work.  My husband is an excellent cook, but we rarely cook together because we have two little kids.  Its hard enough for one person to cook in our house never mind both of us together, someone needs to keep the kids from terrorizing each other.   So it was a nice treat to be able to be in the kitchen together without someone holding on to my arm, sitting on my foot or yelling at me.  Even if you don’t have kids cooking or baking together can be a nice change if you don’t do it often.

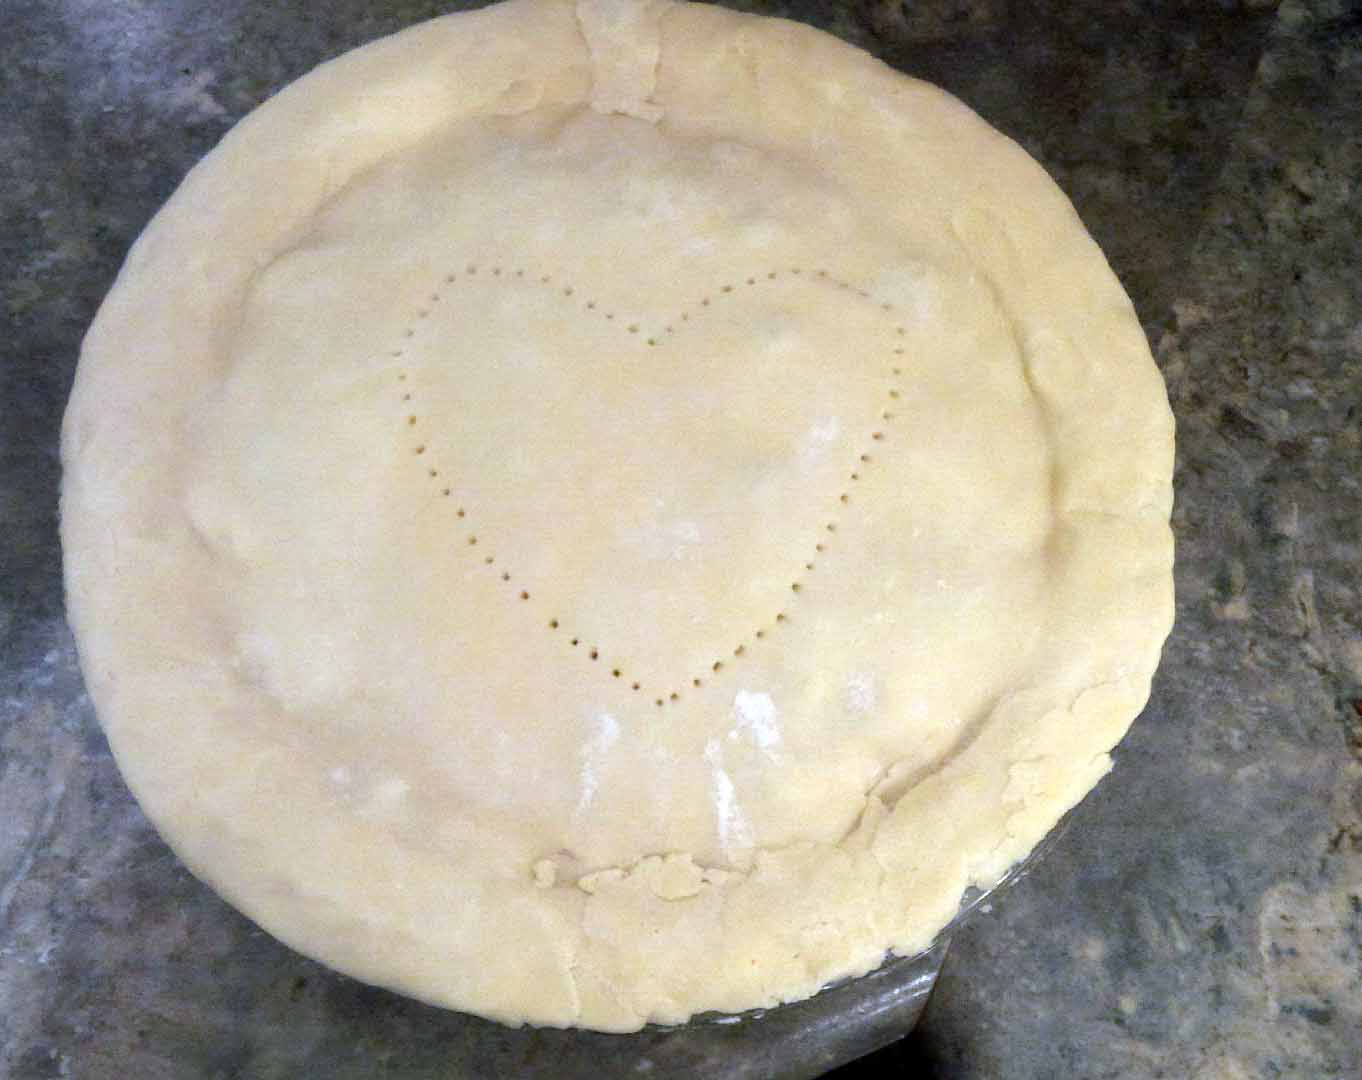
My husband cleaned the apples and prepared the filling while I made the crust.  This is a dairy free apple pie because we have one little person who has an issue with dairy, but you can easily substitute butter in the same quantity below.


Pie Crust

Ingredients

  • 2 3/4 cups flour
  • 2 tablespoons sugar
  • 1 1/4 teaspoon salt
  • 1 cup chilled margarine (margarine was in the freezer for about 10 minutes)
  • 1/3 cup ice water

Instructions

  1. Mix flour, sugar, and salt together
  2. Using a pastry cutter blend margarine into flour mixture until it looks like small peas.  I used my Kitchenaid mixer without an issue.
  3. Sprinkle water mixture while mixing until the dough forms into a ball.  You don’t want the dough to be too soft.
  4. Cut the dough into 2 balls, a larger one for the bottom and a slightly smaller one for the top.
  5. Put the balls into the fridge.
  6. Grease a 9″ or 9.5″ pie plate.
  7. Prepare the surface for rolling out the pie crust with flour, and flour the rolling-pin.
  8. Take the larger ball from the fridge and roll it out, and place the rolled dough into the pie plate.
  9. Fill the crust with the apple filling
  10. Roll out the top of the pie crust and place over the apples.
  11. Pinch the edges closed, and make holes in the top with a fork for the heat to escape while baking.
  12. Bake at 425 degrees for 40 minutes or until the top is lightly browned.

Pie Filling

Ingredients

  • 8 medium apples
  • 1/3 cup melted margarine
  • 1/2 cup of brown sugar
  • cinnamon – as much or little as you like
  • Chocolate chips, or chopped nuts – as many or few as you like
  • 1/2 cup of brown sugar

Directions

  1. Wash, peel and core the apples
  2. Melt the margarine
  3. Toss apples in margarine, sugar and cinnamon
  4. Mix in chocolate chips, or nuts as you wish
  5. Pour the apple mixture into the prepared pie crust

Keep cooking, and dating.


Logan’s Birthday Take 2

IMGP2111

I love to entertain, and I am often looking for any opportunity to throw a party.  Logan had 2 birthday parties for his second birthday, one with family and one with friends.  I know that throwing parties can be a lot of work, and some people just groan at the thought of throwing one.  But it’s not work when you really enjoy the preparation and the party planning.  In truth Logan’s birthday was just another reason to get friends together and have a chat, get caught up and have a bite to eat.

Logan is learning to speak and is putting words together in an attempt to communicate in sentences.  Pulling a party theme from his common words and phrases we came up with a woof woof puppies theme.  Food consisted of hot dogs, smokies in crescent rolls, chips, veggies, and plums from the yard.  It wouldn’t be a party with out Happy Cupcakes which were also dog themed.  For the doggie bags I made the kids dog ears, and puppy treats (malt balls).  There were also balloons dog themed of course.

Pictures of the Logan and his friends at the party.

Keep celebrating!

50 pounds of plums

IMG_20140728_210930We have 2 plum trees which are producing an abundance of fruit this year.  So what do you do with 50 pounds of plums?  So far I have made plum bread, plum chutney and frozen 20 or so cups for future use.  When Logan was a baby we made baby food with the plums, but he’s a little old now for that.  Of course we are eating them but there are only so many plums that I want to eat.  I have been handing them out to friends, and neighbours.  If you happen to have been one of my plum victims here are 2 recipes to try, and if you have a recipe to share please send it to me because I am running out of freezer space.

IMG_20140812_214029


Plum Bread – 2 loaves

Ingredients

  • 2 cups diced purple plums
  • 4 cups flour
  • 1 cup butter
  • 1 1/2 cups sugar
  • 1 teaspoon vanilla
  • 5 eggs
  • 1 teaspoon salt
  • 1 teaspoon baking soda
  • 3/4 cup vanilla yogurt

Directions

  1. Cream butter, sugar and vanilla together
  2. Add eggs one at a time, beat after each addition
  3. Mix flour, salt, baking soda
  4. Add 1/3 yogurt mix then add 1/3 flour mixture and mix, alternating until all is added
  5. Fill 2 greased loaf pans 1/3 full with batter, then add 1/3 of the fruit to each, alternating until all is added
  6. Bake at 350 degrees for about 50-55 minutes
  7. Cool in the pan for 15 minutes

IMG_20140814_130524


Plum Chutney (makes 2 medium-sized canning jars)

Ingredients

  • 3 1/2 cups of purple plums
  • 1 cup brown sugar
  • 1 cup white sugar
  • 3/4 cup balsamic vinegar
  • 1 cup of seedless raisins
  • 2 teaspoons salt
  • 1/3 cup of chopped onion
  • 1 clove of garlic chopped
  • 2 teaspoons mustard powder
  • 3 tablespoons chopped crystalized ginger
  • 3/4 teaspoon cayenne pepper

Directions

  1. Combine sugars and vinegar and bring to a boil, stirring until sugars dissolve
  2. Add remaining ingredients and mix well, bring to a boil
  3. Reduce heat and cook gently 45-50 minutes or until thickened
  4. Keep stirring to prevent chutney from scorching
  5. Pour into clean canning jars and seal
  6. Allow at least one month to season before opening

Keep baking, canning and creating.


If you like my blog please send me a comment, or click on the Top Mommy Blog button on the top right.


Logan’s 2nd Birthday

Logan turns 2 in less than a month, but we celebrated a little early this year.  We live 5,000 km away from all of our family so family birthday parties don’t happen often.  This past week we were fortunate to have my parents, sister and niece in town so we took advantage and threw Logan a pre-birthday party.  He is still a little young to understand what a birthday is but he is old enough to understand cupcakes.  I made him some Bear cupcakes at least that is what they were supposed to be.

bear cupcakes

Here are some of the pictures of the birthday boy, and his party guests.

Blackberry Jam

Who loves FREE food?  I sure do.  We have blackberries growing in our front yard but after we picked all of the ripe ones my oldest suggested we go in search for more.  It’s not hard to find blackberry bushes in our neighbourhood, but it is a little tricky to find the bushes that haven’t been picked over.  Did we ever score today though, we went a little off the path and found the mother load of ripe juicy berries.  Here are some pics of our berry picking adventures today.  There were a couple of people way more interested in eating than picking, but who can blame them.

I have never made jam before but now that I know how easy it is I have no idea why it took me so long.  With the blackberries we picked I made a small batch of jam, and I still have a couple of containers full of berries for the next baking adventure.  I love that this jam has 3 ingredients, how easy is that.  I followed this recipe and it turned out great.  Here are some pics of the jam in process.

Keep canning, crafting & creating.

If you like what you just read please click to send a quick vote for me on Top Mommy Blogs- The best mommy blog directory featuring top mom bloggers

Peach and Rat Season

peaches1Three years ago we bought the house in the city with a yard slightly bigger than a postage stamp.  We moved in at the middle of August and on the third day while I was cleaning a paint tray in the kitchen sink I looked out the window and saw a rat.  A huge ugly long-tailed rat sitting on the kitchen window sill.  I freaked out, completely.  After calling my husband to observe the rat, I called the real estate agent and demanded that he get the compost bin out of the yard.  Sorry about that Brad.  There was no way I was going anywhere near the compost bin to find out what was living in it. When the real estate agent did get the compost bin removed we learned that it was yard waste only.

We also learned that we had a peach tree with rotting fruit which had attracted the rat.  How is it possible that we bought a house with a postage stamp sized yard without realizing that there was a mature peach tree and two plum trees.  Well I don’t want to say that I am completely oblivious so I will tell you that we bought the house in April before any of the tree’s flowered, and the trees are on a strip of land about 3 feet wide at the side of the house, the opposite side from the front door.  Or I was so concerned with the interior I couldn’t give a rats ass about the plants, trees and bushes.  All are true.  I now give a rats ass about the trees because I have no desire to see a rats ass ever again.

So it’s mid July and the peaches are ready.  I have picked them, cleaned them and turned them into a fantastic peach bread.  The recipe is below if you happen to have a peach tree and a desire to keep rats away.


Ingredients

1 1/2 cups of flourIMG_20140723_212227

1/2 teaspoon salt

1/2 tablespoon baking soda

1/3 cup white sugar

1/3 cup brown sugar

1 tablespoon cinnamon (or as little as you like)

2 eggs

1/2 cup coconut oil

1/2 teaspoon vanilla

1/4 cup chopped almonds or other nut

1 1/4 cup chopped peaches

Directions

Preheat the over to 350 degrees.  Blend the eggs, coconut oil, and vanilla until well beaten.  Mix the flour, salt, sugars, baking soda, and cinnamon in a separate bowl.  Add the dry ingredients to the wet mixture in 2 parts mixing throughly.  Add the peaches, and mix until they are dissolved into the mixture.  Add the almonds.  Grease a 9×5 loaf pan, and pour in the mixture.  Bake at 350 for 45 minutes or until done.

Basil & Chive Pesto

deck 4I love basil.  Caprese salads are my favourite with tomato, bocconcini and fresh basil.  For this reason I am growing basil and tomato’s.  Recently the basil plants were a bit out of control, and the chive plant needed a hair cut badly.  So I made Basil & Chive pesto.


Ingredients

1 1/2 cups of packed fresh basil

1/2 cup of chives

3 cloves of garlic

1/4 cup grated parmesan cheese

1/4 cup extra virgin olive oil

2 tablespoons pine nuts

Directions

Combine all ingredients in a food processor or blender, and blend to a smooth paste.  You can use ice-cube trays to freeze what you aren’t going to eat any time soon.

IMG_20140712_173223 IMG_20140712_173640

It doesn’t look like much but it’s very tasty.

Keep chopping, growing and creating.

If you enjoy reading my blog please vote for me by clicking on the “Top Mommy Blog” button on the top right corner. On that site you can rate my blog. 10 is my favourite number, hint, hint. Even if you only click on the link it helps my rating.  Thanks.

Be-nana Bread

IMG_20140712_212942When I was younger we would spend part of each summer at the cottage, and Saturday mornings were reserved for the “market”.  For a couple of years my aunt & nana had a table and sold crafts, and we tagged along with our crafts.  We got to know the other vendors and local cottagers.  I believe it was at the market where we met the Hilborn family.  We also met Dick Marshall from Valley Haven Farm he sold eggs, chicken’s, baked goods and my favourite jam.  This recipe for Banana Bread belongs to him (which I have altered slightly) it is from the one cookbook I own called the “Carling Market Cookbook”.  Banana Bread or Be-nana bread as the kids call it is a house favourite.

Ingredients:

1 3/4 cup all-purpose flour

2 1/4 tspns baking powder

1/2 tspn salt

1/3 cup butter or coconut oil (I use coconut oil because we have a dairy allergy in the house)

2/3 cup brown sugar

2 eggs

2-3 crushed ripe bananas

Optional Ingredients:

Often I add a 1/2 cup of two of the following to the mixture, chocolate chips, walnuts, sun flower seeds, raisins, or dried cranberries.  Sometimes I top with dried banana chips, it just depends on what is in the pantry.

Instructions:

Blend until creamy the butter (or coconut oil) and sugar.  Beat into the butter mixture 2 eggs and the ripe bananas.  Mix flour, salt & baking powder in a separate bowl and add to the wet mixture in three parts mixing throughly.  Add in the optional ingredients.  Grease a 8 1/2″ x 4 1/2″ loaf pan.  Pour batter into prepared loaf pan.  Bake one hour at 350 degrees or until done.  Cool before slicing.


Keep baking, crafting and creating.

If you enjoy reading my blog please vote for me by clicking on the “Top Mommy Blog” button on the top right corner.  On that site you can rate my blog.  10 is my favourite number, hint, hint.  Thanks.


Celebrating Canada and Nana

I might get a little sappy on you with this one, just a warning. Canada Day is a special holiday for me, and believe it or not it doesn’t have anything to do with celebrating Canada.  While I was in my twenties before kids & marriage every year just before Canada Day I would make a call to the cottage to see if it was ok to come for the Canada day long weekend.  My Nana would always answer, your room is waiting and we would love to have you.  We would always have a chat about the weather, the weekend, and whatever.  I miss those chats.  I could still call the cottage and see if I could come for the weekend but someone else would answer and it wouldn’t be quite the same.  The last time I saw Nana was on a Canada Day long weekend just weeks after we found out that she had cancer.  We had a great visit but it was the last Canada Day that we got to spend together.

canada day cake

Every Canada Day she made this simple and delicious cake, or tricked my aunt or I into making it.  I think that she used to make the base out of angel food cake but I make mine vanilla, with vanilla icing and topped with cut up strawberries in the shape of the Canadian flag.  I have been making it for years to celebrate Canada but more importantly to keep traditions alive and to celebrate Nana.


We played tourist in Victoria today by taking the Hippo Bus it’s an amphibian bus so we got a land and water tour.  Here are some of my favourite pics.

After that we went to a Canada Day event in Esquimalt complete with a bouncy castle, Hayley Wickenheiser, and the Mounties playing hockey.  It doesn’t get much more Canadian than that, EH.  I will let you guess what was the most exciting part for a 2 & 5-year-old.  As you can see Logan was not quite so sure about the RCMP, but all in all a fun day.

Canada Day Dessert

We are celebrating Canada Day this weekend.  S and I made this quick no bake Canada day flag dessert.  It’s really just a pan of iced rice crispy treats.  The only alteration to the instructions on the rice crispy box, is that we substituted in coconut oil instead of butter, for our non-dairy eater.  If I was to do this again I would buy red icing (or red food colouring paste) instead of attempting to make it with those liquid drops.

IMG_20140629_144627

Happy CANADA Day!