BBQ Cupcakes Hot off the Grill

BBQ Cupcake detail 2We headed to a potluck BBQ on the weekend and wait for it, we brought cupcakes. If you have been following my blog for a little while you might have noticed that every other post is about cupcakes. I have been altering the posts between brain tumours and cupcakes just to keep the content light and fluffy.

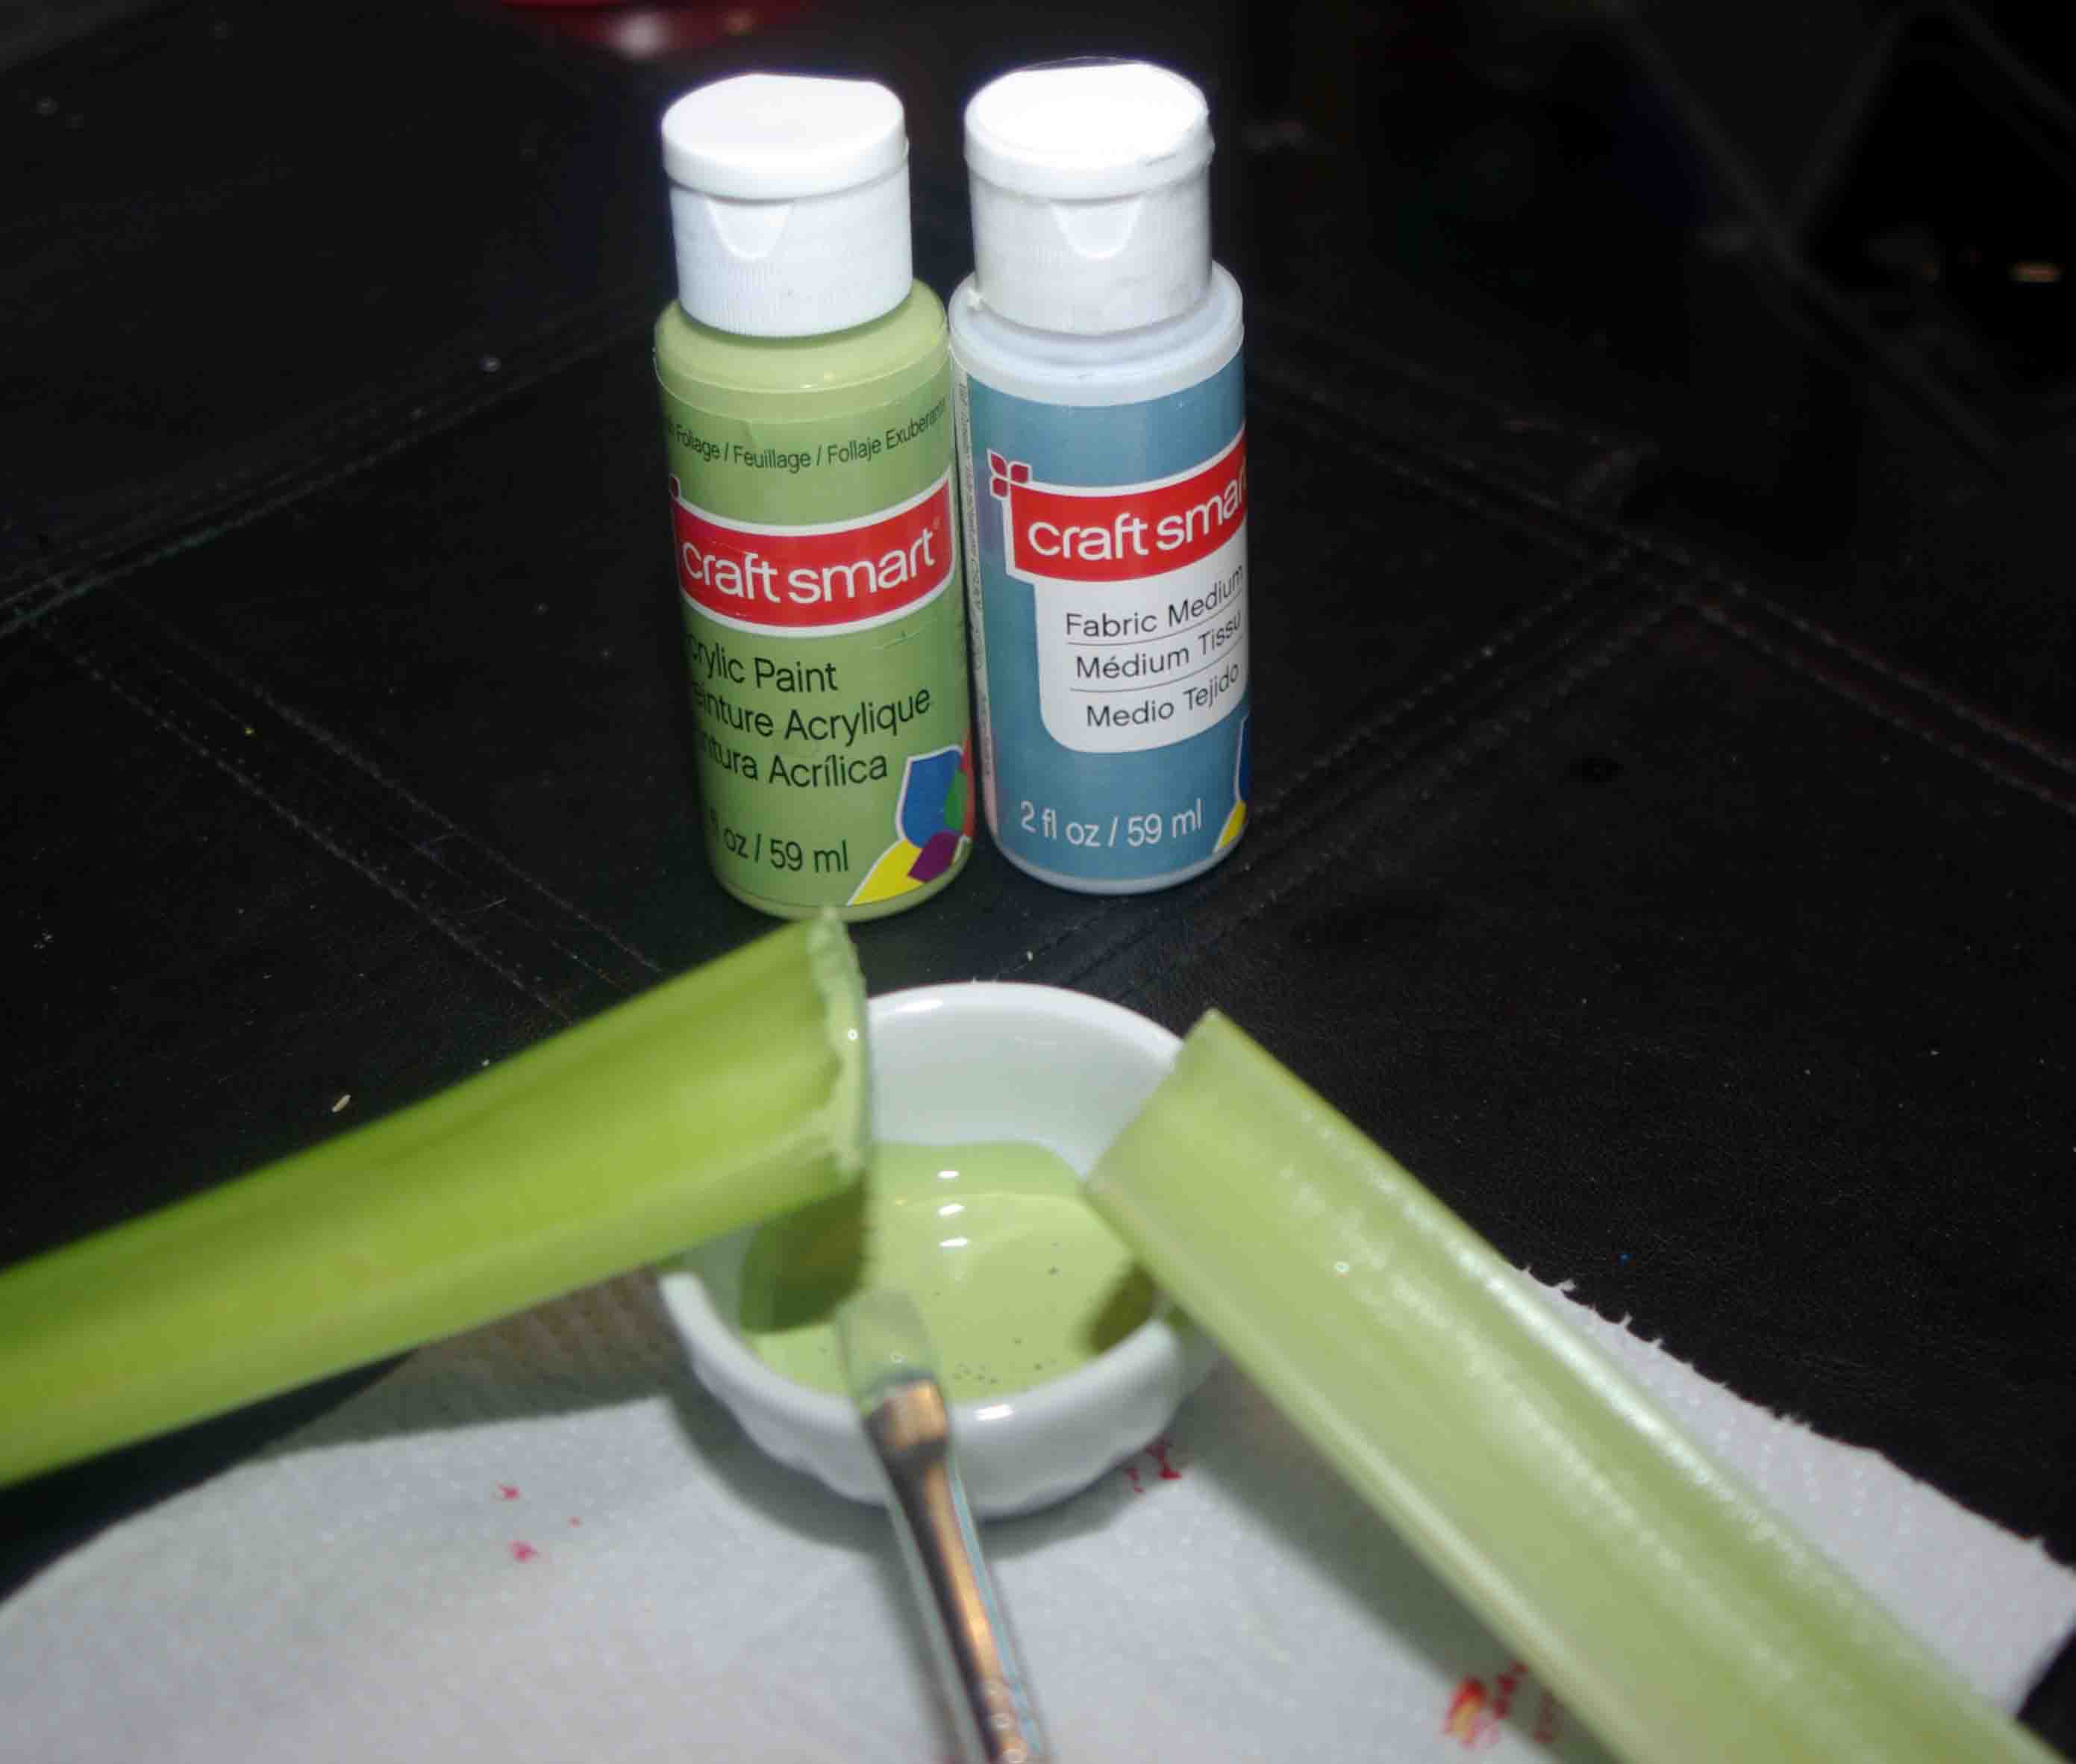
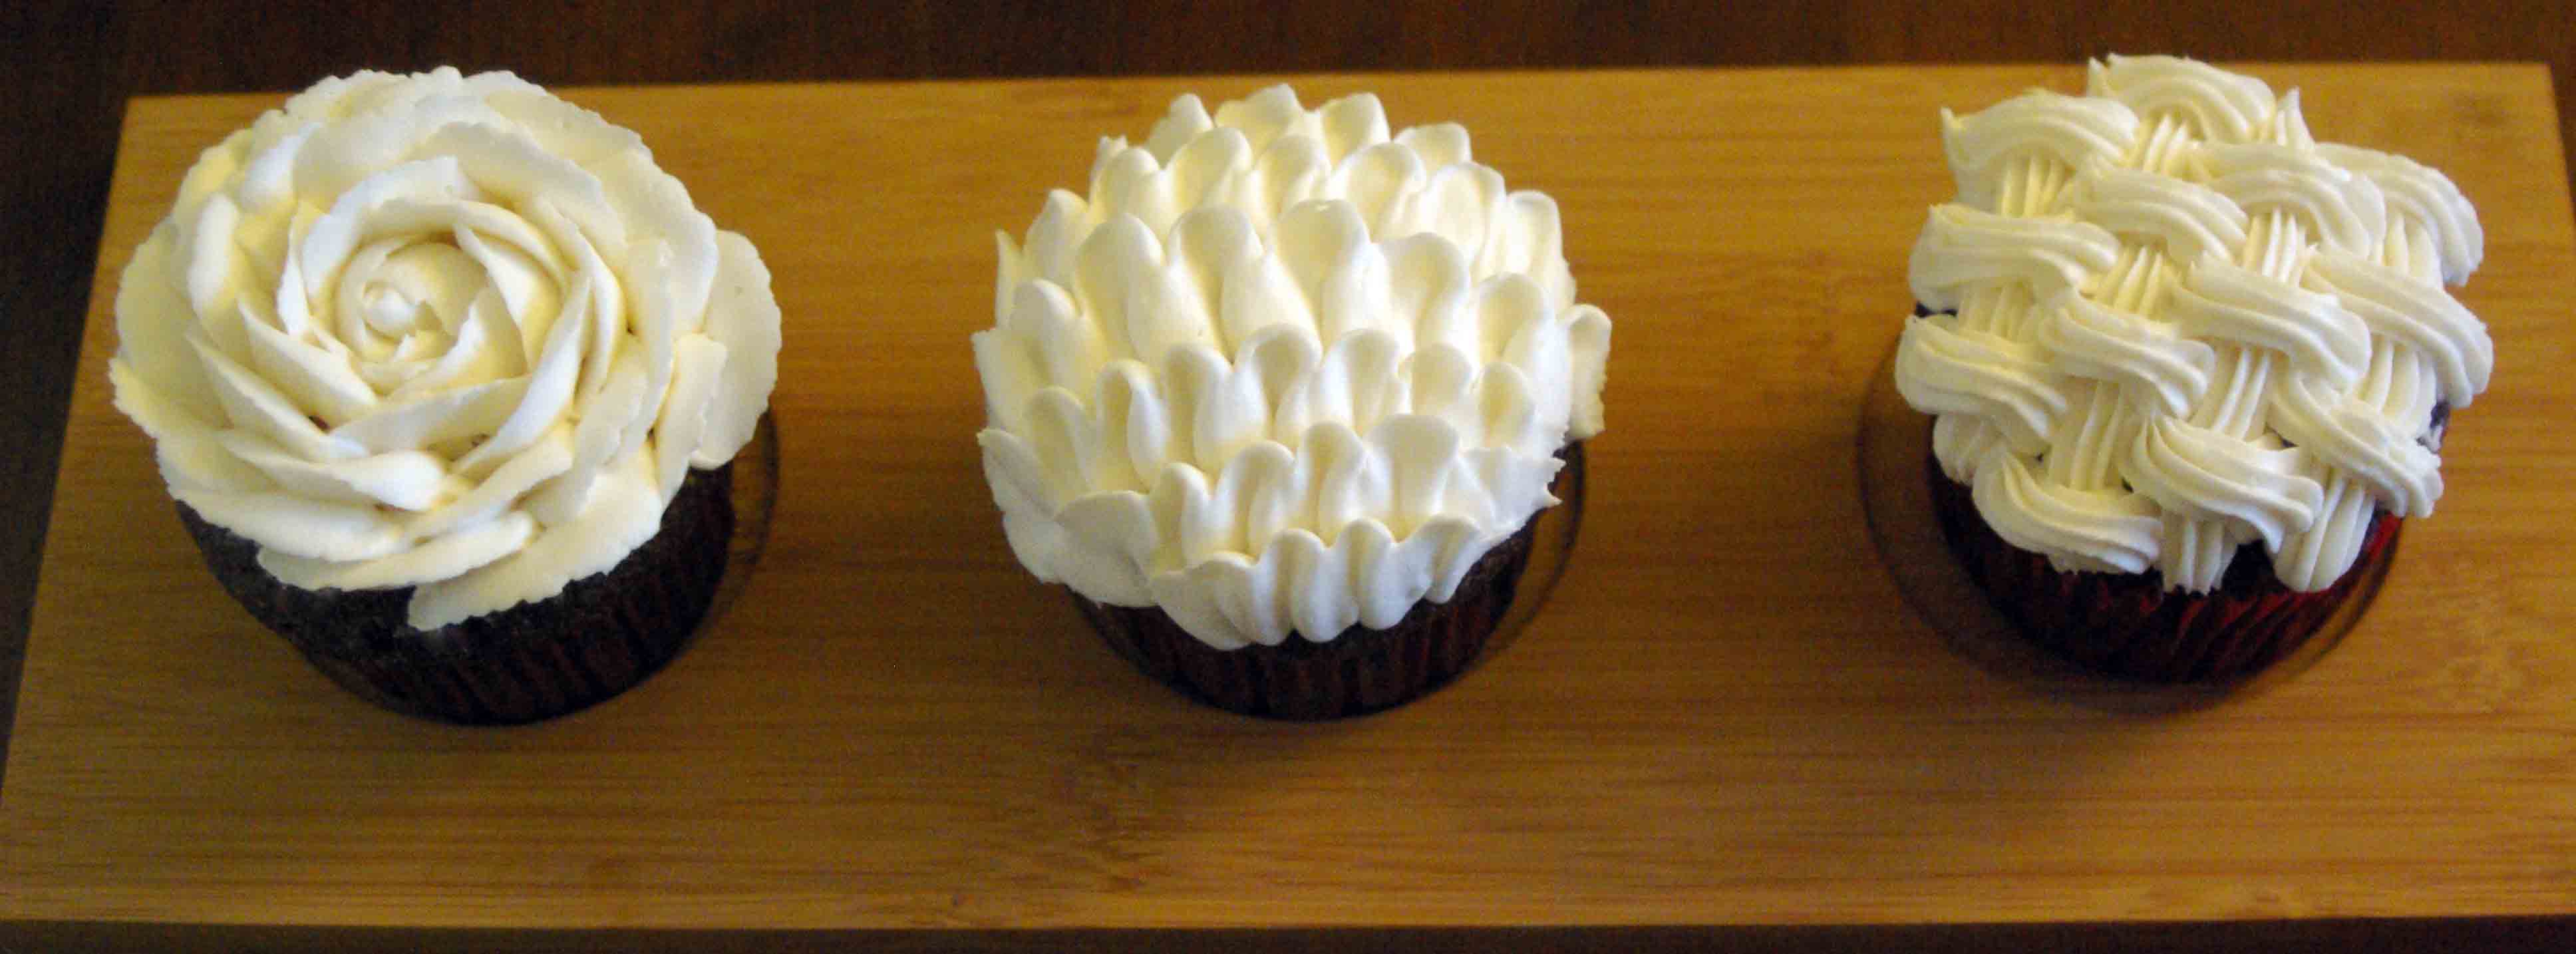
I started taking a cake decorating class and I was quite bummed when it got postponed because the instructor had to go in for surgery, the class will resume some time in August and I am hoping to be healed from my surgery in time to participate. During the last class the young girl beside me managed to get frosting in her hair. I will have to remember to keep my distance from her as frosting in my healing skull probably wouldn’t be “just what the doctor ordered”.

In keeping with the BBQ theme I stole this idea from my favourite site. In case you want to copy from me copying from Pinterest here are the instructions:

Instructions

BBQ Cupcakes steps

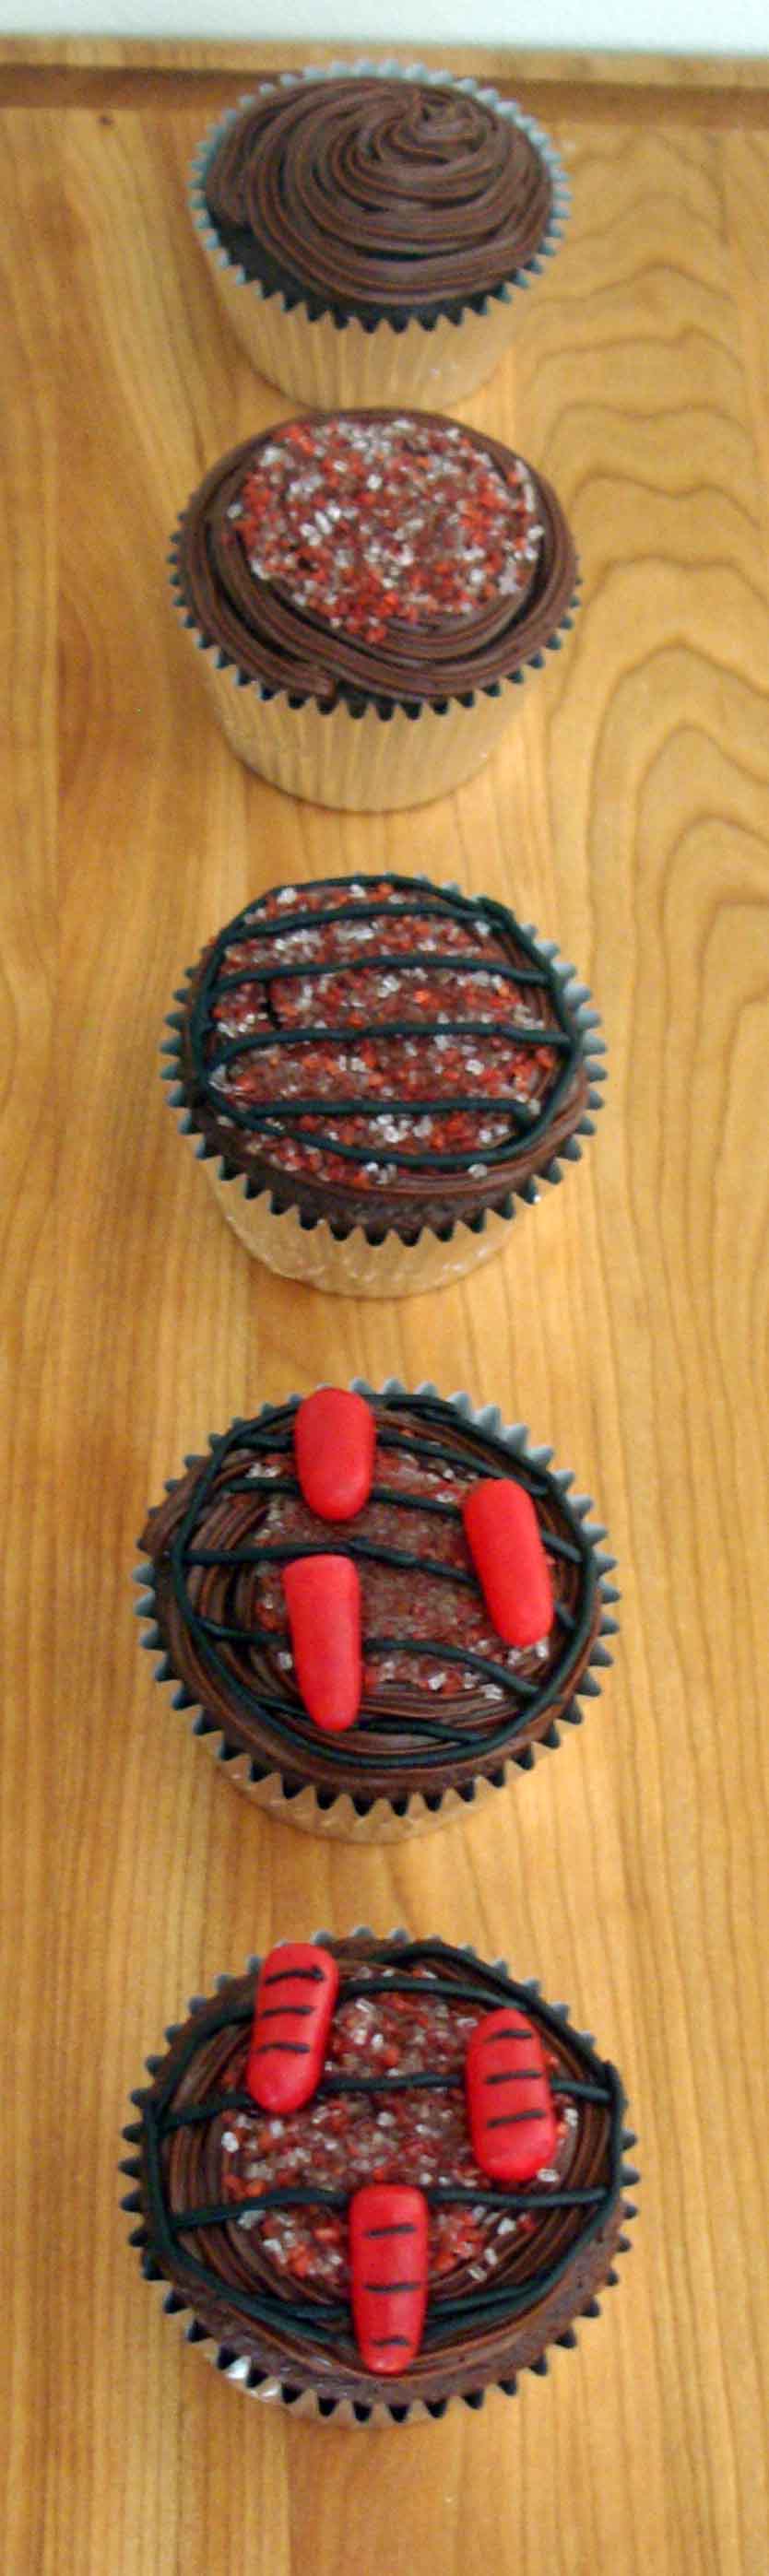
  1. Bake chocolate cupcakes (just follow the instructions on a boxed cake mix) or get really wild and bake them from scratch
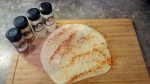
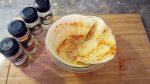
  2. Frost the cupcakes once they are cooled with chocolate frosting, they don’t have to be perfect because you are going to cover them in sprinkles (aka fire)
  3. Dip, roll or sprinkle the cupcakes with any combination of red, orange or yellow sprinkles (I used red and clear sugar sprinkles because that’s what they sell at the dollarstore and I am cheap)
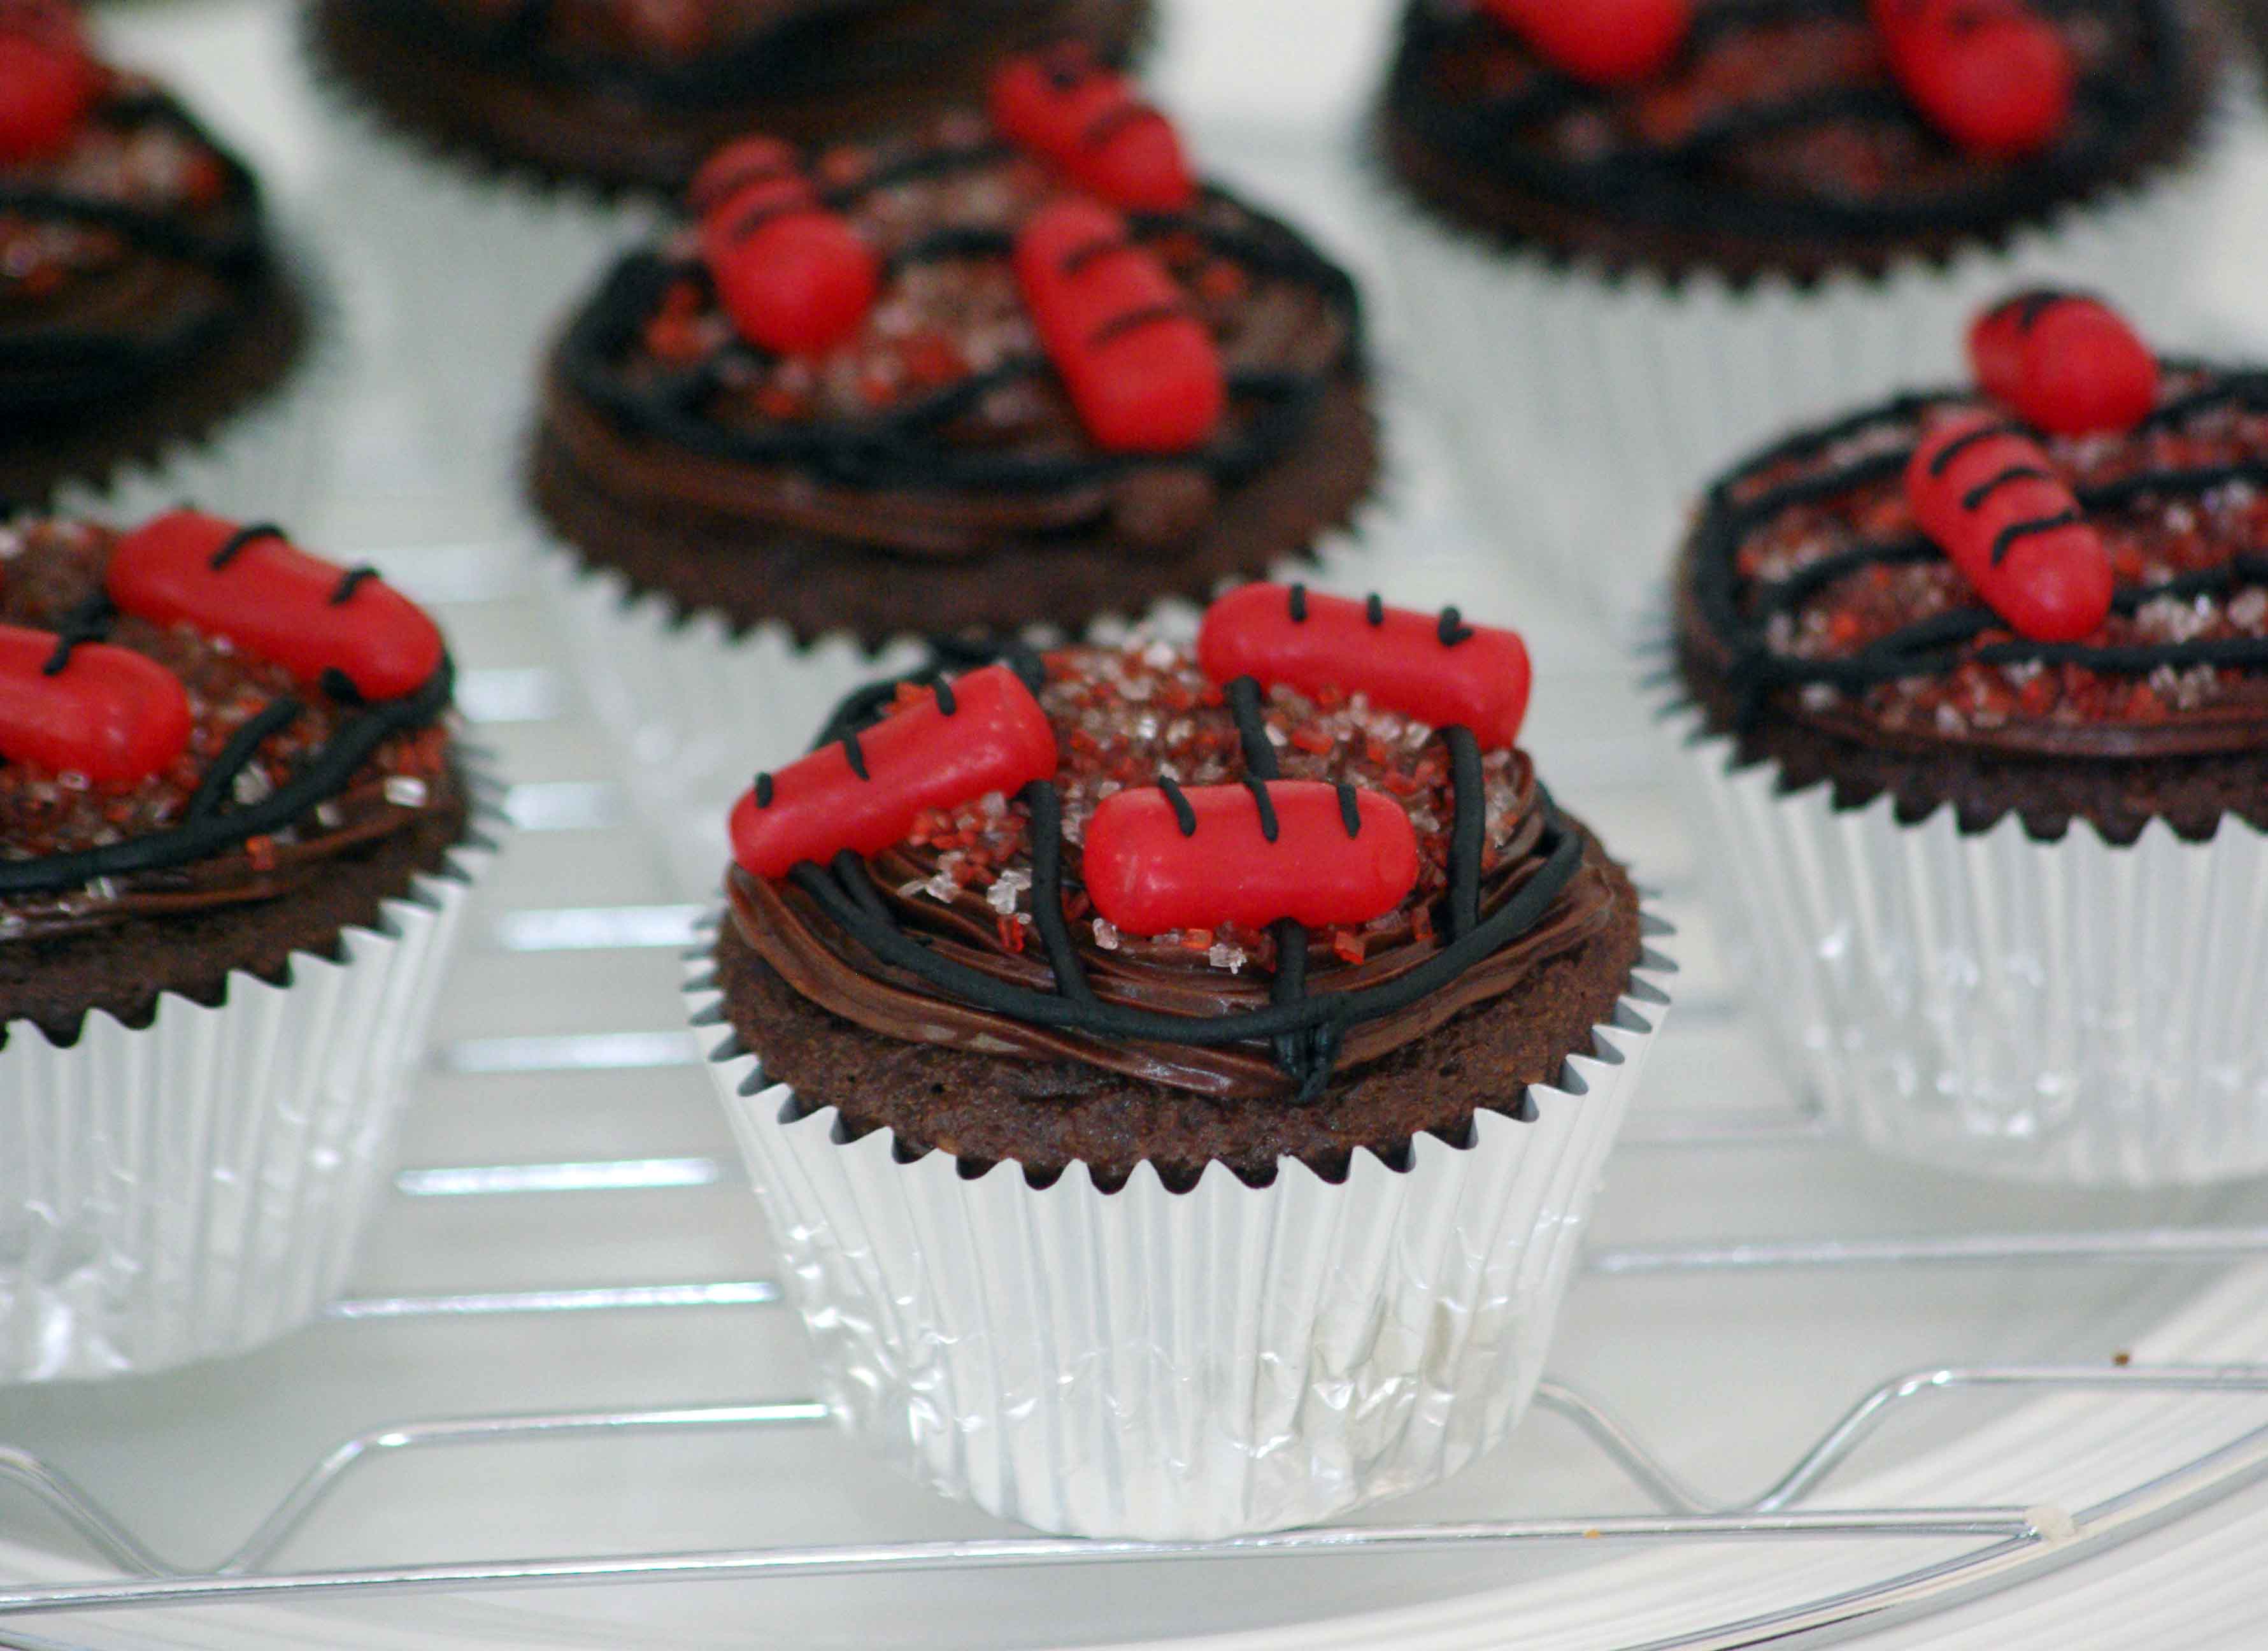
  4. Draw on a BBQ grill with black frosting
  5. Add on a few “Hot Tamales” or red Mike&Ike candies (aka Hot dogs)
  6. Draw grill marks on the candy

P.S. if you decide to send your husband to the store for hot tamales and he happens to have been born in another country where he wouldn’t have had access to these treats explain to him exactly what you want or you might end up with hot peppers.

Eating Beavers

For our Canada day celebrations I made beaver cupcakes for the little cannucks, or at least that is what they are supposed to look like. For some reason when I made them they did actually resemble the animal, now looking at the pictures I wonder how much wine I consumed while baking. Either way the kiddies ate them up.

If you want to take a run at them this is what I did, perhaps you can improve on it.

  1. baked and iced cupcakes with chocolate frosting
  2. for the tails I used lady finger type cookies cut in half
  3. the flag is helping the tail stand up
  4. ears are M&M’s
  5. eyes are fondant with brown food colouring dots
  6. teeth are white fondant
  7. the nose is the last step and it a red M&M

Canada Day Cake

canada day shirtI haven’t posted anything in a little while because I have been on a baking frenzy and I am supposed to be studying for exams. I write the first exam of three on Wednesday of next week. I just can’t let a holiday pass by without some sort of festive treat. We had a party on Canada Day to celebrate the birthday of our fantastic country and I made a cake, no real surprise there. I also made some festive cupcakes for the kiddies, I will reveal those tomorrow. We had a great time and the kids had a blast with water guns, and water balloons. Here is little L sporting his new Canada Day shirt for the occasion.

Historically I have made a sheet cake frosted with white icing, and decorated with strawberries in the shape of a Canadian flag. I thought that I would mix things up a bit this year. I have wanted to try making a cake with more than 2 layers. So I made a red, white, red layered cake to resemble the colours and pattern of the Canadian flag. It was more like pink than red but after a few drinks who could tell the difference. I did my best free hand maple leaf on the top. My free hand technique could use some work, but the taste is the same regardless of drawing ability.

DIY Teacher’s Gifts

I can’t believe the school year is over, maybe it’s because we got a late start due to a strike, or maybe it’s because this was my oldest’s first year of school. Either way it’s over and summer is officially here. Along with the graduation cupcakes, and the vacationing bear cupcakes I also made some teacher’s gifts. Last year I made watermelon tea towels with some lovely ladies, but this year it was a last minute race to get the presents done on time.

The cost of this gift is in no way related to the thanks I have for S’s amazing teachers this year. I am hoping that the thought and effort outweighs the $1.25 that I spent. Honestly if I didn’t tell you that I spent $1.25 you would never know. Being that I have a overflowing closet of crafting supplies I didn’t need to buy paint, but even if I had needed to the total cost of this project would still be less than $5.00. If you happen to have a pile of kids, celery, and a dollar store near by this might be right up your alley.

Supplies

  • scarf – $1.25 at the dollar store
  • Craft paint – $1.00 per colour (dollar store or craft store)
  • textile medium – $2.50 at a craft store
  • paint brush
  • Celery – if you eat celery then you probably already have what you need
  • paper towels

Instructions

1. wash and iron the scarves

celery rose 1

2. Lay the scarf out on a flat surface, and place paper towels under it so that you don’t ruin the table or get the scarf stuck to it

celery rose 2

3. Chop the end off of a bunch of celery, and cut one stalk in half for the leaves

4. Mix the paint and textile medium as per the bottle instructions

5. Paint the end of the celery bunch and stamp it onto the scarf

celery rose 5

6. Repeat step 5 until you have a desired pattern

celery rose 6

7. Paint the end of the celery stalks to make the green leaves, and stamp onto the scarf

celery rose 7

8. Repeat step 7 until all of the roses have leaves

celery rose 8

10. Once the scarf it dry iron it to set the colours

Being that the project cost me so little I made one for me too. I don’t usually take selfies, so I could use a little practice. But you can see how the scarf looks when finished, and I really don’t think you could guess that it cost me $1.25 to make.

celery rose scarf

Hobby Horder

I have a problem. Even though I am working towards a masters in business I still feel the need to learn more, and make more. I have exams that I should be studying for but I just can’t help myself. I enrolled in a cake decorating class. I feel the need to constantly be learning something new. Just over a year ago I took up crochet, the year before that I learned to knit, now I am into cake decorating. Learning a new skill, craft or hobby for me is relaxing. I love making something out of nothing.

The problem really is that with each new hobby I add to my roster, I don’t give up the old ones. I am a hobby horder. With the hobby’s comes the supplies, and I have my fair share of crafting supplies. So much so that I can usually make things without going to the store. When I registered for the cake decorating class (2 hours before it started) the woman on the phone told me that I needed to bring 6 cupcakes. You might find this hard to believe but I already had 6 cupcakes in the fridge, I had to scrape the icing off but other than that I was ready to go. Here are some of my practice cupcakes all decked out with the fancy icing techniques I learned.

class 1

Sunbathing Beauties

Beach bears 2 My oldest graduated from Kindergarten this week and I couldn’t pass up the chance to bake some cupcakes for the celebration party. In the process I learned that you can make and ice about 60 mini cupcakes from a standard boxed cake mix and tub of frosting. These bathing beauties were vanilla cupcakes with cream cheese frosting, dipped in light and dark brown (sand) sugar. Topped with a strip of fruit roll-up for the towel and a gummy bear. Garnished with a paper parasol these were a hit with the kiddies.

Ingredients

  • Boxed cake mix
  • eggs
  • oil
  • Tub of frosting
  • gummy bears
  • light/dark brown sugar
  • fruit roll ups
  • paper umbrella

Instructions

  • Bake the cupcakes as per the box instructions
  • Ice once cooled
  • Roll iced cupcakes in the sugar
  • Cut the fruit roll up into towel sized pieces (I did 1″ pieces for mini cupcakes)
  • put a dab of icing on the top of the cupcake to attach the towel (fruit roll up)
  • Put a dab of icing in the middle of the towel and attach the gummy bear
  • decorate with a paper umbrella

Graduation Cupcakes

IMG_7863
Image provided by Megan

One of the moms in my son’s class had the brilliant idea of hosting a party for 40 kids graduating from Kindergarten. It was an opportunity for all of the families to meet and a chance for all of the kids to get together on the weekend outside of the school environment. There were a group of moms that got together to plan the event. We rented a “block party” trailer from the city which included chairs, tents, tables and games. With 40 kindergarten children plus their parents, and siblings we ended up with just over 100 people in attendance. With a group that large we opted to book a local park with a playground. We ordered party platters of fruit, veggies, cheese and meat to compliment the chips, popsicles and cupcakes. There was also two surprise guests from the movie Frozen who made a special appearance.

The weather was fantastic. The turnout was amazing. And my kids were exhausted and that is the sign of a good party. I volunteered to bake the cupcakes, all 100 of them. It was a bit of an undertaking but it was a challenge that I eagerly accepted. If you happen to be planning a graduation party these cupcakes were a hit.

Ingredients:

  • boxeingredientsd cake mix
  • eggs
  • vegetable oil
  • canned frosting
  • fruit rollups
  • mini peanut butter cups
  • chocolate covered cookies
  • m&m’s

Instructions:

1. Bakes the cupcakes as per the box instructions and let cool

2. Place chocolate covered cookies upside down on a tray (so that you can put them in the freezer)

Step 2

3. Put a dab of frosting in the middle of each one

Step 3

4. Place the small end of the mini peanut butter cup in the frosting/cookie

5. Place the try in the freezer to set for 15-20 minutes

6. Cut the fruit rollup into 1/4″ x 1 1/2″-2″ strips

7. Remove from freezer once stuck together and flip all of the cookies over so that they are standing on the peanut butter cup

8. Put a dab of frosting in the middle of each cookie to adhere the tassel and M&M

Step 8

9. Place the fruit rollup “tassel” and them the M&M in the frosting and place the tray back into the freezer to set

10. Ice the cupcakes

11. Place the graduation cap (mortarboards) in the center of the cupcakes

12. Refrigerate or freeze (because we were having an outdoor party I froze the cupcakes so that the chocolate hats would melt slower. We had them out for an hour and only had a couple break before eaten)

Taco Salad

Taco saladHere’s a little secret. My husband is a much better cook than I will ever be. But as my family will attest to I rock a mean salad. Since I was diagnosed with a brain tumour I have been sitting back eating junk. I had previous to the diagnosis been running for exercise because it’s free, we have a treadmill and it’s a great excuse to buy new shoes. Exercise was also the reason why I had the intense head pains that caused me to go to the doctor and led me to the brain tumour diagnosis. So running is off the table for now. Which means that healthy eating is on.

I always thought that those fancy taco salad bowls in restaurants would be hard to duplicate. I am happy to say that I was so wrong about that. Last night I made a couple taco salad bowls and here are the instructions:

Ingredients:

  • 8″ flour tortilla shells (from a package)
  • onion powder, garlic powder, paprika, and chili powder
  • Olive oil
  • cooking spray

Instructions:

  1. Lay the tortilla shell on a flat surface, lightly brush with olive oil
  2. Lightly dust with spices
  3. Spray non stick cooking spray inside an oven safe bowl
  4. Put the tortilla shell into the bowl, pressing down in the middle
  5. Heat in the oven until crispy (350 degrees for 10 minutes in my oven)

Salad:

  • Romaine lettuce
  • Tomato
  • Yellow pepper
  • black beans
  • Chicken
  • Avocado
  • Green onion
  • Shredded cheese
  • Dressing (oil and balsamic vinegar)

Ahoy Matey

About three weeks ago my sister, brother-in-law and niece welcomed little Bennett into the family. In honour of the event and my sister’s love of cupcakes I made a little welcome cupcake dessert to celebrate his arrival. His room is decorated in a nautical theme so I ran with that for the cupcakes as well. Welcome to the family little guy.

anchor cupcakes

It only took 6 years…

We live 5,000 kilometers from all of our family which makes some things a little tricky logistically. When our first son was born we investigated getting him baptized. We had decided that we would try and baptize the kids into my husband’s religion which proved to be very difficult. I say investigated because we live on an island where there isn’t a church of my husbands religion. There were also some pretty strict rules about who could be the children’s godparents. The best option that we had available would prove to be very expensive, involve ferry travel and included strangers as godparent’s. Not exactly the ideal situation. So for years we didn’t do anything because we felt that we hit a road block. The solution that we finally chose was to baptize the children in a church that was neither mine or my husbands. That might seem extreme, but it was actually the best option for all of us. We found a church which would baptize the children and welcome us all. The minister was lovely and organized a ceremony on a very short timeline. The minister removed all of the barriers which we had previously run up against, which in my mind is the way that religion should be anyway. We met with him on a Friday and baptized the children on Sunday while we were visiting family. This also allowed our family to be present and be involved in the ceremony. My mom arranged a little party last minute and the whole day came together without any issues.

In my regular style the event included cupcakes!