Superhero capes

If you could choose a super power what would it be?

At a party this weekend I was asked what superpower I would chose if I had the option and my response was the ability to fly. Most people wrote something about reading thoughts or controlling people with their minds. Thinking about it now flying might not be the most practical super power but it sure would be fun. In keeping with the flying theme I made all of the super hero’s in my life personalized capes for Christmas. And if you are interested I will make one for you too, click here for details.

When you have more than one child I find that there is fighting over everything. Having personalized toys helps cutting back on the fighting (at least when they can recognize their own names).

Up, Up and away.

On the third day of Christmas…Clothes pin Wreath

On the third day of Christmas I made a clothes pin wreath.  We have a clear glass front door which means that if you feel the urge to have a midnight snack in the nude the neighbours can see all your bits and pieces.  It also means that anything hanging on the door should be nice looking from both sides.  Most door hanging decorations are only meant to be viewed from one side, the backs are typically unfinished or ugly.  My solution is a washi tape clothes pin wreath which is nice from both sides.  As a bonus the style fits with the modern aesthetic of the door.  Plus it was easy, fast and fairly inexpensive.

To make a similar wreath you will need:

supplies

  • Washi tape – get it at the dollar store, Target or Walmart (don’t spend the big bucks at Michael’s)
  • Clothes pins – dollar store
  • Foam core – dollar store
  • Chalkboard clothes pin – Michael’s
  • Scissors
  • A dessert plate
  • Fishing line and a magnet (for hanging on a steel door)

Instructions:

1. Decide how big to make the wreath.  I held the dessert plate up to the door with a couple of clothes pins on it to get an idea of what the finished size would be.  I traced the dessert plate onto foam core, cut out the circle and then traced a circle that was 1/2″ smaller and cut out the center to make a foam core donut.

2. Using 5 red and 5 green patterns of washi tape I started making the clothes pins.  I made 10 clothes pins with each colour, so 50 pins total, with red on one side and green on the reverse.  When alternating red and green you will have a 10 pin repeat.  I would suggest not mixing and matching the tape patterns when applying them to the pins or it will be difficult to get a nice pattern on both side.  I would make a set of 10 that matched with a red pattern on one side and green on the back (but don’t use those tapes again in other combinations)

3. Decide on the repeat pattern, and clip the pins onto the foam core circle.

4. Write a message on the chalkboard clothes pin, and hang.

On the first day of Christmas…

Two years ago I started a blog called Crafting through the holidays, and I wrote about a craft, baking, or holiday inspired project everyday for the 12 days of Christmas.  It was my first attempt at blogging, and two years later I am still at it.

So on the first day of Christmas my true love made for me….. Reindeer cupcakes!

reindeer cupcakes

There was a cupcake fundraiser at my son’s school this past week and these reindeer cupcakes were my contribution.

I used pretzels for the antlers, M&M’s for the eyes and nose, and a chocolate button for the snout.  I was thinking as I was making these that chocolate or yogurt covered pretzels would be good too.

On the first day of Christmas two years ago my true love gave to me a Veggie tree, check out this link for more info

veggie tree

I also made a cookie version of the reindeer cupcakes last year, check out this link for more info.

reindeer cookies

35 Sucks. Banana peanut butter chocolate pie does not!

35 sucksMy husband had a birthday last week which prompted me to ask, what kind of cake would you like?  His response…you know that one that your mom bought from the grocery store that one time when she was visiting, that was really good.  I respond with…the one that she got the day after I delivered Logan??  He’s like ya, it was good.  OK seriously I have no idea what the cake from the grocery store that my mom bought more than 2 years ago 24 hours after I gave birth to our second son tasted like, what it looked like or what it was called.  Neither could he, he just remembered that it tasted good.  I also have the feeling that if I could have found the right cake that it wasn’t going to taste the same as he remembered, so I opted for something different.  Frozen banana peanut butter chocolate pie

Did you know that fourth anniversary gifts are flowers, fruit and appliances?  I do because it was just our 4th anniversary and I bought my husband a Yonanas machine.  How romantic.  If you haven’t heard of it, it takes frozen bananas and turns them into the consistency of ice cream.  It might sound gross but it’s actually quite delicious, especially when you add chocolate, peanut butter, walnuts, whipped cream and coconut.  Apparently there are other ways to turn bananas into ice cream.  I saw some recipes that used a food processor, but we haven’t gotten to the food processor anniversary yet, so we don’t have one.  So if you have a Yonanas machine or a food processor and want to give this pie a whirl the instructions are below.

Frozen banana peanut butter chocolate pie

  • chocolate graham cracker pie crust (you can make your own or buy one from the little elves)
  • 4 frozen bananas – frozen with the peel removed
  • enough chocolate chips to line the bottom of the pie crust
  • 2 1/2 tbsp peanut butter
  • enough chopped walnuts to line the bottom of a pie crust
  • a sprinkle of coconut
  • whipped cream (in a can because I am lazy)

Instructions

  1. Remove the bananas from the freezer and let them thaw on the counter for 10-15 minutes depending on your room temperature.  You want them to be frozen but not rock hard.
  2. Heat the oven to 400 degrees.
  3. Line the bottom of the pie crust with chocolate chips and put in the oven for 3-4 minutes or until the chocolate is soft but still in the shape of chocolate chips
  4. Put 2 1/2 tablespoons of peanut butter in a microwave safe container and melt on high (our microwave is old so it took 30 sec)
  5. Take the pie from the oven and pour the peanut butter on top of the chocolate
  6. Top with chopped walnuts and put it in the freezer
  7. With a Yonanas machine grind up those bananas into an ice cream texture
  8. Take the banana ice cream and spread it over the frozen pie crust
  9. Top with coconut and put it in the freezer
  10. Take it out of the freezer 10-15 minutes before serving so that you can cut it.
  11. Top with whipped cream.
  12. ENJOY!

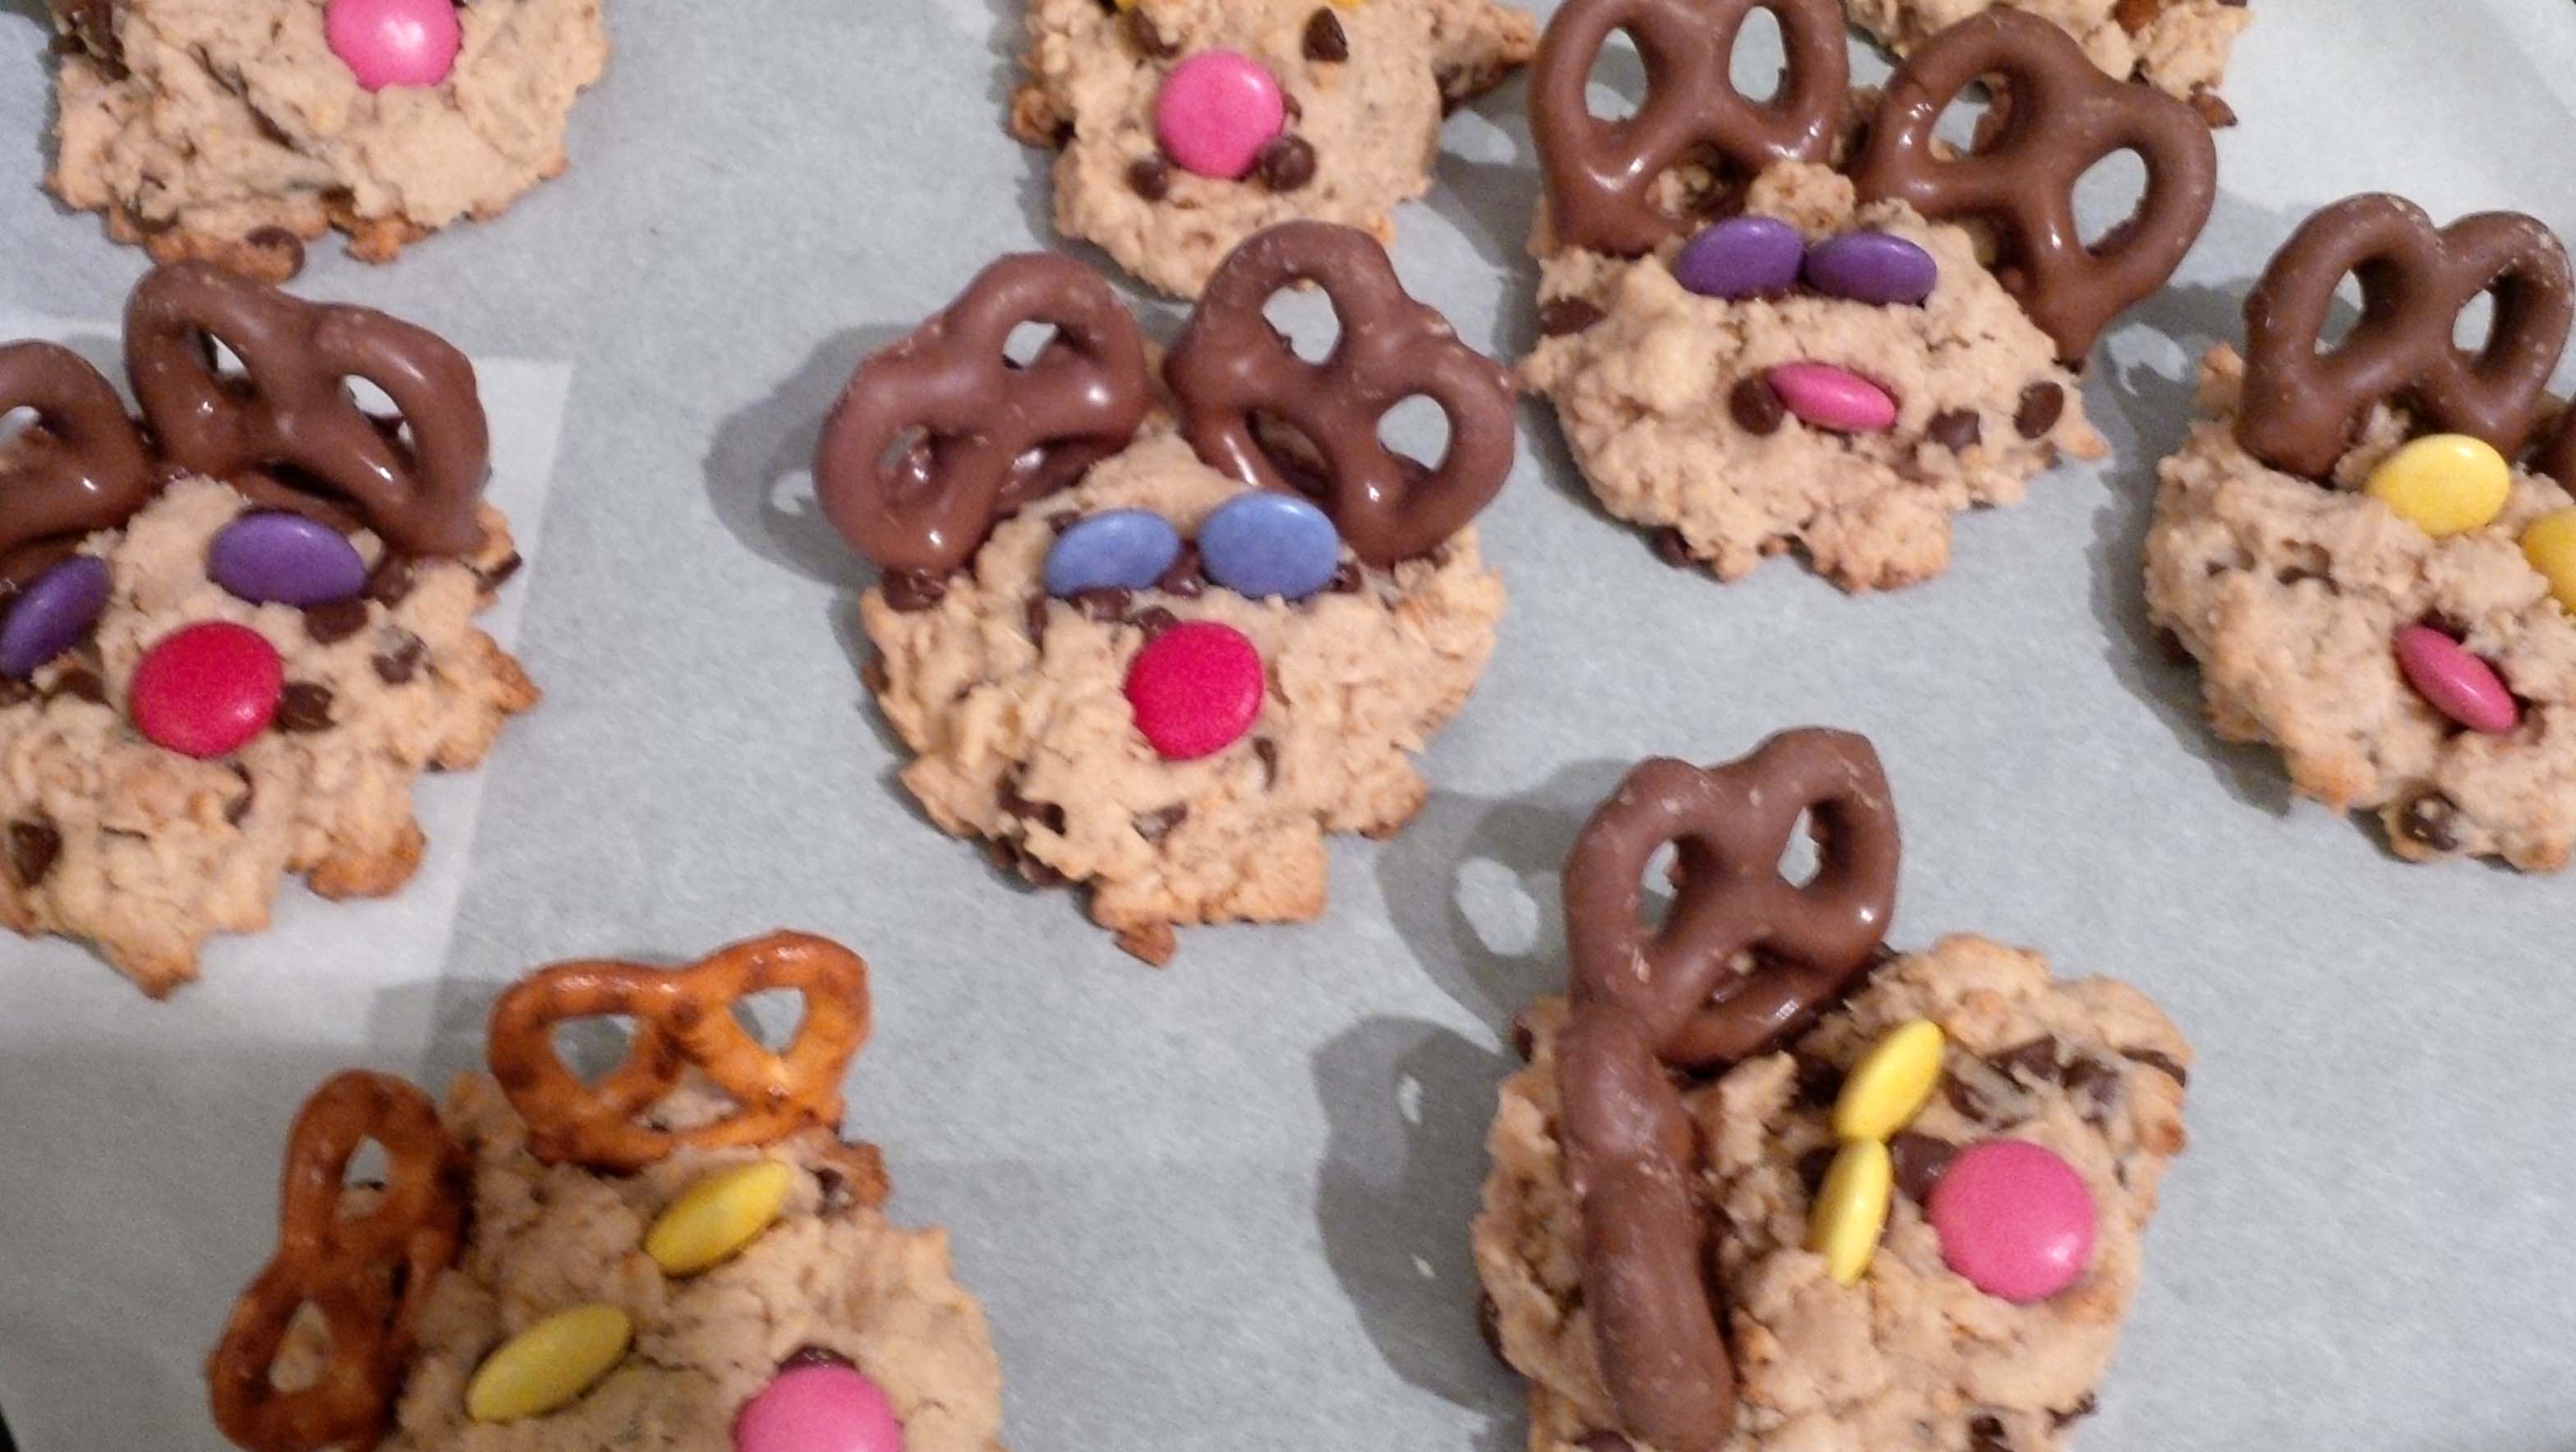
The kids were super excited for Daddy’s birthday.  Here are a couple of pics.

Like what you see, then vote for me!  Click on the button below, THANKS.

Visit Top Mommy Blogs To Vote For Me

Somebody is going to be a BIG Sister….

IMG_1945To be clear I have 2 boys and I am not pregnant. But someone near and dear to my heart is. My little sister is going to have another baby. Here is a pick of my niece Ruby who looks thrilled to be a big sister, in her BIG SIS shirt made my yours truly. I made a batch of these shirts recently for newly arrived babies, babies on their way and their siblings. I am looking very forward to this new arrival because babies come with nothing so they are the perfect target for my crafty goodness. Plus my sister doesn’t seem to mind being showered with my homemade creations. Congratulations to Erin, Phil and Ruby as they continue to expand their lovely family.  I can’t wait for April to arrive so I can meet this new little person!


I'm A Top Craft & Diy Mom Blogger @ Top Mommy Blogs - Please Click To Give Me A Vote

Remembering

Life is short and I am reminded of this everyday.  A child in my son’s preschool class last year lost her dad. Her father was a member of the Canadian military and died on leave on the way home to see his family.  I can’t think of anything worse for a child than to lose a parent.

As I was making the Christmas Sock monkeys (on a Saturday night after most of a bottle of wine) I got to thinking that if the socks had meaning the monkey would be more than just a decoration.  My mind went on a bit of a spiral and I ended up thinking about the family from Sasha’s class that lost their dad & husband.

Before I sound like a complete nutter, we see this family everywhere, our kids are the same age, they go to school together, our youngest go to a play group together and our kids have swimming lessons together. So in the school yard bright and early Monday morning I approached the mom.  I told her that I was thinking about them on the weekend and I explained my idea about turning her late husbands socks into sock monkeys for her kids.  It was a slightly awkward conversation  because I was asking for her late husbands socks and I have no idea how that conversation can be anything but awkward, but she brought me the socks a couple of days later.

When I started working on the sock monkeys I was in tears because one of the socks had pink paint on the toe and heel which I later confirmed came from painting their daughter’s room.  As I worked on these monkeys I thought about my own family and how I can’t imagine the pain of this family and the strength of the mom.  It’s my hope that these monkeys bring them a little joy even for a minute.

For a pattern and tutorial to make sock monkeys please visit Craftpassion.com.


Our Cross-dressing Christmas Tree

My favourite post from last Christmas

spaleksic's avatarMaking A Life

tree skirt 1 With three guys in the house the testosterone over flows. Much to my surprise the Christmas tree is male too.   I was told by my four year old that “the tree is a boy, and boys don’t wear skirts”.   Of course I learned that the tree was a boy only after I made it a skirt.  So the compromise, a train tree skirt. For the times that I have put up a tree in the last 18 years, the skirt was missing. Sometimes I put a towel, or piece of random fabric draped around the base of the tree. I just filled the bottom with presents and who knew what was hiding underneath. But this year I committed to “finishing” the tree. I was out shopping, and I saw a beautiful tree skirt (with a train on it) for $100.00, and thought hey I can make something like this. My go to for “floor” fabrics…

View original post 82 more words

Crafting from Kits – Felt Tree’s

A couple of weeks ago I was talking with my sister about making a craft and she was saying that she finds it super expensive to make things.  I totally know where she is coming from.  I have a large craft stash in a walk in closet in my office/craft room which I have accumulated over many years.  But if you aren’t stocked like Michael’s then I get it.  If you want to do the basic craft you need to buy all of the supplies, and that can be a drag.  Plus you need to be organized before you start to avoid multiple trips to the store.  There is a pretty good alternative if you want to try to make crafts but you aren’t sure if it’s for you, or you don’t want to invest in a lot of supplies.  When I started crafting the first thing that I tried was cross-stitch.  My mom (I was in the single digits at the time) would buy me cross-stitch kits which contained everything I needed to complete the craft.  So what I would suggest if you are interested in crafting but don’t want to buy a lot of supplies look for crafts that come in kits.  Aside for buying everything you need in a nice little package typically there is an age on the package that will give you an idea of the skill level required especially if you are crafting with little people.

Often I pickup craft kits on sale at the end of a season or with a coupon (I don’t want to pay full price for anything ever).  The kit that I bought to make these trees cost $6.00 or less and it came with the felt, stars, red beads, needle and string to make 5 ornaments.  I wasn’t a huge fan of the string it came with the kit so I raided my ribbon supply, I call it artistic expression.  I rarely follow a recipe or pattern exactly, where is the fun in that?  Sasha (age 5) helped me sort the colours, and make one tree after which point he got bored and walked away.  Then his brother (age 2) got a hold of the 5 finished trees and started pulling them apart.  Crafting with kids is fun?

It’s a great time of the year to pick up a craft kit so go out there and get one, I dare you.

Vote for me @ Top Mommy Blogs - Mom Blog Directory

Crafty Mommas – Monkey Making

This past Sunday I hosted a monkey making party.  I really enjoy making things and I want everyone to know how to make things too which is why I invite people over and attempt to teach them.  I say attempt because I realized this weekend as I tried to show someone how to sew a specific part of the monkey that I am not the best crafting instructor.  I think that it is mainly because I have been making things for so long that I don’t even realize what I am doing or how I am doing it.  When Jen asks me how I sewing a specific part I don’t even know how to explain, I am just sewing.  Sewing is so natural to me that I don’t question what I am doing or how I am doing it anymore, I am just sewing.  This isn’t particularly helpful but I am at least aware now, and next time I might be able to explain a little better.  Here are some of my lovely friends crafting their monkeys.  They look super intense but really we had fun.

Vote for me @ Top Mommy Blogs - Mom Blog Directory

Love Socks

Today is our 4th second anniversary for 2014 which sounds complicated.  We were legally married in Canada and then went and got married in Mexico with our friends and family (my mom sent me this great collage today of pictures from the wedding).  Looking at these pictures today I am longing for the beach but I will have to settle for Café Mexico for dinner.  Today is our Mexican wedding anniversary and to celebrate I made my husband love socks.  We both happen to have the same initials and not because I took his last name, it just worked out that way which is why both feet have SP in the hearts.  It’s getting to be the time of year that wool socks are so warm and cozy inside winter boots (or rain boots if you live on the west coast of Canada) so I thought he might like a pair of warm woolly socks branded with my initials or his or both depending on his mood.  Cheers to love and hand knit wool socks seems like a great combination to me.