I am a fan of nice surprises and I love getting mail, so imagine my delight when I opened a package today and these cuties were inside. Thanks Mom, you are the best.
 I saw a blog post about making felt hearts to give to someone who might be nervous about a new situation and I though that it would be perfect for the first day of kindergarten. So with a scrap of felt, embroidery floss, and some stuffing I whipped up a pocket heart for Sasha. I told him a story about making it from my heart and that I would know when he squeezed it if he was nervous. So on the first day of school he grabbed it on his own, while we were running out the door. The first thing that he reported when I picked him up was that he didn’t need it. The next day we searched the house in a panic to find his pocket heart before we left, and again he reported at pick up that he didn’t need it. On the third day he started crying in the line up because he forgot it, so home I went to get it and bring it back to the school. Note to self, make a couple of these and stash them in the car and purse.
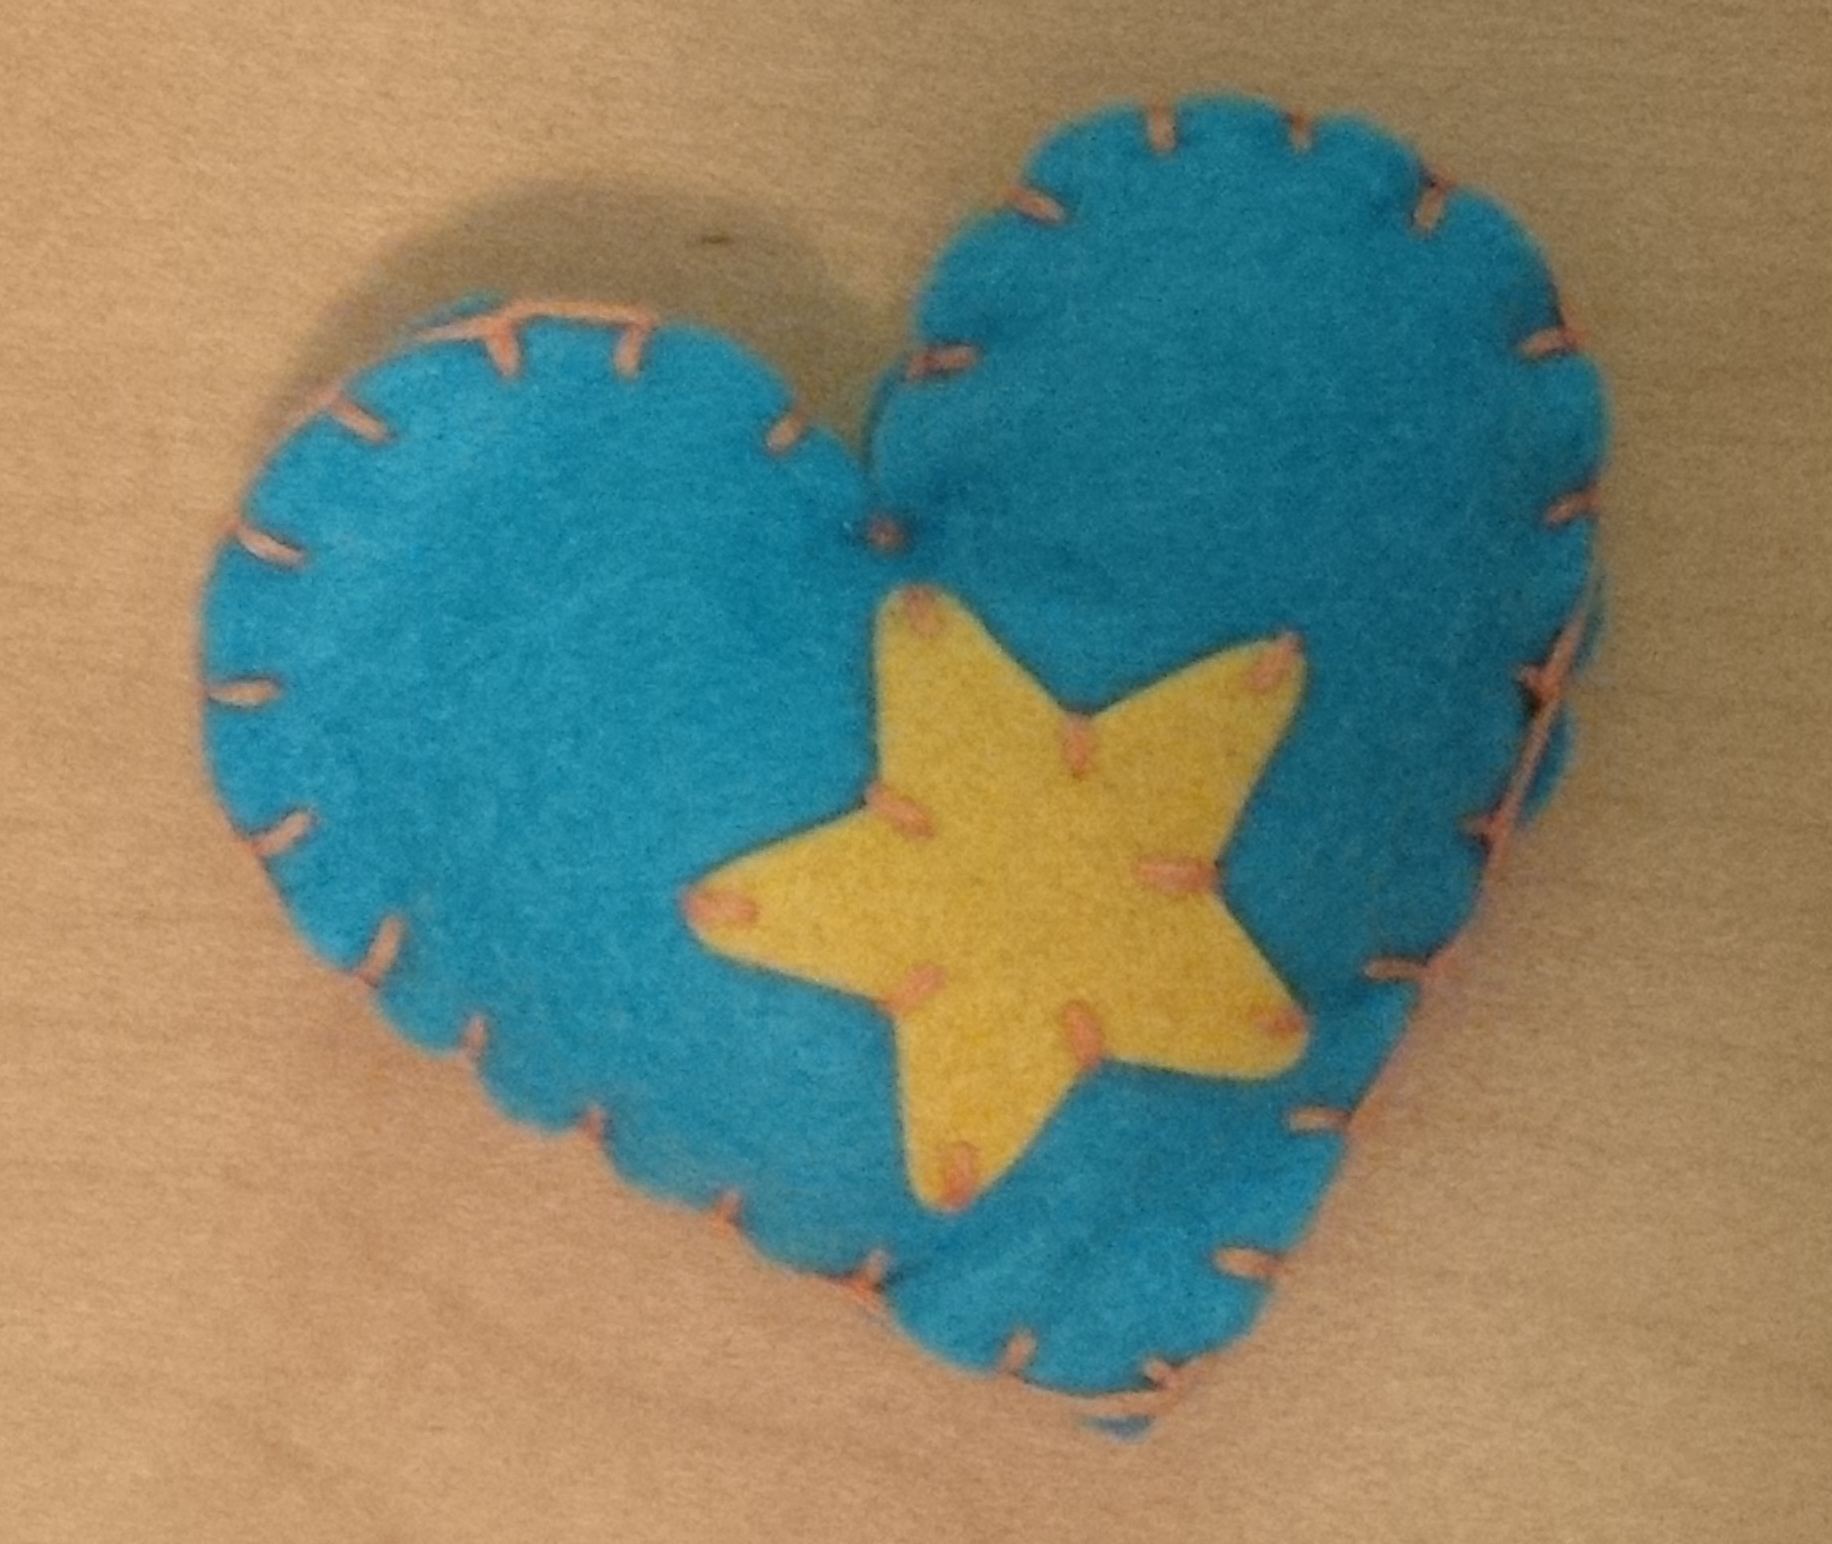
If you want to make one for someone that needs a little love in their pocket see the attached PDF pattern.

 Sasha started Kindergarten this week, after a slight school suspension. The teachers in BC were on strike advocating for our children, which caused a three week delay in the start date of classes. I wanted to do so many fun crafty things for the first day of school, and because I had no idea when it was going to begin I procrastinated. I managed to get two little projects completed, the first one is a blackboard sign. The second project I will blog about tomorrow.
A shout out to Janaya for the reminder on this one. To make this sign I used an art canvas (dollar store) which I spray painted with chalk board paint (Rona). It was that easy. You are supposed to let the paint dry for 24 hours, but who has time for that, so after 15 hours or so I wrote out the wording and erased, and wrote it again. Kudos to the teachers who write in chalk everyday it’s a skill I have yet to acquire.
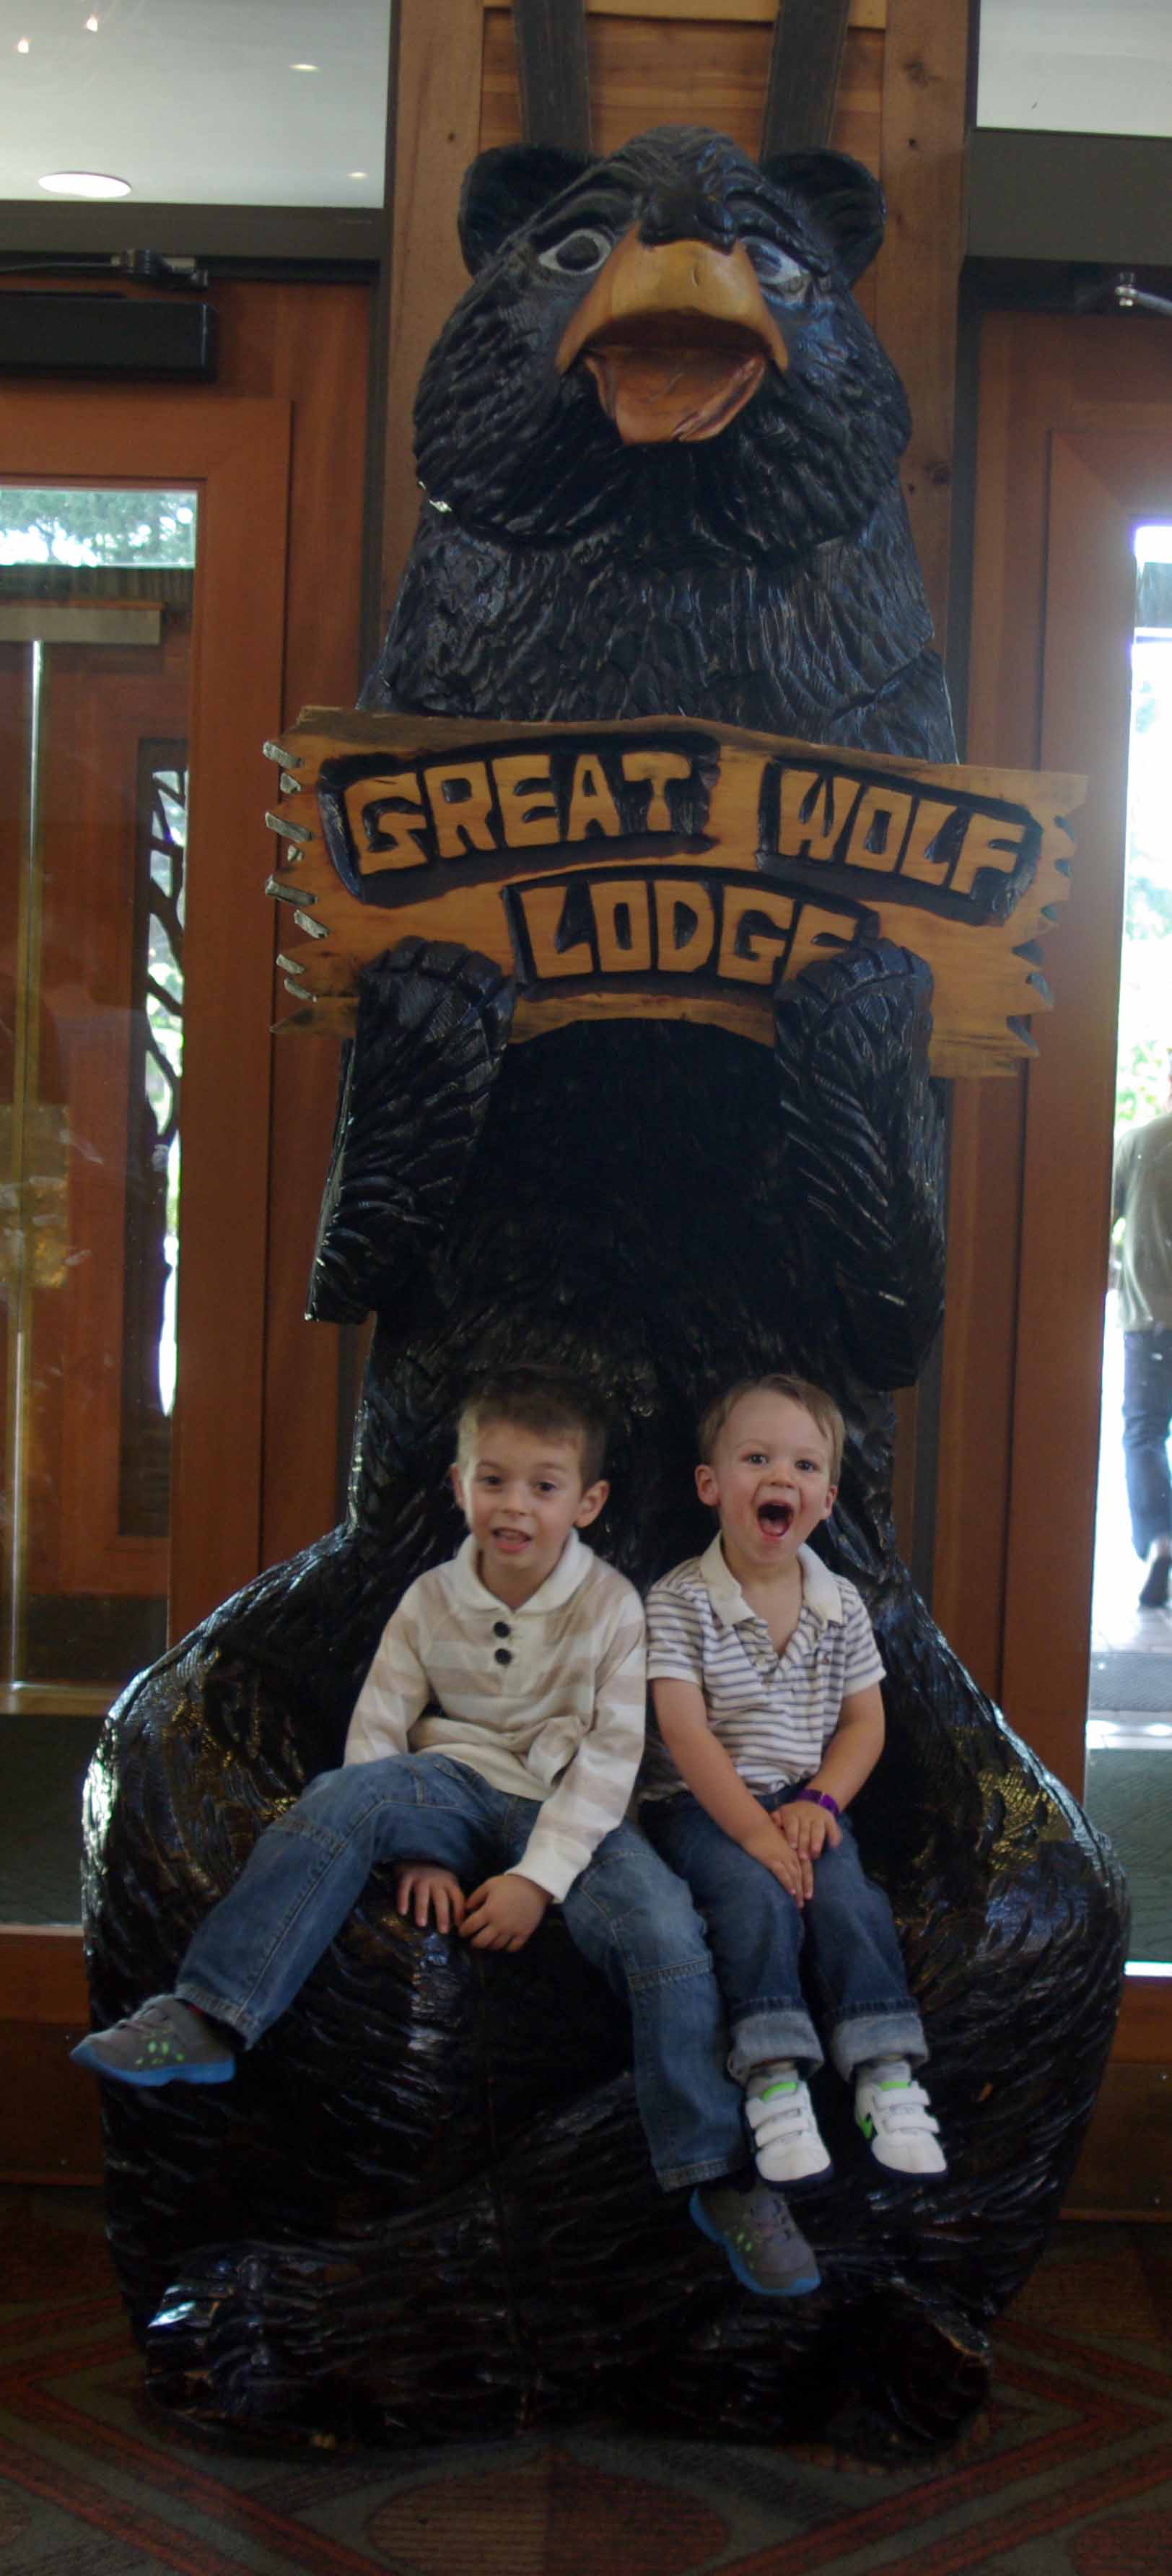 While my husband and I were lapping up the sun in the Seychelles we decided that we should take the kids somewhere fun (I think it was guilt), so we booked a little weekend get away to the Great Wolf Lodge in Washington state. If you haven’t heard of Great Wolf Lodge it’s a chain of an indoor water parks/hotels and ultimate kid paradise. I am not a huge fan of water parks, I don’t know why. Maybe I am too old…but this trip wasn’t about me it was for the kiddies aged 5 and 2.
So we packed up the car and headed to the border via the ferry. We live on an island so most trips require a plane or ferry, fun times. We dropped off a car at the ferry terminal (Black Ball/Coho) the night before to try to secure a spot on the first ferry of the day, and it was a good plan because we hadn’t made a reservation and space was tight. We then drove for 3 hours to Great Wolf Lodge, it all went pretty well and involved a game or two of Eye Spy.


When we got to our room our oldest was elated because he got to sleep in a bunk bed, the top bunk of course. He was so excited before we left, not about the water park, but about the bunk bed. We could have saved a lot of money and just bought him a bunk bed. Our youngest was not interested in sleeping in a bunk bed, he thought that our bed was his (he sleeps in a double bed at home so it’s not a huge stretch). After we got over both the elation and the trauma of sleeping in bunk beds, we hit the water park. But first a stop at the magic wand store. There is a game that all of the kids and adults were playing that involved a wand that lit up objects around the hotel. The guy in the wand store said that it was geared to 7+, so we got the wand and walked around the hotel lighting things up, but we weren’t on the quest. But those on the quest were running around the hotel, and appeared totally into it.


So on to the water park. There was a great kids play area which kept both kids pretty occupied until bed time.


We went to the clock tower for story time. And tucked the little peeps into their bunks just to do it all over again the next day.


The hotel was on the pricier side but not unreasonable and it included entrance to the water park for 3 days. The prices were pretty inline with what we would normally pay in restaurants and hotels so no complaints here. The only suggestion for improvement I would have is in the housekeeping department. In the pool area there was a lot of food/containers on the ground/tables, really other guest should just put their garbage in the bin, but if not then the hotel should be cleaning up the common areas. Also our room wasn’t cleaned and when I called down to request it be cleaned the housekeeping staff were gone for the day. Not a huge deal except we have a little person in diapers. In a place that caters to families housekeeping should be flexible enough to work around naps. In most hotels I wouldn’t ever suggest it but in a family resort it is to be expected.
I imagine that another trip to the Great Wolf Lodge will be in my future, I am not a fortune-teller but I am a push over for my little peeps.


 I am feeling in the giving mood today. If you would like to win a custom knit pumpkin hat please:
1) Like Making a Life on Facebook – Click on the Facebook box on the right hand side of this blog post
2) Share the post on your facebook feed
3) Post the size that you would like as a comment on the facebook post, or the age of the person that it is for
I will do a random draw once I reach 100 likes on Facebook.
My boys in their pumpkin hats last year.


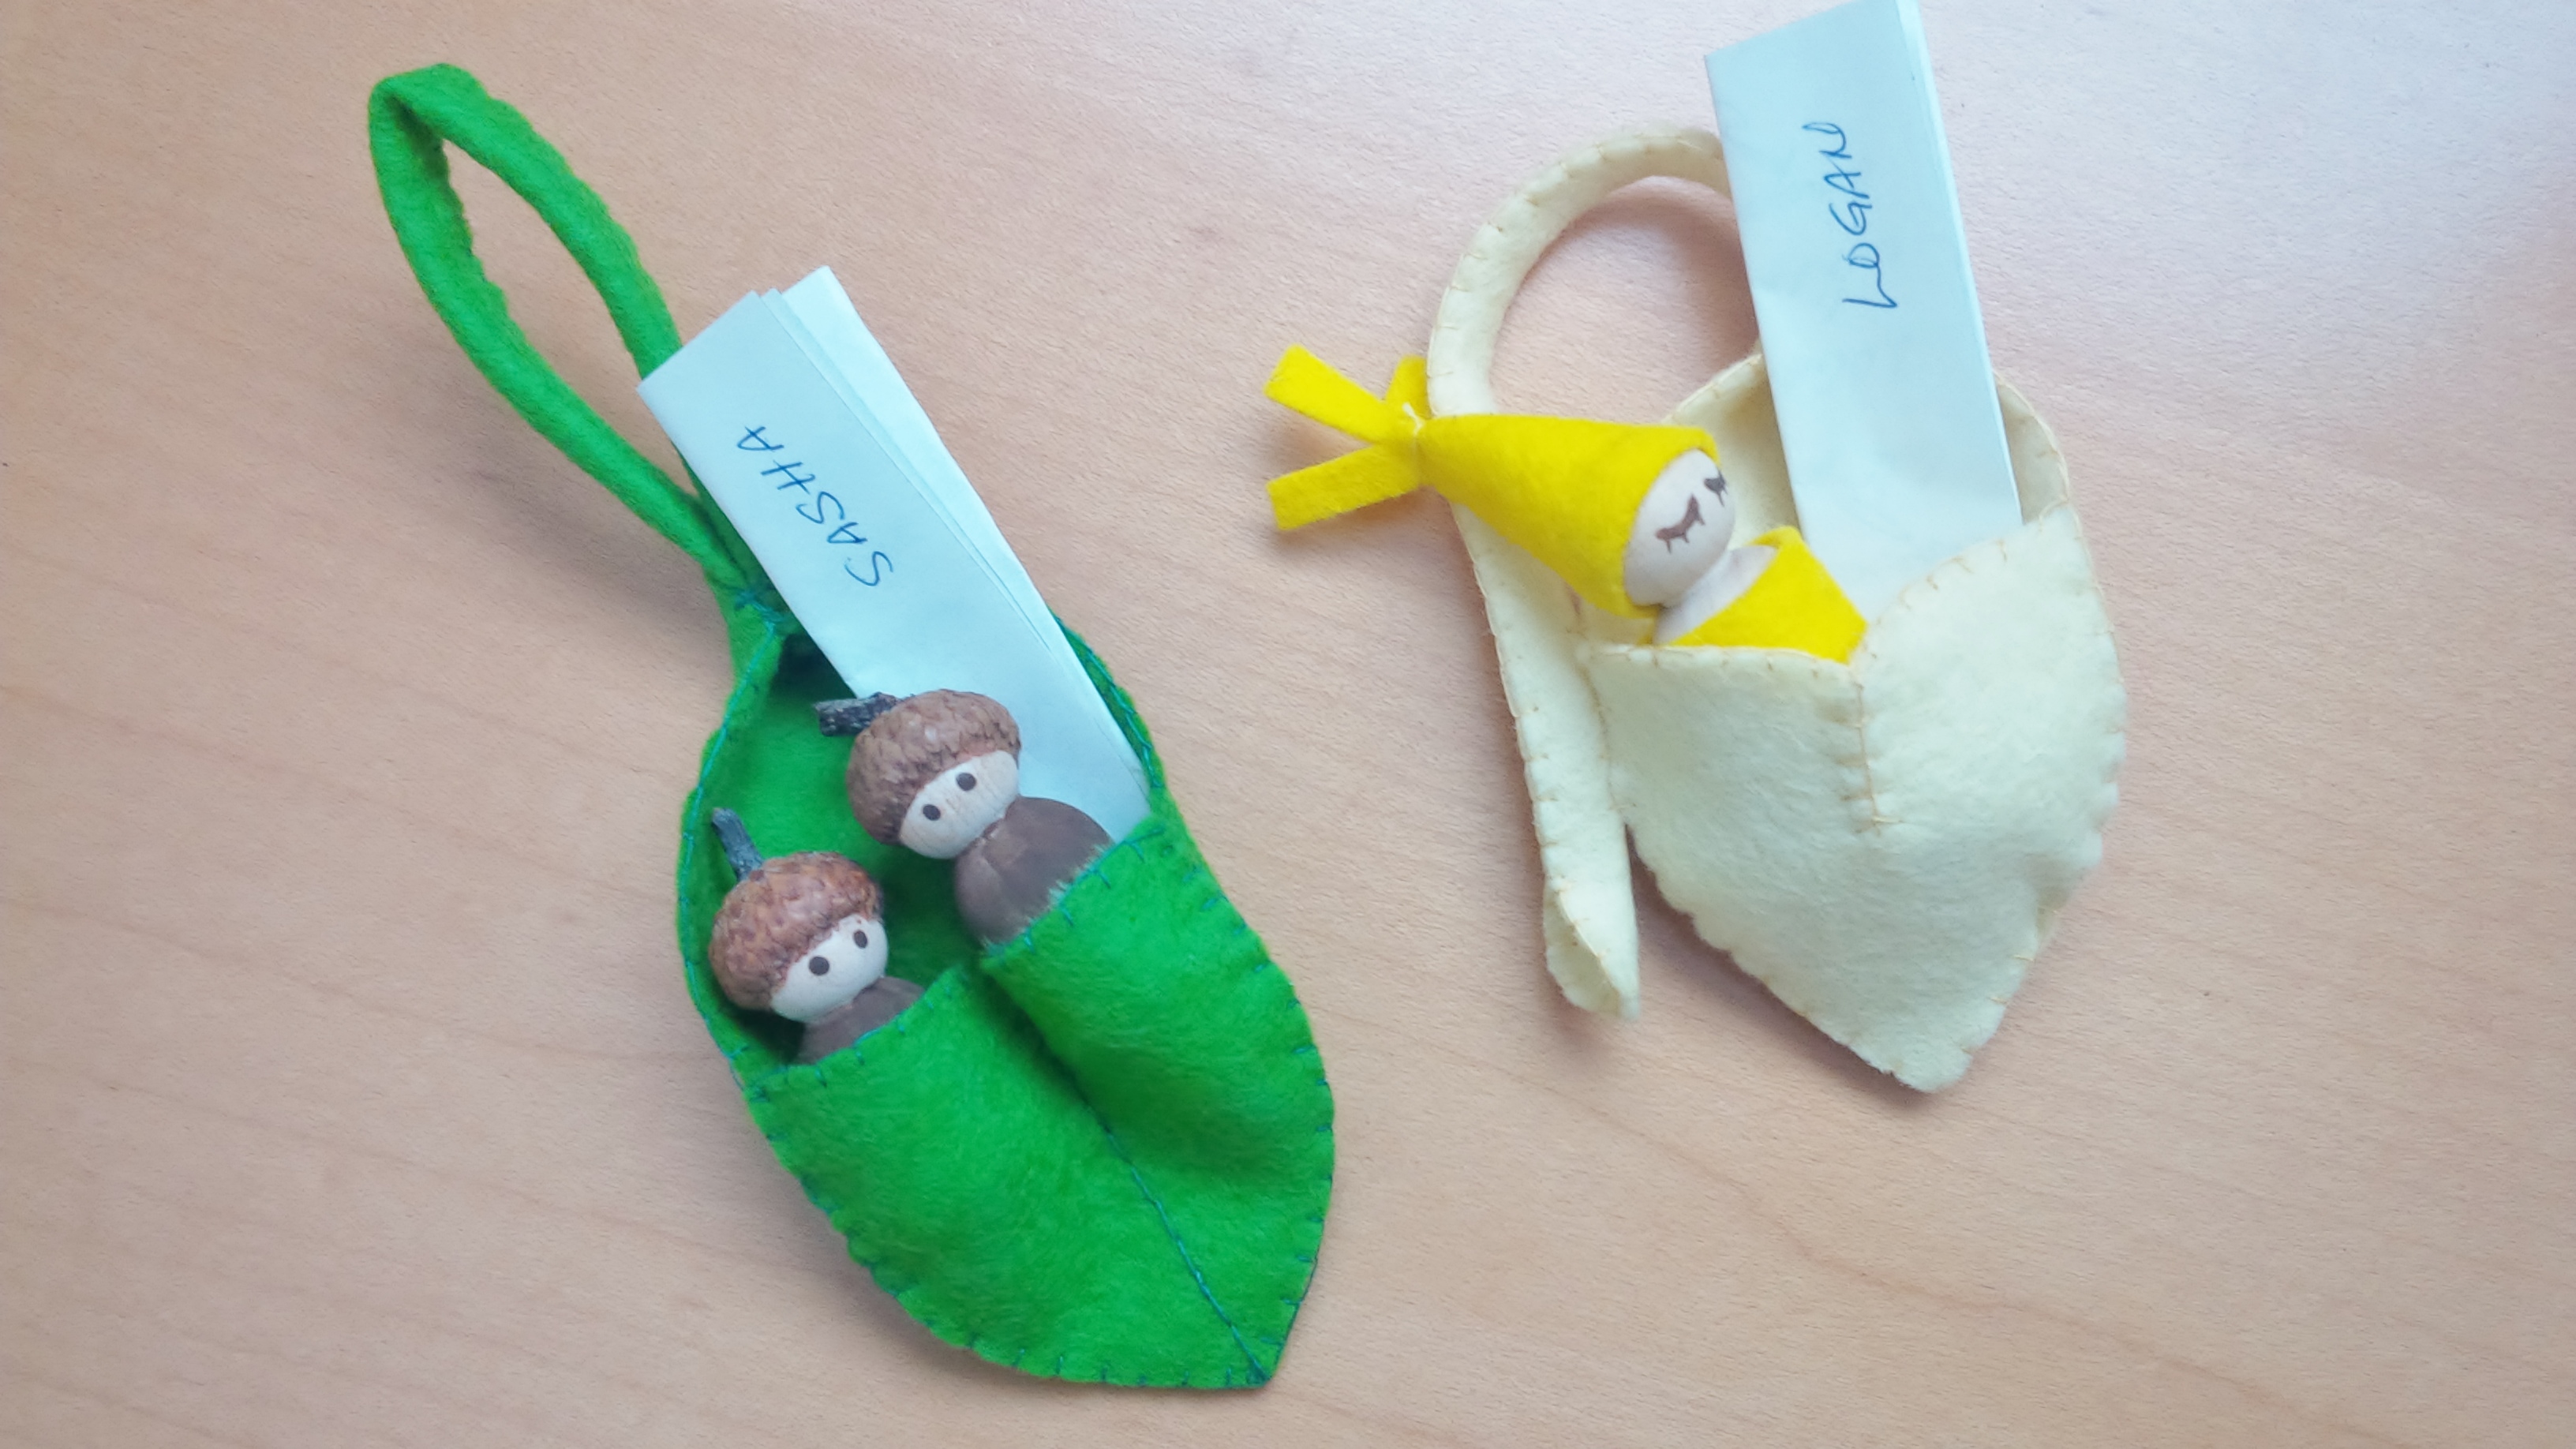
Just over a month ago my parent came to visit. No visit from the grandparents is complete without presents, at least in my experience. Parents (myself included) can be a little picky about toys and gifts for their kids and often for good reason. Those little people are always putting things in their mouths, so parents want to make sure that the toys are BPA free, non-toxic and age appropriate. But sometimes the list goes beyond safety. People can have preferences about toys with TV/Disney characters, noise, plastic versus more environmentally friendly materials, the quantity of toys, the quality of toys and the list goes on. No judgement here. Parenting is a tough gig. I personally have a preference for handmade versus mass manufactured toys, but that same preference stretches to furniture, coffee mugs, cookies, socks… It’s no surprise that I also want my kiddies to be surrounded by handmade objects. That being said, I am happy when anyone is thoughtful enough to remember my kids and send them gifts of any kind. Variety is a good thing too.
So when Grandma and Grandpa arrived with their bag of tricks imagine my delight when these little guys came out.


My mother is a maker and these are her creations. They are made of birch wood, non-toxic paint, and real felt (not that recycled pop bottle stuff from the dollar store that I use). But most importantly because they are made by my mom for her grandchildren they are made with LOVE and that is much more important that anything else.
PS. Mom I sent you a pic on Pinterest of a rocket and some astronaut peg dolls. Hint, Hint.
Below are some of the toys I made for my kiddies. Click on the pictures to link to the blog posts.


Around the country kids went back to school but not here in British Columbia, we are in a holding pattern with the young ones because of a teacher’s strike. But I went back to school this week. I am officially a graduate student attempting to complete an MBA, online from home with a child hanging off each arm. Sounds appealing doesn’t it, what was I thinking. Perhaps I will learn over the course of getting an MBA how to study from home with a five year old and two year old. I am doubtful that they will teach that in an MBA program which is unfortunate, but it would be worth the price of tuition.
I did learn a couple of things this week though:

Until next time…

August was a whirl wind of activity and I am hoping that September will be low-key in comparison. I was reflecting on the month yesterday and was prompted to take action, a little chocolate chip cookie action. August brought great highs and some lows including:
September brings the first day of Kindergarten for Sasha as soon as the teacher’s strike ends, and tomorrow I officially become a graduate student pursuing an Master’s in Business Administration. So there was a lot happening and in the works in August, and I needed to regroup with a little Chocolate Chip comfort to kiss the month goodbye. If you need a little break try out the recipe below, stop relax and eat a cookie. My five-year old has told me that they are both “terrific” and the “best cookies he has ever eaten”. I think it was a marketing ploy so I would give him more cookies.
Ingredients
This recipe makes 2 dozen cookies
Instructions
Keep relaxing and eating cookies, I know I will be.

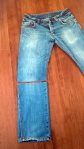
Are you heading back to school or have someone in your house that is? Maybe a lunch bag made of leftovers is a great environmentally friendly option.
The Leftover Lunch Bag was made using a torn pair of my husbands jeans and a child’s belt. I was inspired by a pin I saw on Pinterest, thank you Between the lines for the idea.
Materials
 To make this lunch bag I recommend adult jeans, and not skinny fit, boot cut or straight leg would be ideal. A child size 4-5 canvas belt is great, they often come with pants or shorts and are not required, at least not in my house. This project took me less than half an hour with a sewing machine.
Instructions


Thanks for reading! Keep creating, and crafting.
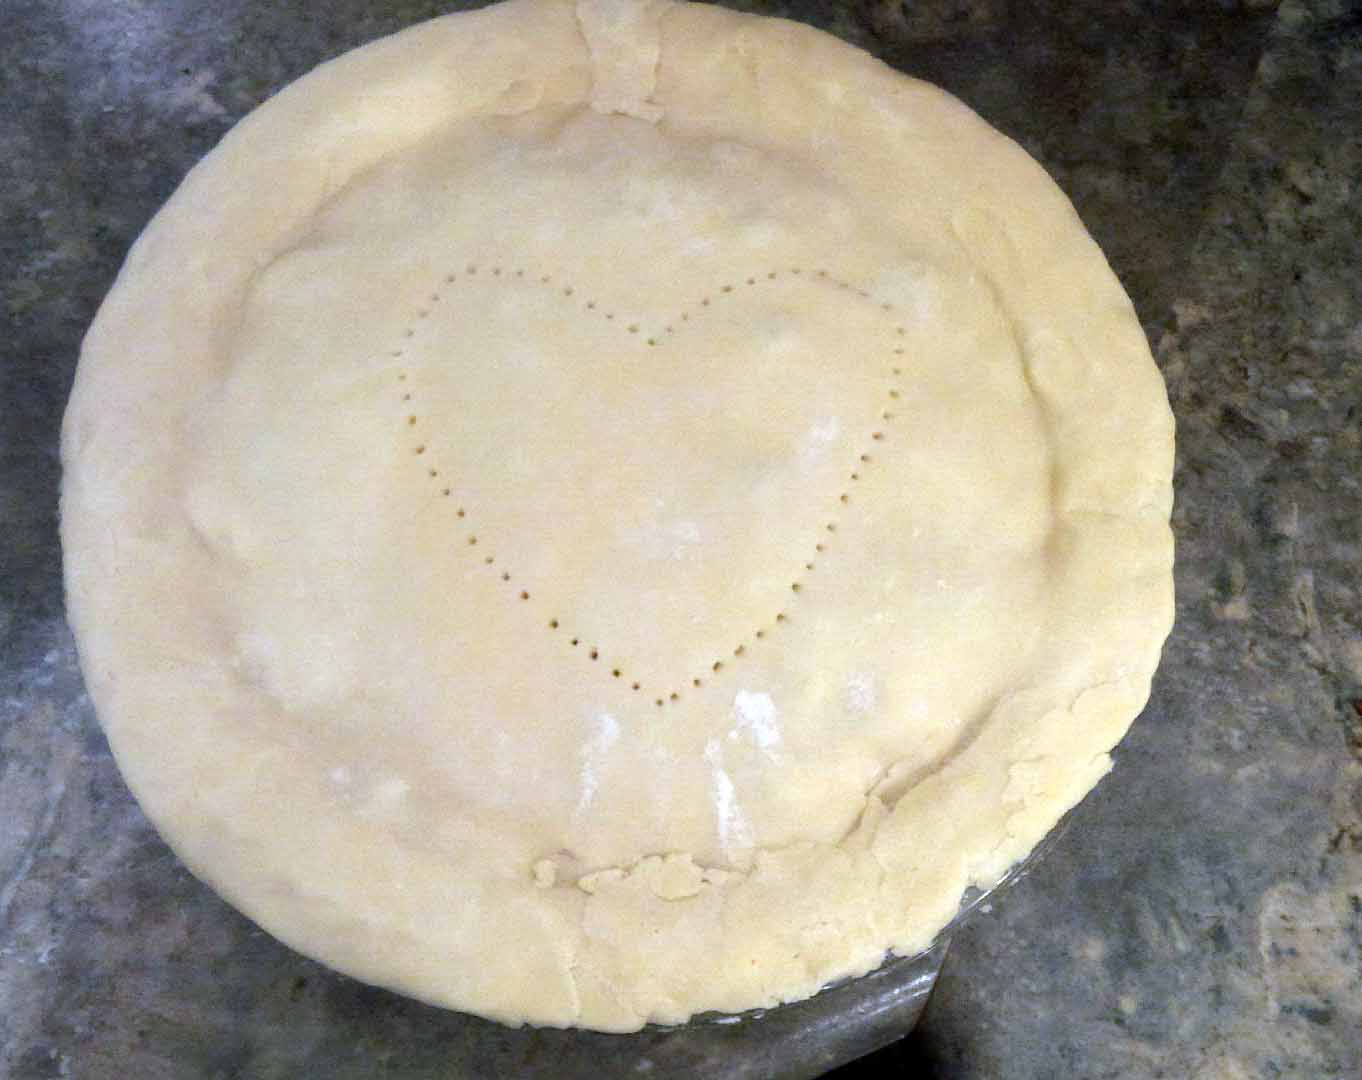 Are you looking for something to do on date night? Have you baked a pie together? We are always looking for things to do together at home after the kids go to bed, it seems that we get stuck doing the same things every week. But this week was a little different, this week we baked an apple pie. When I was out pedaling the excess plums around our neighbourhood, one neighbour insisted that we take apples in exchange for the plums. So with a basket of local apples we set to work. My husband is an excellent cook, but we rarely cook together because we have two little kids. Its hard enough for one person to cook in our house never mind both of us together, someone needs to keep the kids from terrorizing each other. So it was a nice treat to be able to be in the kitchen together without someone holding on to my arm, sitting on my foot or yelling at me. Even if you don’t have kids cooking or baking together can be a nice change if you don’t do it often.
My husband cleaned the apples and prepared the filling while I made the crust. This is a dairy free apple pie because we have one little person who has an issue with dairy, but you can easily substitute butter in the same quantity below.


Pie Crust
Ingredients
Instructions


Pie Filling
Ingredients
Directions
Keep cooking, and dating.
