On the seventh day of Christmas…Nuts & Bolts

IMG_20141219_114954

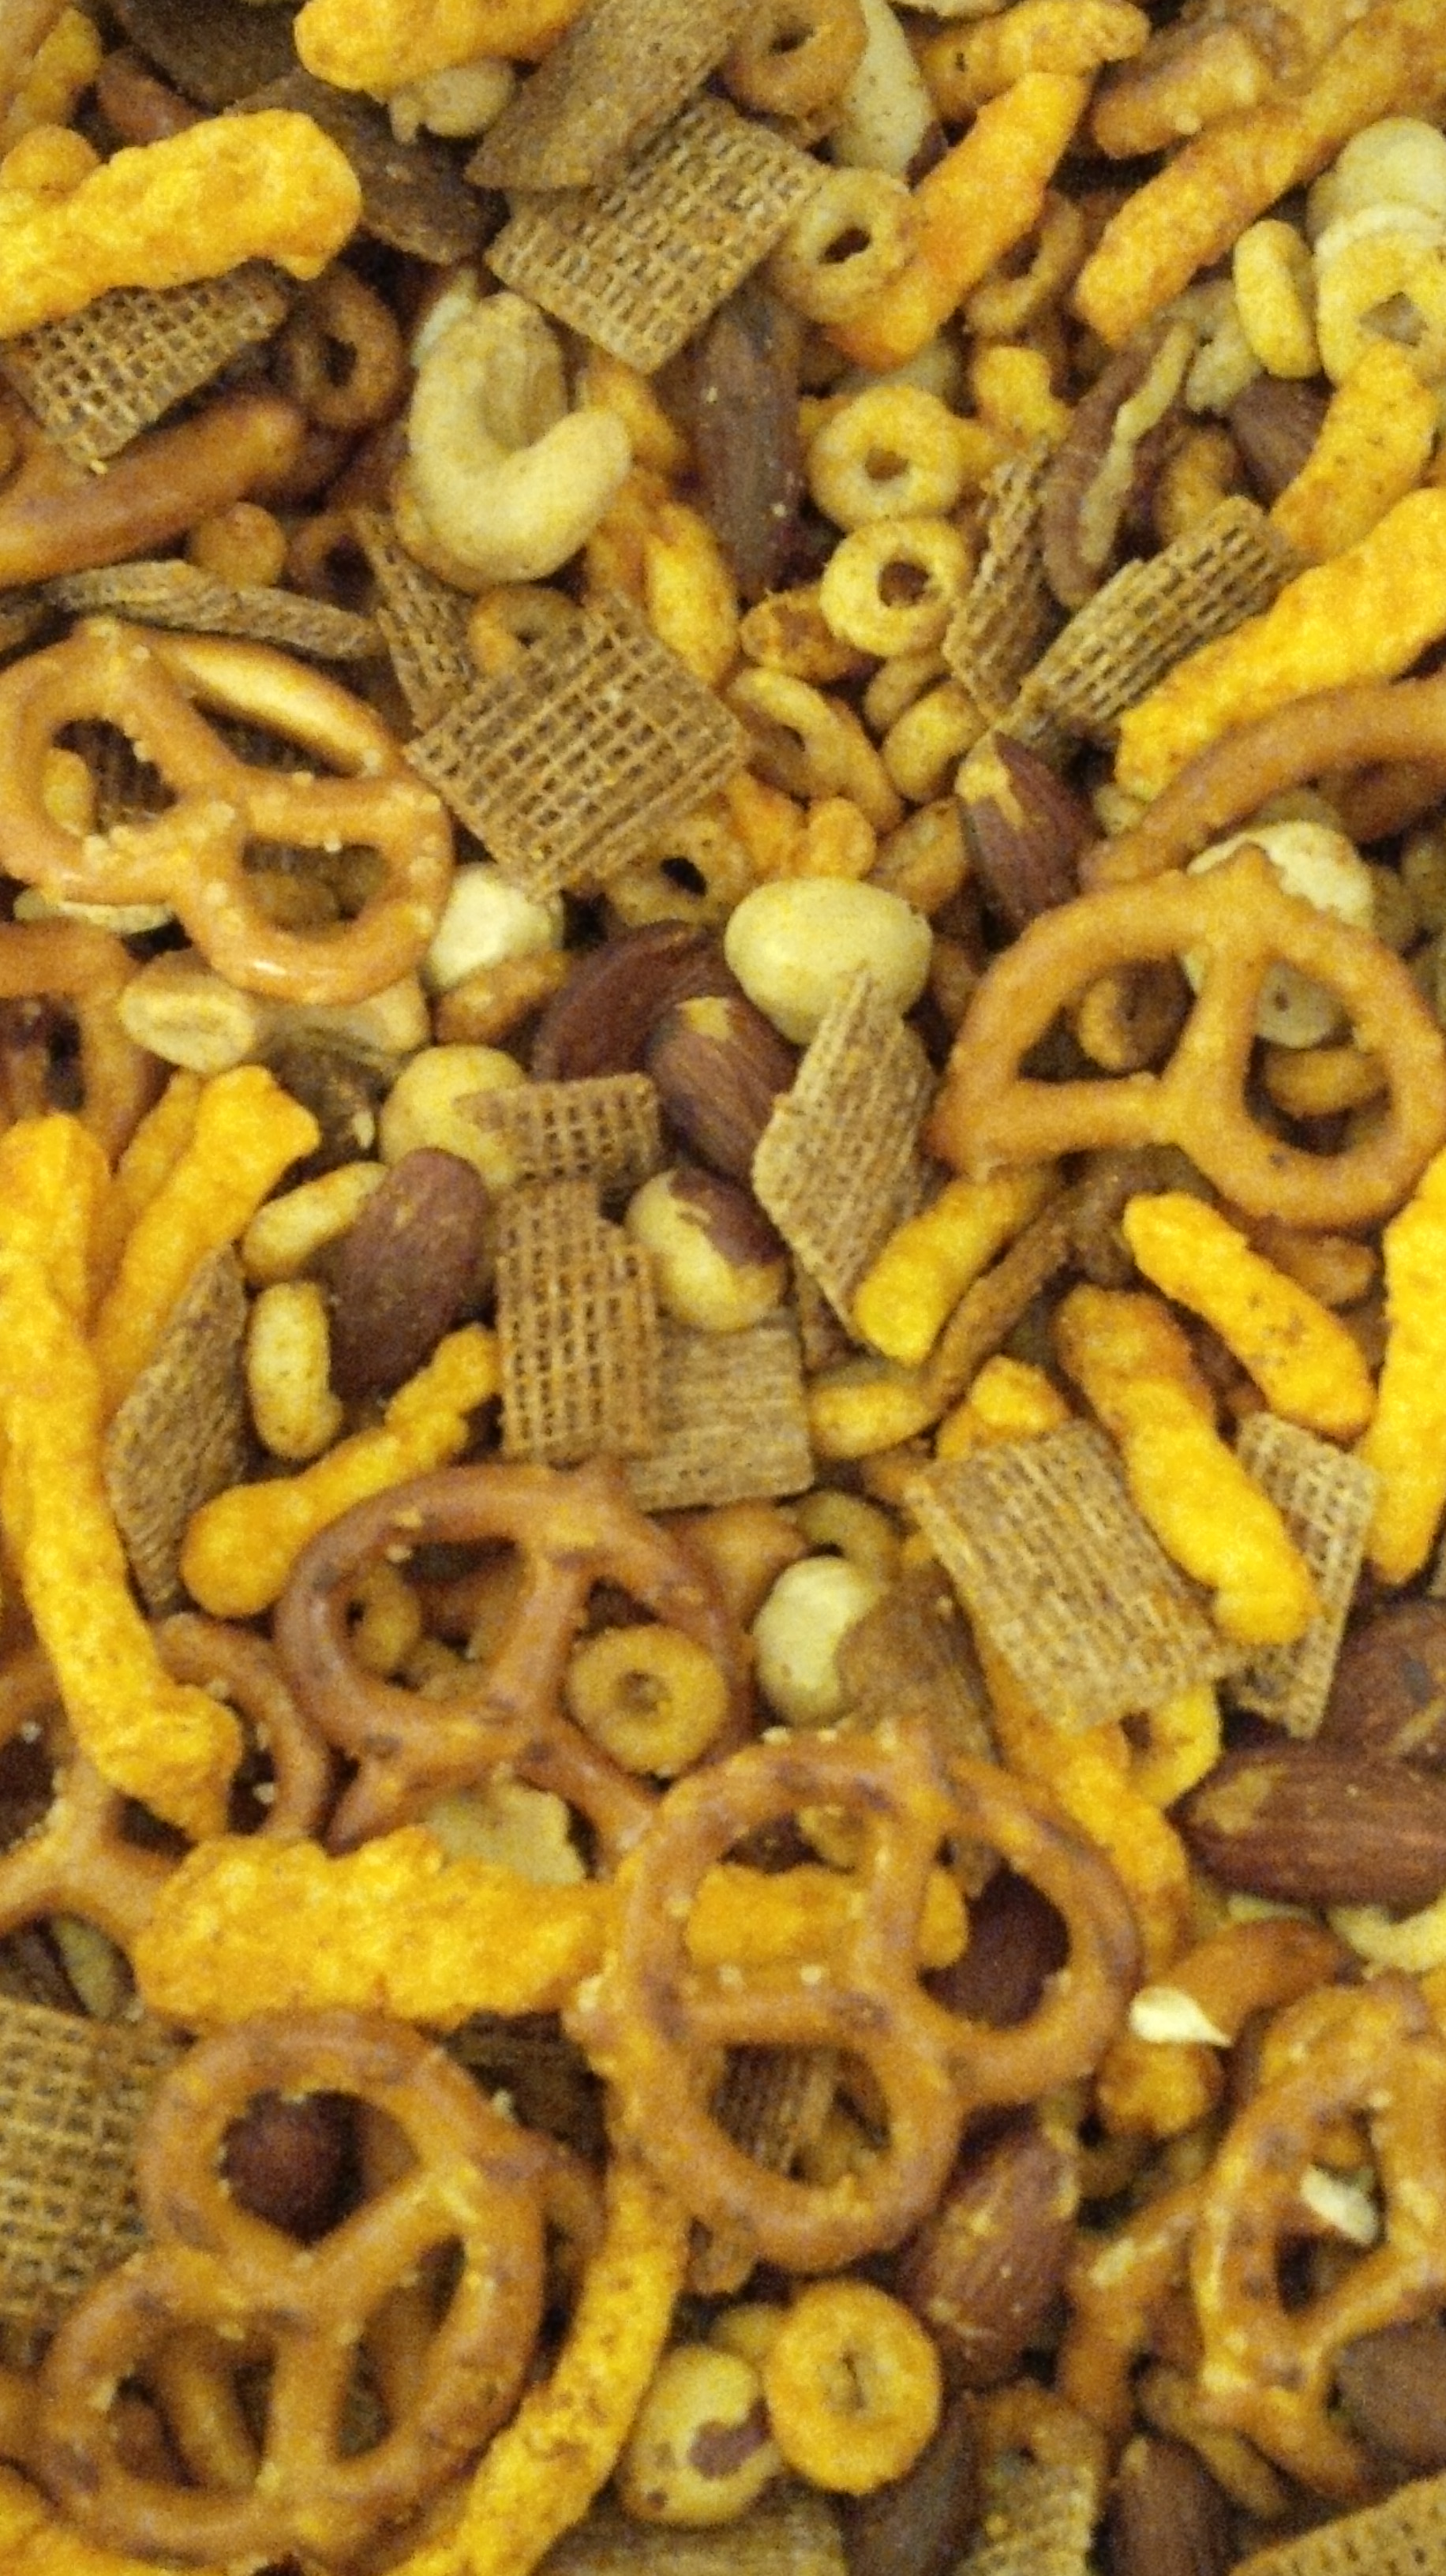
When I was a kid there were some traditions surrounding Christmas.  The tree never went up until 2 weeks before Christmas, on Christmas morning breakfast had to be eaten before we got to see what Santa had left, and my parents always made Nuts & Bolts.  My parents would make nuts and bolts in the largest oven safe pan available which usually became home to the 20+ pound turkey days later.  When I first moved out west a package arrived at Christmas with nuts and bolts but since then I have been making my own large batch.  This year I had some help.

IMG_20141215_153844

Recipe
3 cups Shreddies
3 cups Multigrain Cherrios
3 cups pretzel sticks or twists
3 cups Cheetios cheese sticks
2 cups mixed nuts
1/2 cup butter
3 tbsp Worcestershire sauce
3 tsp onion powder
3 tsp garlic powder
3 tsp paprika

​Preheat oven to 250°F (120°C).  Combine Shreddies, Cheerios, pretzles, Cheetios and nuts in a large roasting pan.

Melt butter.  Mix into butter Worcestershire sauce, onion, garlic and paprika until blended.  Pour butter mixture over cereal mixture and toss gently to coat.

Bake, stirring every 30 minutes, for 2 hours.  Cool completely in pan on a rack.

On the sixth day of Christmas…Gingerbread cookies

Gingerbread cookies are my favorite type of cookie yet I have never baked them.  For some reason I though that they were difficult to bake.  I was pleasantly surprised that they are not difficult at all and they are a hit with the kids.

I found the recipe here, and made a couple of changes.  I doubled the recipe, added a little more brown sugar to compensate for the super dark molasses I bought (having no idea that there are different ones), swapped the butter for vegetable shortening and added more cinnamon because I love it.  I also added more eggs (5 total) because the dough wasn’t sticking together as well as I would expect.  I let the dough sit for 2 hours as instructed and it rose quite a bit.  It was super easy to work with, and the thicker you roll the dough the squishier the cookies.

On the third day of Christmas…Clothes pin Wreath

On the third day of Christmas I made a clothes pin wreath.  We have a clear glass front door which means that if you feel the urge to have a midnight snack in the nude the neighbours can see all your bits and pieces.  It also means that anything hanging on the door should be nice looking from both sides.  Most door hanging decorations are only meant to be viewed from one side, the backs are typically unfinished or ugly.  My solution is a washi tape clothes pin wreath which is nice from both sides.  As a bonus the style fits with the modern aesthetic of the door.  Plus it was easy, fast and fairly inexpensive.

To make a similar wreath you will need:

supplies

  • Washi tape – get it at the dollar store, Target or Walmart (don’t spend the big bucks at Michael’s)
  • Clothes pins – dollar store
  • Foam core – dollar store
  • Chalkboard clothes pin – Michael’s
  • Scissors
  • A dessert plate
  • Fishing line and a magnet (for hanging on a steel door)

Instructions:

1. Decide how big to make the wreath.  I held the dessert plate up to the door with a couple of clothes pins on it to get an idea of what the finished size would be.  I traced the dessert plate onto foam core, cut out the circle and then traced a circle that was 1/2″ smaller and cut out the center to make a foam core donut.

2. Using 5 red and 5 green patterns of washi tape I started making the clothes pins.  I made 10 clothes pins with each colour, so 50 pins total, with red on one side and green on the reverse.  When alternating red and green you will have a 10 pin repeat.  I would suggest not mixing and matching the tape patterns when applying them to the pins or it will be difficult to get a nice pattern on both side.  I would make a set of 10 that matched with a red pattern on one side and green on the back (but don’t use those tapes again in other combinations)

3. Decide on the repeat pattern, and clip the pins onto the foam core circle.

4. Write a message on the chalkboard clothes pin, and hang.

On the second day of Christmas…

On the second day of Christmas my true love made for me a Santa cap.  I ended up making 3 of these this year with one fitting me by accident.  I was reminded once again that checking the gauge before starting a knitting project is important.  I was trying to make one for each of the kids.  The hat I made for Sasha is too big but Sasha has informed me that he doesn’t need one because he has a Santa hat from the dollar store.  Perhaps once the dollar store hat has ripped or the glue seam dries out he will want the knitted one.  I can only hope.

If you are interested in the pattern, it was free from Lion Brand and can be downloaded here.  I had to edit the pattern to get the right gauge for the bulky yarn mentioned below.

I used Lion’s Pride Woolspun, Red (body) and Fisherman (band and tassel)

P.S.  Ericka the one for Grace was knitted just for her 🙂

On the first day of Christmas…

Two years ago I started a blog called Crafting through the holidays, and I wrote about a craft, baking, or holiday inspired project everyday for the 12 days of Christmas.  It was my first attempt at blogging, and two years later I am still at it.

So on the first day of Christmas my true love made for me….. Reindeer cupcakes!

reindeer cupcakes

There was a cupcake fundraiser at my son’s school this past week and these reindeer cupcakes were my contribution.

I used pretzels for the antlers, M&M’s for the eyes and nose, and a chocolate button for the snout.  I was thinking as I was making these that chocolate or yogurt covered pretzels would be good too.

On the first day of Christmas two years ago my true love gave to me a Veggie tree, check out this link for more info

veggie tree

I also made a cookie version of the reindeer cupcakes last year, check out this link for more info.

reindeer cookies

Our Cross-dressing Christmas Tree

tree skirt 1 With three guys in the house the testosterone over flows. Much to my surprise the Christmas tree is male too.   I was told by my four year old that “the tree is a boy, and boys don’t wear skirts”.   Of course I learned that the tree was a boy only after I made it a skirt.  So the compromise, a train tree skirt. For the times that I have put up a tree in the last 18 years, the skirt was missing. Sometimes I put a towel, or piece of random fabric draped around the base of the tree. I just filled the bottom with presents and who knew what was hiding underneath. But this year I committed to “finishing” the tree. I was out shopping, and I saw a beautiful tree skirt (with a train on it) for $100.00, and thought hey I can make something like this. My go to for “floor” fabrics are canvas painting drop cloths available at most hardware stores for what amounts to a couple of dollars a yard for heavy-duty fabric. A trip to Michael’s for ribbon, and felt and I was ready to craft.  I edged the skirt with ribbon, cut out the train shapes and cargo out of felt, and using coloured embroidery floss sewed the train cars, ribbon/button embellishments and button wheels to the fabric base. It is a hit was Sasha who insisted on making a paper train to match.

tree skirt 3tree skirt 2

I'm A Top Craft & Diy Mom Blogger @ Top Mommy Blogs - Please Click To Give Me A Vote